
Every golfer knows the frustration of clubs scattered across the garage floor, leaning precariously against the wall, or jammed awkwardly into a corner. A well-built golf club rack solves that problem, keeping your set organized, protected, and easy to access. Whether you are a weekend DIYer or a seasoned woodworker, how to make a golf club rack is simpler than you think. This guide walks you through seven proven designs, from beginner-friendly scrap builds to furniture-grade freestanding units.
You will learn how to choose the right materials, avoid common mistakes, and build a rack that fits your space, style, and budget. Whether you need room for one bag or a full collection, want mobility or wall-mounted sleekness, there is a plan here that works. Let us get building.
Compact Freestanding Plywood Rack
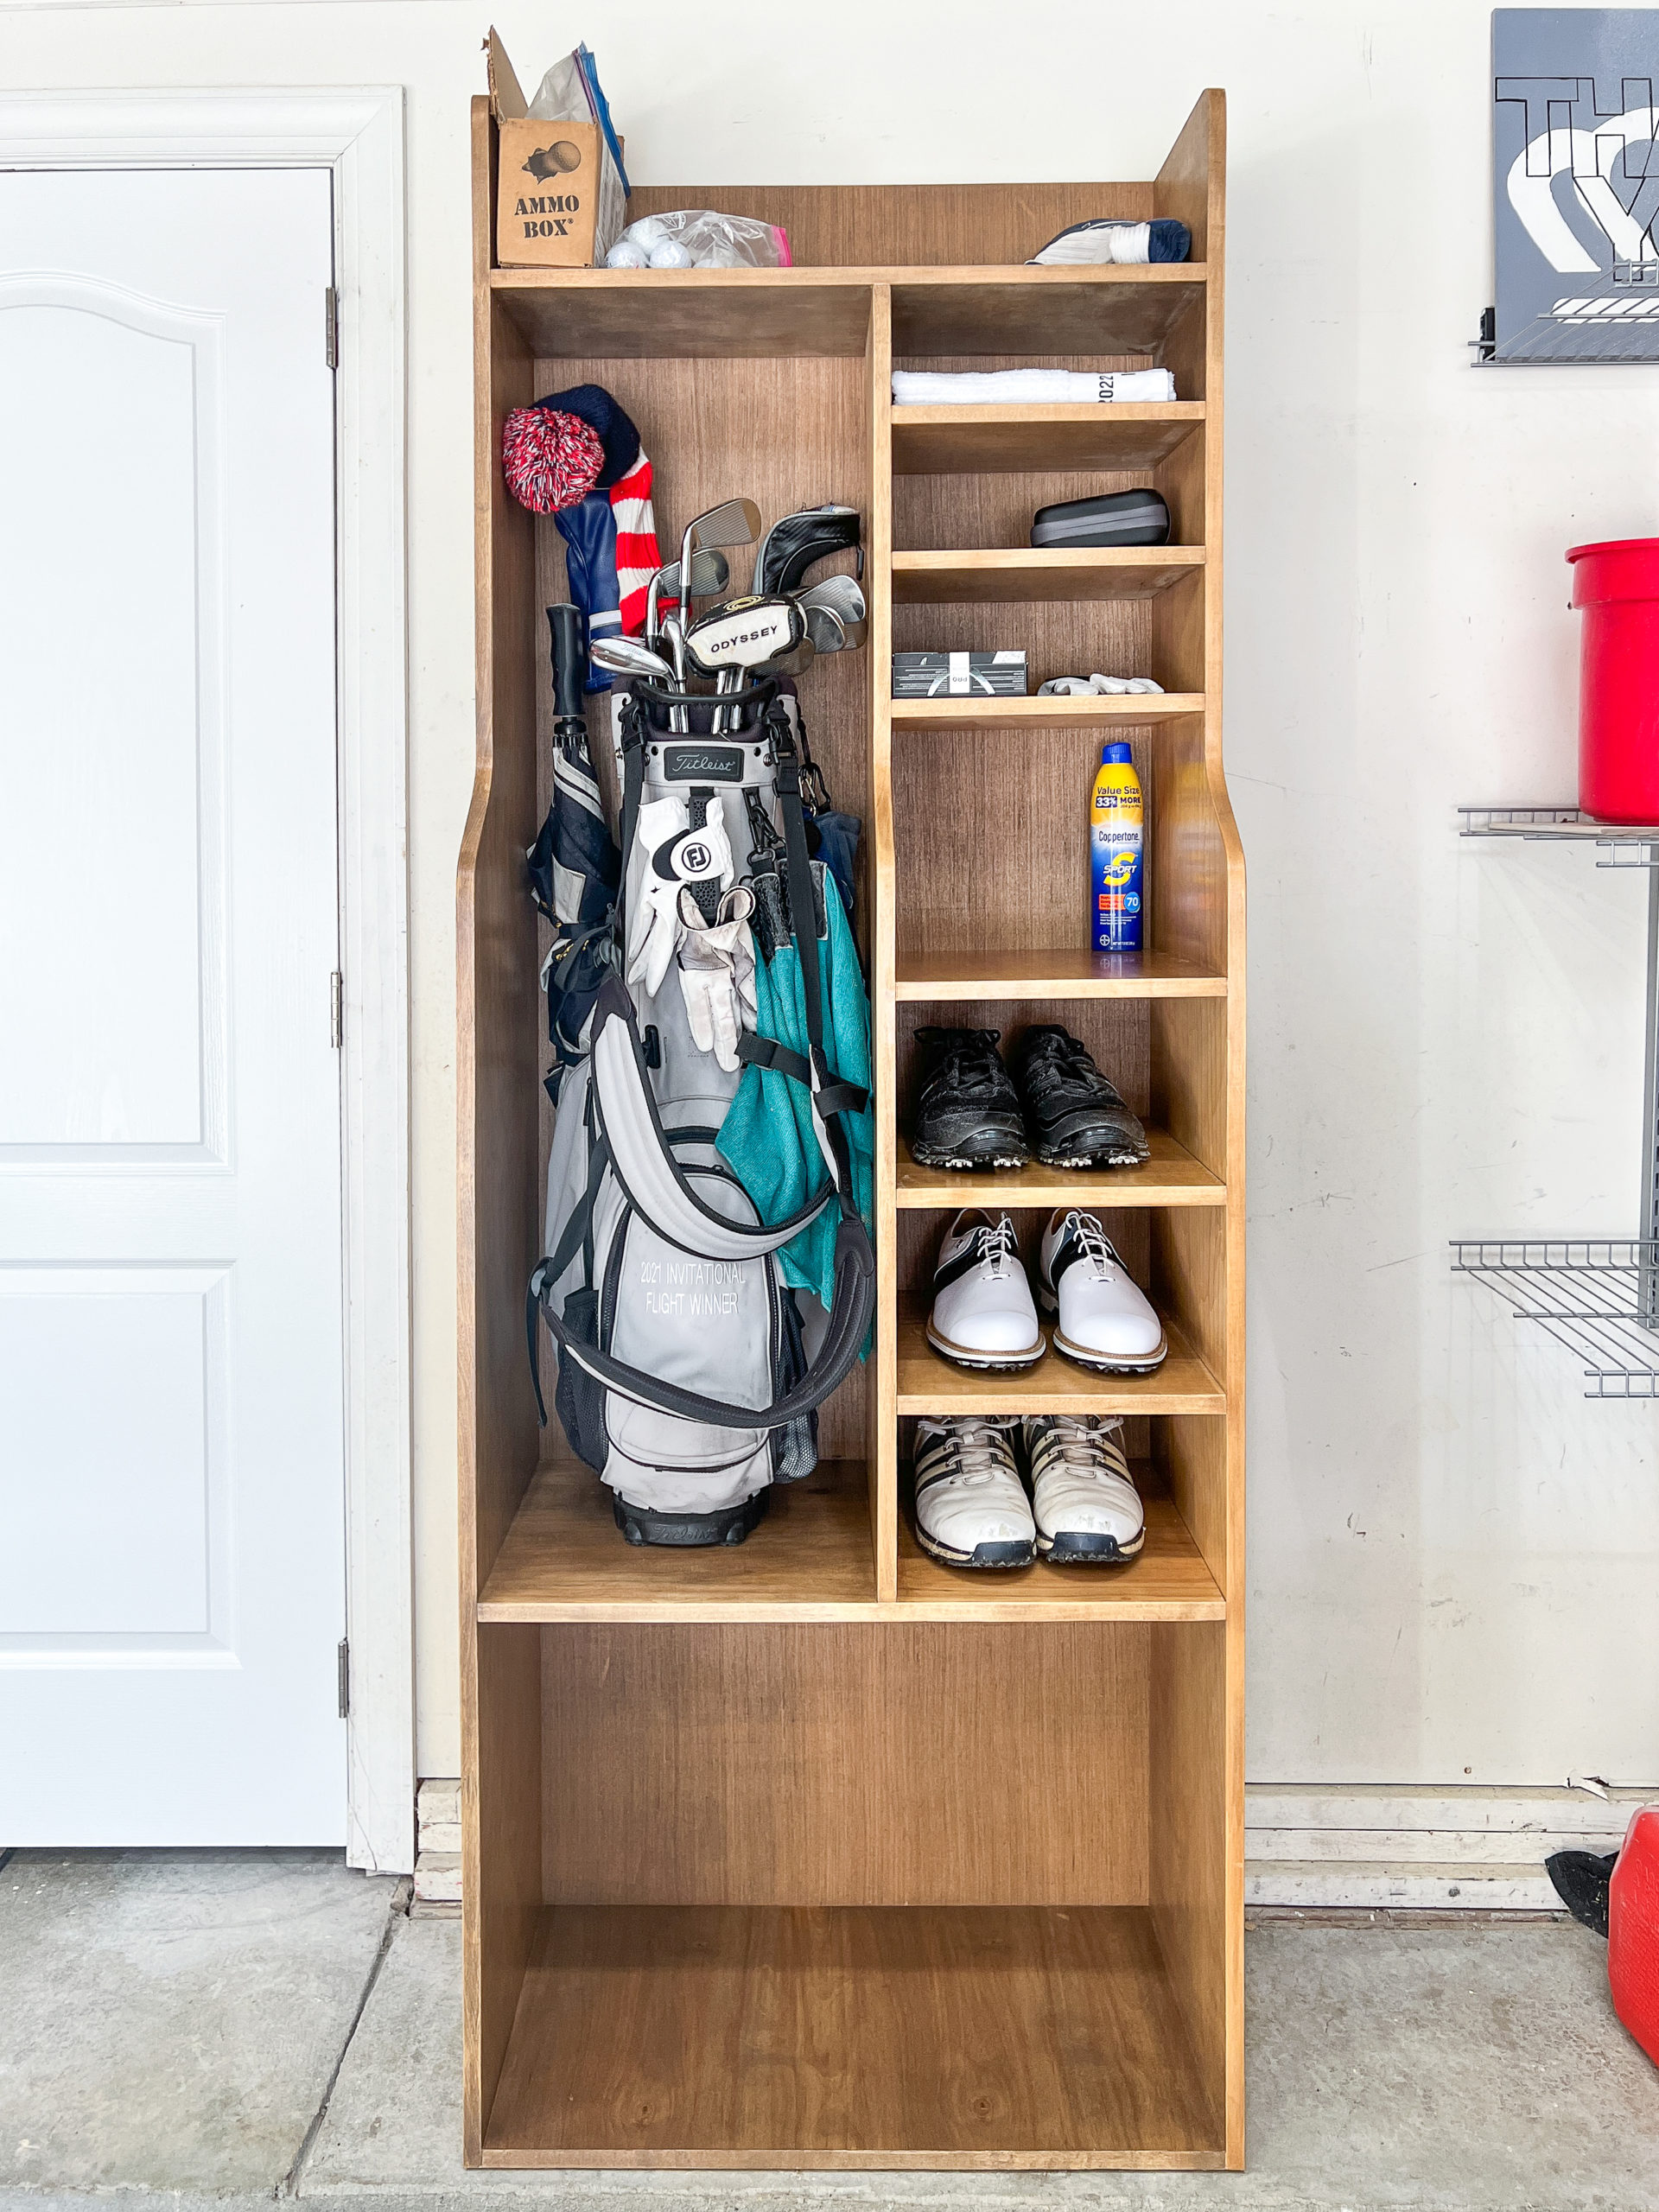
The plywood rack is the gold standard for DIY golf storage. This design uses exactly one 4’×8′ sheet of 1/2″ plywood and supports two full golf bags plus gear, making it ideal for home simulators or garages. The overall dimensions are 38″ W × 19″ D × 37″ H.
Cut List and Frame Assembly
Start by cutting all pieces from the plywood sheet using a table saw. You will need two side panels at 38″ H × 19″ D, two shelves at 34.5″ W × 10.5″ D, a top cap, and back supports. Label each piece with painter’s tape to avoid confusion during assembly. Leave lengths slightly oversized for final trimming during dry-fit.
Use a Kreg Jig to drill pocket holes on shelf edges for hidden fastening. Assemble the frame with wood glue and 75 pocket screws. Clamp pieces together and use spacer blocks to ensure squareness. A right-angle drill attachment helps drive screws in tight corners without splitting wood.
Curve Cutting and Edge Finishing
The side panels feature gentle curves at the top and base for visual appeal. Print full-scale templates from SketchUp, attach them with a glue stick, and trace the shape. Cut curves with a jigsaw, then smooth with an oscillating spindle sander.
Exposed plywood edges need finishing. Apply pre-glued edge banding using a clothing iron to activate the adhesive. Trim excess with a razor blade, then sand with 220-grit paper. Curved edges require extra care. Move slowly to prevent lifting or burning.
Bag Rests and Final Touches
For a premium look, add 3/4″ maple bag rests at the top. Cut them using a band saw, shape with a spindle sander, stain for contrast, and finish with two coats of Minwax Polycrilic. Attach with pocket screws and through-bolts for strength.
Line the base with artificial putting green turf to protect clubs and add realism. Apply two coats of water-based polyurethane to the entire rack for durability. Load it with actual clubs and bags to test fit and stability before final placement.
Pro Tip: Purchase a $12.95 digital plan set for cut lists, templates, and assembly guides. It saves hours of guesswork.
Tapered Pine Rack from Scrap Wood

This elegant build turns reclaimed pine into a sleek, wall-ready club rack. It is perfect for those who value sustainability and craftsmanship, using minimal tools and offcuts. The design emphasizes tapered sides and decorative hole patterns.
Tapered Side Panels
Use a 25 mm thick pine board salvaged from old furniture or cabinets. Remove any round-overs, rip to width, then cut to 36″ height. Use a track saw to create a tapered edge. This yields two symmetrical side panels from one cut.
Joint the front tapered edges with the grain to prevent tear-out. Clean up back edges with sandpaper to remove saw marks. These panels form the rack’s elegant silhouette.
Foot Shaping and Shelf Grooves
Shape the bottom feet using an MDF template routed with a double-bearing straight bit. Always cut with the grain to avoid splintering. The template includes screw-hole markings for the bottom shelf.
Cut grooves for shelves. Route the bottom groove directly on the router table. Clamp both side panels together and use a straight edge guide with a handheld router for the top groove. This ensures perfect alignment and a clean, inset fit.
Decorative Holes and Final Assembly
Drill aesthetic holes of varying diameters using hole saws. These reduce weight, add visual interest, and allow light to pass through. Smooth interiors with a custom sanding spindle made from the cut-out hole pieces.
For the top shelf, drill a series of holes along the front edge, then rip the board through the center to create a club slot. Sand smooth with a dowel-wrapped sandpaper. Add a back lip to prevent clubs from sliding off.
Round over all edges before assembly. Glue and screw shelves into place, using a clamp as a spreader to prevent glue smearing on the back. Fill screw holes with dowel plugs, trim flush, and sand the entire rack. Finish with black enamel paint for a durable, low-maintenance, modern look.
Beginner Alternative: Use a jigsaw instead of a router and hand sand all curves.
Simple Frame Rack with Jesled Clips
For a quick, no-frills solution that holds up to 14 clubs securely, this frame rack is unbeatable. It is lightweight, easy to build, and uses affordable hardware.
Build the Base Frame
Cut two 1″ x 2″ boards to 24″ for width and two to 12″ for depth. Assemble into a rectangle with the depth pieces inside the width boards. Predrill corners, countersink screws, and attach with wood glue and screws for a flush finish.
Attach Uprights and Top Connector
Mount two 36″ 1″ x 3″ uprights to the back corners of the base. These support the club-holding bar. On top, install a 26″ 1″ x 2″ connector across the uprights.
Now add Jesled Clips, plastic shaft holders that grip club shafts firmly. Start 1 inch from the edge and space them 1.5 inches apart. They support irons, wedges, and even drivers when angled. Cap the top with a 24″ finishing board for rigidity and clean appearance.
Add Base Padding
Insert a protective pad or artificial turf inside the base frame. This cushions clubheads and prevents floor scratches.
Upgrade Option: Replace Jesled Clips with U-bolts or 3D-printed holders if unavailable.
Slotted Cross-Piece Design
This minimalist rack uses clean lines and functional slots to display clubs like a pro shop. It is ideal for tight spaces and offers a polished look with minimal material.
Cut and Assemble Base
Use 1×3 and 1×4 pine. The base front is 36″, base back is 34.5″, sides are 7.75″ each, and the base platform is 34.5″ × 10.5″ using 3/4″ plywood. Assemble the base with wood glue and Kreg pocket screws. Attach risers at 29.25″ to the back ends for height.
Install Slotted Cross-Piece
Cut a 36″ 1×4 and drill 1.25″ diameter holes at 1.5″ intervals. Inset holes toward the center so clubs rest securely and do not slide out. Attach the slotted piece to the top of the risers with screws. This angled design lets clubs lean slightly back for stability.
Finish with Style
Sand progressively from 80 to 220 grit. Apply wood stain for warmth, then two coats of polyurethane. Line the base with scrap putting green turf for a realistic touch.
Metal Frame Club Rack
For industrial style and maximum durability, a metal rack is a smart choice. It is ideal for commercial spaces or modern garages.
Frame Assembly
Use steel or aluminum tubing. You will need two 36″ verticals, three 18″ horizontals for shelves, two 18″ base supports, and one 36″ base crosspiece. Cut tubes to size and assemble with T-connectors or welded joints. Reinforce with screws if not welding.
Mount the base first, ensuring it is level. Attach verticals, then horizontal shelves.
Install Club Holders
Use metal hooks spaced every 6 inches, starting 2 inches from the edge. Mount on the front-facing side of shelves so clubs hang forward for easy access. Add diagonal bracing if the rack wobbles. This prevents lateral movement.
Mobility Hack: Mount the entire frame on a dolly or casters for easy movement.
Wall-Mounted Wooden Rack
Save floor space with a wall-mounted solution. This design is simple, strong, and perfect for narrow areas.
Mount Brackets Securely
Use two heavy-duty L-brackets. Locate wall studs with a stud finder and mount brackets with 3″ screws. Ensure they are perfectly level. Use a laser level if possible.
Attach Wooden Plank
Cut a 36″ × 6″ × 1″ wooden plank. Sand and finish with stain or paint. Place on brackets and screw down from above. Attach shaft holders or hooks along the front edge, spaced 1.5″ apart. For extra security, screw through the back into wall studs.
Safety Note: Never mount into drywall alone. Always anchor into studs.
Alternative Low-Cost Storage Ideas
Not every solution requires a full build. These creative options deliver results fast and cheap.
Concrete Form Tube Rack
Use six round concrete forms at 32″ long. Stand them vertically in a row, secured to a plywood base. Clubs stand upright inside with no risk of shaft damage. This option is extremely strong and holds unlimited clubs, though it is bulky and not decorative. Build time is 2–3 hours.
Wire Cube and Dolly System
Buy four wire storage cubes at 12″×12″×12″. Attach them in a 2×2 grid to a plywood base mounted on a dolly with casters. Use cubes to hold clubs, bags, balls, or accessories. This system is fully mobile and expandable. The cost is $30–50 and skill level is beginner.
Under-Bench Slats
Screw scrap wood slats under a workbench or shelf. Angle them slightly back so clubs stay put. This costs less than $10 and is ideal for quick, space-saving storage.
Material and Tool Guide by Skill Level
Best Materials for Each Build
Choose 1/2″ plywood for freestanding racks. Edge banding hides seams beautifully. Reclaimed pine works well for decorative builds. Sand thoroughly before use. Use 1×2 and 1×3 pine for frame racks. They are lightweight and easy to cut. Steel tubing suits industrial racks. Use connectors for no-weld builds. Wire cubes create modular storage. Add felt pads to protect clubs.
Tools You Will Need
Beginners need a circular saw, drill, measuring tape, and sandpaper. Intermediate builders should add a table saw, Kreg Jig, router, and clamps. Advanced woodworkers benefit from a band saw, spindle sander, SketchUp, and finish sprayer.
Safety First: Always wear safety glasses and secure workpieces with clamps.
Finishing Touches That Last
A great rack is not just functional. It is durable.
Top Finish Options
Minwax Polycrilic is water-based, odorless, and cleans with water. Stain plus polyurethane enhances wood grain and resists abrasion. Black enamel paint provides a sleek, chip-resistant surface ideal for modern looks. Edge banding is essential for clean plywood edges.
Apply finishes in a dust-free area. Sand lightly between coats for smoothness.
Customization and Upgrades
Make your rack uniquely yours. Add casters for mobility. Install LED strips under shelves for ambiance. Engrave your name or logo on the top rail. Add hooks or bins for gloves, balls, and tees. Use marine varnish for outdoor or humid areas.
Key Takeaways for Building Your Golf Club Rack
No matter your skill level or space, how to make a golf club rack is a rewarding project that transforms clutter into order. For most DIYers, the plywood rack with edge banding offers the best balance of strength, style, and long-term value. For beginners, the Jesled Clip frame or wire cube system gets you organized fast.
Start building today. Your clubs deserve better than a dusty corner or tangled pile. Choose the design that matches your space, budget, and tools, and enjoy the satisfaction of a custom-built rack that looks like a pro shop display.
Frequently Asked Questions About Making a Golf Club Rack
What is the easiest golf club rack to build for beginners?
The wire cube and dolly system is the easiest beginner option. It costs $30–50, takes 1–2 hours, and requires no specialized tools. Simply assemble four wire storage cubes on a plywood base with casters.
How much does it cost to build a golf club rack?
Costs range widely based on design. Plywood racks cost $50–80 plus $12.95 for plans. Reclaimed wood builds cost under $20. Concrete form racks run about $60. Wire cube systems are $30–50. Pallet wood builds cost under $10.
How many clubs can a standard rack hold?
Most designs hold 14 clubs, which is a full standard set. The Jesled Clip system supports 14+ clubs when spaced 1.5 inches apart. Freestanding plywood racks hold two full golf bags plus gear.
What tools do I need to make a golf club rack?
Beginners need a circular saw, drill, measuring tape, and sandpaper. Intermediate builders add a table saw, Kreg Jig, router, and clamps. Advanced woodworkers use band saws, spindle sanders, and CAD software like SketchUp for planning.
Can I make a golf club rack from scrap wood?
Yes. The tapered pine rack is specifically designed for scrap wood and reclaimed materials. It uses 25 mm pine from old furniture and 19 mm pine for shelves. Any offcuts can work with creative planning.
How do I protect clubs from damage in a DIY rack?
Line the base with artificial putting green turf or foam padding. Use felt-lined slots or rubber grommets for shaft holders. Ensure slots or clips are properly sized to prevent clubs from falling or sliding.


