If you’re looking for a sturdy, customizable storage solution, learning how to build 3-tier shelf is a smart DIY project that pays off in both function and style. Whether you need a workbench with built-in shelving, extra garage storage, or a sleek organizer for your kitchen or office, a three-tier shelf offers maximum utility with minimal footprint. This build is beginner-friendly, cost-effective, and can be completed in a single day with basic tools like a circular saw, pocket-hole jig, and drill.
By the end of this guide, you’ll know every step from cutting lumber to applying the final coat of stain. You’ll create a durable unit capable of holding heavy loads while customizing the height, depth, and finish to match your space.
Selecting the Right 3-Tier Shelf Design for Your Space
Matching Your Build to the Intended Use
Not all 3-tier shelves serve the same purpose. The design you choose should reflect how and where you’ll use it. A workbench-style shelf stands at 35.5 inches high, which is ideal for standing tasks like crafting or heat pressing. It features a solid top with two lower shelves for supplies. In contrast, a tall garage shelf can reach 72 inches high, spanning nearly 8 feet in length to maximize vertical storage. For lighter use, a decorative tiered organizer with a narrow profile fits neatly in bathrooms or pantries. Pick your purpose first, as this determines dimensions, materials, and reinforcement needs.
Choosing Standard or Custom Dimensions
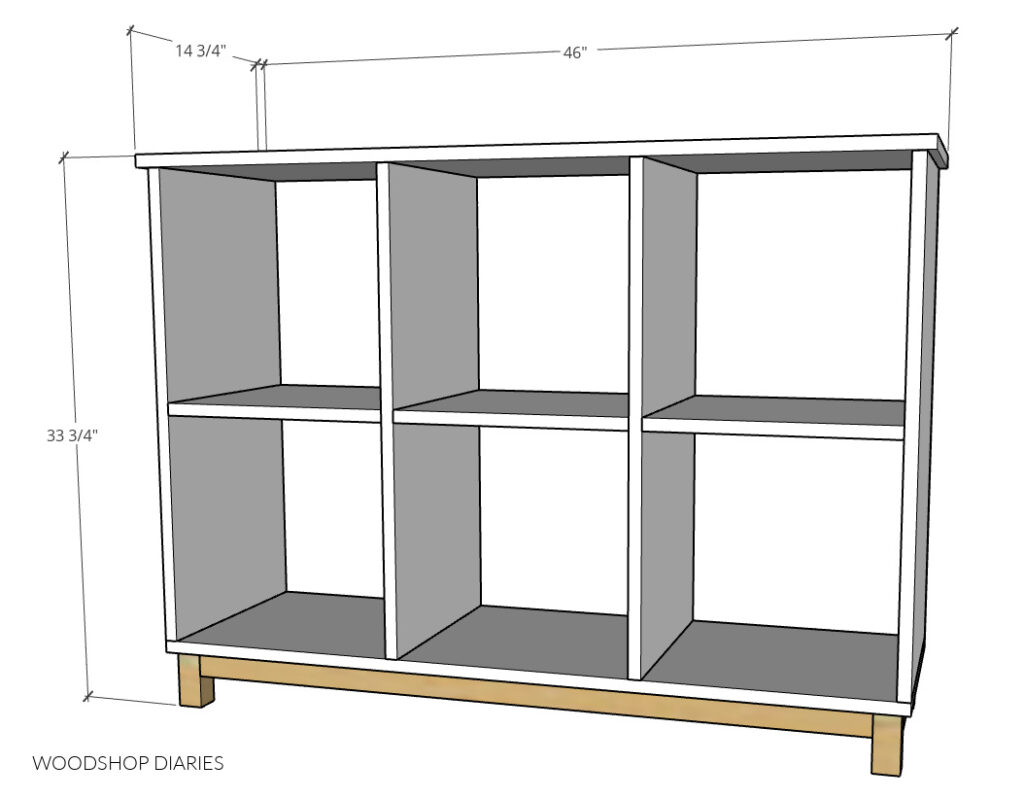
Use proven dimensions to ensure stability and usability. For a workbench-style build, the legs should be 35.5 inches long, the tabletop should measure 20 by 48 inches, and each shelf should be 16 by 48 inches. The frame width internally measures 39 inches, with the first shelf positioned 14.75 inches from the top and the second shelf sitting 10.75 inches below that. For a large garage unit, aim for 72 inches in height, 24 inches in depth, and 99 inches in length. Allow a 1-inch overhang on all sides for a clean, finished look. You can resize based on your space, but avoid spans over 48 inches without center supports to prevent sagging.
Materials and Tools Needed for Your 3-Tier Shelf Build
Buying the Right Lumber and Hardware
Gather these core materials for a standard 3-tier shelf workbench version. You’ll need 2×4 lumber in four to six eight-foot boards for legs, supports, and bracing. One 4-by-8-foot sheet of 3/4-inch plywood or project panel serves as your shelves and top. Stock up on wood screws in 2-inch and 2.5-inch lengths, with at least 50 pieces. Pocket-hole screws in 1.25-inch to 2-inch lengths create hidden joints. L-brackets in 2-inch to 3-inch sizes, about six to eight pieces, reinforce corners. One bottle of wood glue (PVA or waterproof), 100 or more brad nails in 1.5-inch to 2.5-inch lengths, four felt pads for leg bottoms, and one can of stain or finish complete your shopping list.
Pro Tip: Reclaimed 2x4s cut costs and add character, just ensure they’re straight and splinter-free.
Equipping Yourself for Efficient Assembly
You don’t need a full workshop to build a strong shelf. A circular saw or table saw handles cutting plywood and long boards. A miter saw provides precise leg cuts. A pocket-hole jig (like Kreg Jig) drills angled holes for strong, hidden joints. Your drill and driver fastens screws quickly. A brad nailer secures panels without visible fasteners, though beginners can skip this and use screws with wood filler instead. Clamps hold pieces during glue-up. A tape measure, speed square, and level ensure accuracy and keep shelves flat. An orbital sander smooths edges before finishing. Always wear safety gear including goggles, gloves, and a dust mask.
Cutting and Preparing Lumber for Your Shelf
Cutting Legs and Supports to Size
Start by cutting the vertical legs. Use a stop block on your saw to ensure all four legs are exactly 35.5 inches (or 72 inches for a tall unit). This prevents wobble and ensures a level build. Label each leg to avoid mix-ups during assembly. Then, cut the horizontal supports. Top braces need two pieces at 39 inches long, ripped from 2x4s. Shelf supports require four pieces at 16 inches long, ripped to fit between legs. Use a speed square to mark clean, square lines before cutting.
Cutting Shelves and Top Panels
From your 4-by-8 plywood sheet, cut the tabletop at 20 by 48 inches and two shelves at 16 by 48 inches each. Leave a 1-inch overhang on the front and sides. Cut carefully because jagged edges ruin the finish. Sand all cut edges smooth with 120-grit paper to prep for staining.
Labeling and Organizing Pieces for Assembly
Lay out all pieces and label them clearly: Front Left Leg, Top Shelf, Support 1, and so on. Group hardware by step. This prevents confusion and speeds up assembly, especially if you’re working alone.
Building the Shelf Frame
Drilling Pocket Holes for Strong Joints
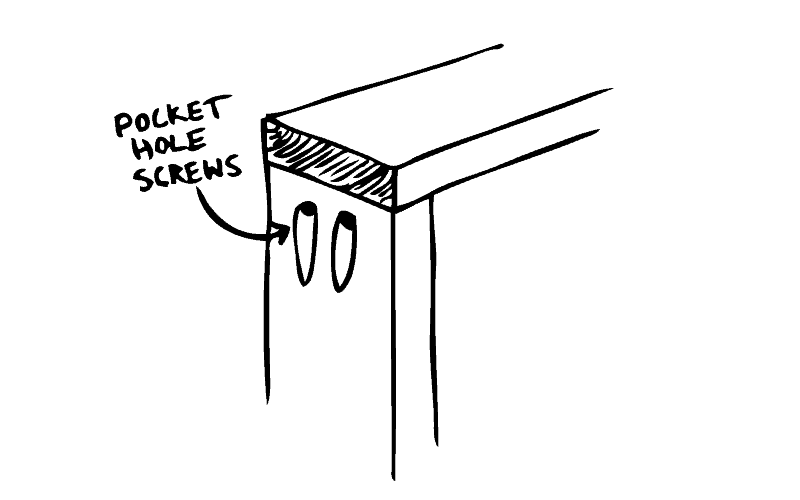
Set up your pocket-hole jig and drill two holes on each end of every support board. That’s 16 holes total (4 top braces plus 4 shelf supports, each with 2 ends). Use 1.25-inch or 2-inch pocket screws. These angled screws pull joints tight and stay hidden, giving a clean look.
Attaching Supports to Legs
Lay two legs side by side. Mark shelf heights on both legs: first shelf at 14.75 inches from the top, second shelf at 25.5 inches from the top. Align a 16-inch support at each mark. Clamp in place, then drive pocket screws through the support into the leg. Repeat for the second leg set. Now you have two identical uprights.
Connecting Uprights with Top Braces
Position the two uprights 39 inches apart. Attach the 39-inch top braces between them at the very top. Use pocket screws from the inside of the uprights into the ends of the braces. Check for square with a speed square and use a level to ensure the frame is flat. Reinforce corners with L-brackets to prevent wobble and add long-term strength.
Installing the Three Shelves
Positioning Shelves with Proper Overhang
Place the first shelf on the lower supports. Position it so it overhangs 1 inch in front and 1 inch on each side. Do the same with the second shelf. Use clamps to hold them in place while you check for level.
Securing Shelves from Below
Fasten each shelf by driving screws up through the L-brackets into the shelf bottom. Avoid screws that penetrate the top surface. Alternatively, use 1.5-inch brad nails from above, then cover holes with wood filler. For heavy loads, add a center support underneath long shelves to prevent sagging.
Testing Stability and Alignment
Once both shelves are attached, inspect the unit. Shake it gently. Any wobble means loose joints. Tighten screws or add extra L-brackets as needed. Use a level to confirm all shelves are flat. Adjust leg contact with the floor by trimming or adding shims if needed.
Adding the Tabletop to Your 3-Tier Shelf
Gluing and Positioning the Tabletop
Apply a thin bead of wood glue along the top edges of the frame. Carefully lower the 20-by-48-inch tabletop into place, maintaining the 1-inch overhang. Clamp the edges to hold it during fastening.
Fastening the Top from Below
Flip the entire unit upside down. From underneath, drive 2.5-inch screws up through the frame into the tabletop. Space screws every 8 to 12 inches for even support. This method hides all fasteners and creates a smooth work surface.
Adding Corner Blocks for Strength
Cut four small 2-by-2-inch wood blocks. Glue and screw them into the inside corners where the legs meet the frame. These blocks reinforce the structure and give a professional finish. Wipe away excess glue with a damp cloth before it dries.
Finishing Your Shelf for Lasting Use
Sanding All Surfaces Smooth
Before staining, sand the entire unit with 120-grit paper, then 220-grit for a silky finish. Focus on edges and corners. Wipe away dust with a tack cloth because any debris will show under stain.
Applying Stain and Protective Finish
Use a clean cloth or brush to apply dark walnut stain (or your choice). Work with the grain, wiping off excess after 5 to 10 minutes for a medium tone. Let dry 24 hours. For high-use areas, add a coat of polyurethane to resist scratches and moisture. Reapply every 1 to 2 years for best protection.
Adding Felt Pads and Final Touches
Stick felt pads to the bottom of each leg. This protects floors and reduces noise when moving the shelf. Inspect all screws and tighten if needed. Label shelves if using for organization, such as Tools, Supplies, or Files.
Reinforcing Your Shelf for Heavy Loads
Preventing Shelf Sagging
Long spans over 48 inches can sag under weight. Prevent this by adding a center support underneath each shelf. Use 1-inch-thick plywood instead of 3/4-inch. Install front and back rails to stiffen the structure. For garage units, consider steel brackets or thicker lumber like 2x6s for legs.
Anchoring Tall Units to the Wall
Shelves over 60 inches high can tip if overloaded. Anchor to wall studs using L-brackets and 3-inch screws. This is critical in homes with kids or pets. Drill pilot holes to avoid splitting the frame.
Building Your 3-Tier Shelf on a Budget
Cutting Costs Without Sacrificing Quality
Cut costs by using reclaimed or leftover lumber. Buy project panels instead of full plywood sheets. Skip power tools you don’t own and use hand tools or borrow from friends. A small 3-tier workbench can cost as little as $60 with reclaimed materials.
Completing the Build in One Day
Most builds take 6 to 8 hours total. Plan for 2 hours cutting and prep, 3 hours frame and shelf assembly, 1 hour top attachment and reinforcement, and 2 hours sanding and finishing. Work in daylight to reduce errors. Prep materials the night before to save time.
Fixing Common 3-Tier Shelf Problems
Addressing Wobbly or Uneven Shelves
If the shelf wobbles, check the leg length first. All four must be identical. Check floor flatness and use a level, adjusting with shims if needed. Check for loose joints and tighten screws or add wood glue. Reinforce weak corners with extra L-brackets.
Avoiding Misaligned Pocket Holes
Pocket-hole jigs can drift if not clamped tightly. Always clamp the board securely. Use a square to check drill angle. Test on scrap wood first. Misaligned holes weaken joints, so take time to set up correctly.
Preventing Splintered Plywood Edges
Plywood chips during cutting. Prevent this by using a fine-tooth blade with 80 or more teeth. Apply masking tape along the cut line. Cut with the good side facing down. Sand any small chips smooth before finishing.
Frequently Asked Questions About Building a 3-Tier Shelf
What materials do I need to build a 3-tier shelf?
You’ll need 2×4 lumber (4 to 6 eight-foot boards), one 4×8-foot sheet of 3/4-inch plywood, wood screws in multiple sizes, pocket-hole screws, L-brackets, wood glue, brad nails, felt pads, and stain or finish. A standard workbench build costs approximately $60 using reclaimed materials.
How long does it take to build a 3-tier shelf?
Most builds take 6 to 8 hours total, broken down as 2 hours for cutting and prep, 3 hours for frame and shelf assembly, 1 hour for top attachment and reinforcement, and 2 hours for sanding and finishing. You can complete the project in one day with proper planning.
What tools are required for a beginner build?
Essential tools include a circular saw or table saw, miter saw, pocket-hole jig, drill and driver, tape measure, speed square, level, orbital sander, and safety gear (goggles, gloves, dust mask). You can skip the brad nailer and use screws with wood filler instead.
How do I prevent my shelf from sagging?
Prevent sagging by adding center supports underneath each shelf, using 1-inch-thick plywood instead of 3/4-inch, and installing front and back rails to stiffen the structure. Avoid spans over 48 inches without additional support.
Can I customize the dimensions of my 3-tier shelf?
Yes, you can resize based on your space. However, maintain the 1-inch overhang on all sides for a clean look. Avoid making spans longer than 48 inches without adding center supports to prevent sagging.
Key Takeaways for Building Your Own 3-Tier Shelf
Building a 3-tier shelf is a rewarding project that combines practicality with craftsmanship. With the right materials, tools, and steps, you can create a durable, attractive storage unit in just one day. The key to success lies in accurate measuring and cutting, using pocket-hole joinery for strong hidden joints, and reinforcing corners with L-brackets for stability.
Whether you’re a beginner or experienced DIYer, this guide gives you everything needed to succeed. Customize the size, stain, and layout to fit your space. Choose the design that matches your needs (workbench at 35.5 inches, garage unit at 72 inches, or decorative organizer for lighter use). Apply a quality finish like dark walnut stain with polyurethane topcoat for lasting protection.
The total cost ranges from $60 for a small workbench using reclaimed materials to $150 to $180 for a large garage unit. Start with accurate cuts, assemble methodically, and finish with care. Enjoy a functional piece that lasts for years and fits perfectly in your home or workshop.