If you’re serious about strength training, a power rack isn’t just another piece of gym equipment. It is the foundation of your lifting career. Whether you’re squatting heavy, benching solo, or mastering pull-ups, a well-chosen power rack keeps you safe, supports progression, and grows with your goals. But with dozens of models, sizes, and price points, how to choose power rack can feel overwhelming.
The right power rack balances safety, build quality, space, and expandability. It should support your heaviest lifts without wobbling, fit in your garage or basement, and allow room to add attachments like dip bars, cable systems, or landmines down the line. This guide cuts through the noise and helps you make a confident, future-proof decision.
Pick the Right Power Rack Configuration

Choosing the correct configuration is the first step in selecting your power rack. Each type serves different needs based on space, lifting goals, and expandability.
Full Power Rack: Maximum Safety and Stability
A full power rack (4-post or 6-post) offers the highest level of stability and safety. With uprights on all four corners and top crossmembers, it forms a fully enclosed cage ideal for heavy squats, bench presses, and overhead work. Dual safety arms on both sides catch failed lifts from any angle.
Best for lifters handling 500+ lbs, those using attachments, or training solo without a spotter. Weight capacity typically ranges from 1,000 to 2,000+ lbs. Footprint requires at least 48″ x 48″ of floor space.
Pro tip: If you plan to add belt squats, low rows, or cable machines, go with a full rack.
Half Rack: Space-Saving Strength
A half rack has one set of uprights with a top beam and safety arms on a single side. It supports squats, bench presses, and pull-ups but lacks the rear stability of a full cage.
Best for home gyms with limited floor space or intermediate lifters under 500 lbs. The lower cost and smaller footprint are major advantages. However, it is less stable under extreme loads and not ideal for heavy deadlifts or advanced attachments.
Squat Stand: Budget-Friendly and Portable
Squat stands are two-post frames with J-hooks but no built-in safety arms. They are affordable and easy to move, but lack critical safety features.
Best for beginners, light lifters, or temporary setups. Limitations include not being safe for maximal-effort lifts without external safeties or bumper plates. Never use for heavy bench or squat without additional safety bars.
Folding Rack: Ideal for Multi-Use Spaces
Folding racks mount to the wall and fold vertically when not in use. They are perfect for garages or basements used for more than just workouts.
Best for shared spaces where equipment needs to be stowed. Installation requires anchoring to structural studs or joists. Trade-offs include reduced stability, limited attachment support, and lower weight capacity.
Combo Rack: All-in-One Lifting Station
Combo racks integrate a power rack with a fixed bench press station. They streamline setup for the big four lifts: squat, bench, deadlift, and overhead press.
Best for lifters focused on foundational movements and space efficiency. The main advantage is saving floor space and eliminating the need for a separate bench. The downside is less modularity and difficulty adding third-party accessories.
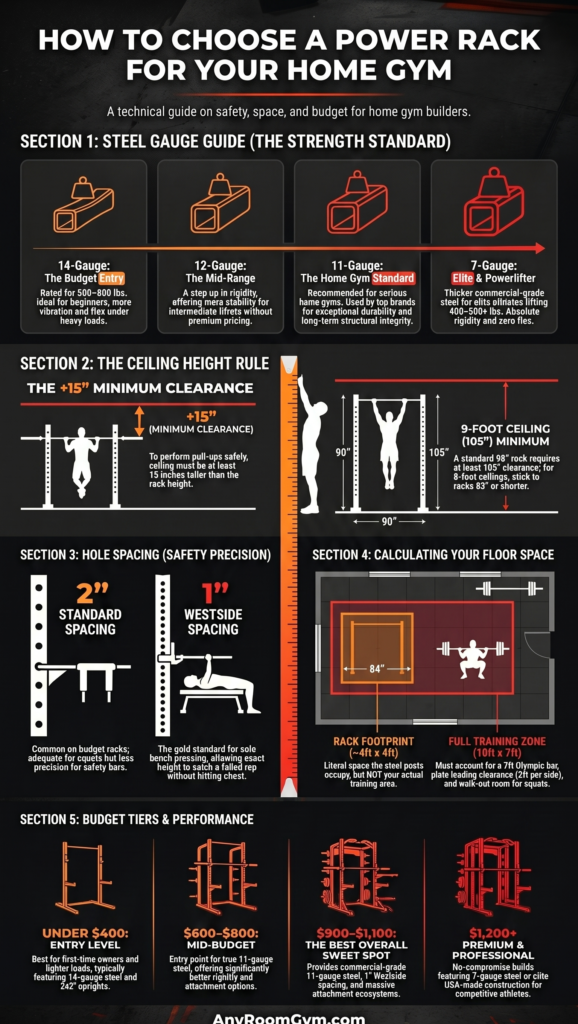
Size It Right: Dimensions That Matter

Choosing the wrong size can ruin your workout experience. These dimensions determine usability, safety, and fit in your space.
Rack Height: Clear the Ceiling
Height affects pull-up access, overhead pressing, and headroom for tall users. An 80-90″ rack fits basements with low ceilings but may require a step for pull-ups. The 90-92″ range is ideal for most users and allows full pull-ups and muscle-ups. A 108″+ rack suits tall lifters over 6 feet or advanced movements like rope climbs.
Measure tip: Include base plates, lighting, and 6-12″ overhead clearance for movement.
Rack Depth: Avoid Tight Squats
Depth (front to back) impacts bar path and stance width. A 24″ depth is compact but tight, risky for wide squats or specialty bars. The 30″ depth is recommended for most lifters, offering comfortable walkouts and bar control. A 43″ depth suits powerlifters with wide stances or large frames.
Avoid 24″ racks if using Kabuki or safety squat bars.
Rack Width: Fit Wide Bars Safely
Width determines clearance during bench press walkouts and specialty bar use. A 47″ exterior (41″ interior) fits most bars. A 49″+ (43″+ interior) is better for wide walkouts or Kabuki Kadillac bars (40.5″ wide).
Choose wider racks if you bench frequently or use odd-shaped bars.
Steel and Structure: Build Quality Essentials
The strength of your rack depends on steel thickness, tubing size, and weld quality, not just brand name.
Steel Gauge: Thicker Is Stronger
Gauge measures steel thickness, and lower numbers mean thicker metal. Seven-gauge (~0.179″) is commercial-grade and overkill for home use. Eleven-gauge (~0.120″) is ideal, durable, and supports 1,000+ lbs. Twelve-gauge (~0.105″) is acceptable for moderate use. Fourteen-gauge (~0.075″) is found in budget models and may flex under heavy loads.
Avoid racks that do not list gauge as they likely use subpar steel. Top brands using 11-gauge include Rogue, REP, IronBull, Titan (T-3/X-3), and Bells of Steel.
Upright Size: 3×3 Inches Is Standard
Tubing size affects accessory compatibility and rigidity. Two-by-two or 2×3 inch tubing is found in older or budget models with limited attachment support. Three-by-three inch (true imperial) is the industry standard with maximum compatibility. Seventy-five millimeter (metric) is marketed as 3×3 but measures ~2.95″ and may fit loosely on imperial racks.
Mixing metric and imperial accessories can cause wobble or misalignment. IronBull offers Frankenstein Uprights that accept both 5/8″ and 1″ pins for the best mixed-brand setups.
Hardware and Holes: Adjustability and Strength
These details impact safety bar placement, J-cup precision, and accessory fit.
Hole Spacing: 2 Inch vs Westside
Hole spacing determines how finely you can adjust components. Two-inch spacing is standard, easy to set up, and widely compatible. Westside spacing features 1″ holes near the bench area and 2″ elsewhere, offering better bench precision. Spacing under 2″ is rare and may weaken uprights.
Westside spacing is great for bench press but limits side-mounted accessories.
Hardware Size: 5/8 Inch or 1 Inch Pins
Pin diameter affects strength and accessory security. Half-inch pins are found in budget models and are less secure, prone to wear. Five-eighths-inch pins are mid-range (like Rogue Monster Lite), strong and common. One-inch pins are premium (like Rogue Monster, Rep PR-5000) and offer maximum stability.
Both 5/8″ and 1″ systems from top brands support 1,000 lbs. The attachment is usually the weak point, not the hardware.
Hole Numbering: Laser-Cut for Precision
Labeled holes let you replicate settings fast. Laser-cut numbers are premium (Rogue, Rep PR-5000) and perfect for multiple users. Every-five-holes labeled is mid-tier and helpful but less precise. No numbering is budget-level and requires paint pens or stickers.
This is essential if multiple people use the rack with different height needs.
Safety and Stability: Critical Features
A rack is only as good as its safety systems, especially when lifting alone.
Safety Bar Types: Choose Smart
Not all safeties are equal. Pin and pipe safeties are clunky and unstable, so avoid them. Flip-down safeties are convenient but may not hold heavy drops. Strap safeties are flexible and absorb impact, ideal for bench press. Drop safeties catch the bar during failure and are common in commercial gyms. Box systems have four adjustable bars and are best for heavy squats.
Use strap or box-style safeties if training max effort lifts solo.
Anchoring: Bolt It Down
Always bolt your rack to concrete or a wooden platform, especially for lifts over 400 lbs. This prevents tipping during bench press or failed squats. Use proper concrete anchors or lag bolts for wood. Freestanding options only work if the rack is heavy (6-post with weight storage) and has anti-tip feet.
Wall-mounted folding racks must anchor to structural studs.
Base Stability: Stop the Wobble
Larger footplates provide more stability. Front stabilizers extend forward and are critical for bench press safety. Rear stabilizers reduce front-to-back sway during dips or heavy pulls.
Add sandbags or plates to the base for extra mass in non-bolted setups.
Expandability: Plan for Future Attachments
A modular rack grows with you. Choose one that supports long-term upgrades.
Must-Have Attachments
Essential attachments include rotating or UHMW-lined J-cups to protect barbells. Safety bars or straps are non-negotiable for solo training. Pull-up bars with multiple grips (neutral, wide, chin-up) are preferred. Landmine attachments work well for core and rotational work. Dip stations mount to the front or side, so ensure your rack supports them.
Advanced Add-Ons
Advanced attachments include cable machines like Rep Ares or Rogue Monster Cable for full functional training. Lat pulldown and low row options expand back development. Belt squat attachments allow squatting without spine compression. GHD, leg roller, band posts, and storage shelves maximize utility.
Choose a rack with active accessory development from brands like Rogue, REP, or IronBull.
Brand and Budget: Smart Buying Strategy
You do not need to spend $3,000, but skimping can cost more long-term.
Budget Tier: $300-$600
The budget tier suits beginners and light use. Examples include Fitness Reality 810XLT. These racks are functional but not expandable.
Mid-Range Tier: $800-$1,500
The mid-range tier fits most home gyms. Examples include Rep PR-4000 and Rogue Monster Lite. These offer excellent value with good expandability.
Premium Tier: $1,500+
The premium tier suits heavy lifters prioritizing expandability. Examples include Rep PR-5000 and Rogue Monster. These are built to last decades.
Value hack: Buy a $1,000 modular rack plus attachments over 3 years rather than a $2,000 non-expandable one.
Top Brands to Consider
Rogue Fitness is the gold standard with U.S.-made products and lifetime warranty. Rep Fitness offers high value with strong accessories. Titan Fitness is affordable but check reviews for quality consistency. IronBull Strength provides hybrid hole options for cross-brand compatibility. Sorinex is a commercial beast with extreme durability at high prices.
Look for lifetime frame warranties and responsive customer service.
Final Checklist Before You Buy
Run through this list to avoid costly mistakes.
Verify these items before purchasing. Space should allow rack plus 2 feet clearance on all sides. Ceiling height should accommodate rack plus 12 inches overhead clearance. Steel gauge should be 11-gauge or better. Upright size should be 3×3 inches (true or metric). Hole spacing should be 2 inches or Westside. Hardware should be 5/8-inch or 1-inch pins. Safety features must include adjustable safeties and anchor points. Stability requires bolt-down capability or freestanding with stabilizers. Expandability should support future attachments. Brand reputation should include warranty, support, and accessory availability.
Top Picks by Category
Best Overall: Rep PR-4000
This rack features 3×3 inch 11-gauge steel, Westside spacing, and 93-inch height. It costs approximately $1,000 and offers excellent value with a full upgrade path. Ideal for 90% of home lifters.
Best Premium: Rep PR-5000 or Rogue Monster
These racks feature 1-inch hardware, laser-cut numbering, and full modularity. Built to last decades, they are worth the investment.
Best Budget: Fitness Reality 810XLT
This rack features 14-gauge steel, tested to 700+ lbs, and costs approximately $400. Functional but not expandable, it makes a good starter rack.
Best Folding: PRX Profile Series
This rack features hydraulic fold-down and stability when open. Perfect for shared spaces.
Best for Tall Users: Sorinex Base Camp or 108+ Inch Racks
These require 10+ foot ceilings and provide full range of motion for overhead work.
Best All-In-One: EVOLPOW or RitFit Buffalo Rack
These bundles include cable system, landmine, and storage. Great for under $600 with everything included.
Frequently Asked Questions About Choosing a Power Rack
What is the most important factor when choosing a power rack?
The most important factors are steel gauge (11-gauge or better), upright size (3×3 inches), and safety features. These determine durability, accessory compatibility, and your ability to train safely, especially when lifting alone.
Should I choose a full rack, half rack, or squat stand?
Choose a full rack if you lift heavy (500+ lbs), train solo, or want maximum expandability. Choose a half rack if space is limited and your lifts stay under 500 lbs. Choose a squat stand only for light use or temporary setups.
Do I need to bolt down my power rack?
Yes, bolting is strongly recommended, especially for lifts over 400 lbs. It prevents tipping and ensures stability. If bolting is not possible, choose a heavy 6-post rack with weight storage or add sandbags to the base for stability.
How much should I spend on a quality power rack?
Spend at least $500 for a decent starter rack. The sweet spot is $800-$1,500 for a high-quality, expandable model. Premium racks cost $1,500-$3,000+ but last 20+ years.
Are power rack attachments compatible between different brands?
Not always. Compatibility depends on tube size (2×2, 2×3, 3×3), hole diameter (5/8-inch, 1-inch), and hole spacing (standard, Westside). Verify compatibility before purchasing accessories.
Build Your Strength Foundation with Confidence
Your power rack is more than equipment. It is where PRs happen, form improves, and confidence grows. How to choose a power rack comes down to matching your goals with the right balance of safety, size, and scalability.
Start by measuring your space and ceiling height. Then pick a configuration: full rack for heavy lifting, half rack for space savings, or all-in-one for budget simplicity. Prioritize 11-gauge steel, 3×3 inch uprights, and 5/8-inch or 1-inch hardware. Always include safety bars and plan to bolt it down.
Buy the best quality you can afford. A well-built rack lasts 20+ years, making it one of the smartest investments in your fitness journey. Do not chase accessories over structural integrity. Safety and durability should always come first.
The right power rack is not just a purchase. It is the foundation of every rep, every set, and every breakthrough to come.