Is your Samsung refrigerator shelf stained, smelly, or hiding mold in the gap between glass and plastic? You’re not alone. Many Samsung fridge owners struggle with cleaning shelves, especially when the glass is sealed inside a frame. The good news: whether your shelf is removable or permanently sealed, you can clean it effectively with the right method. This guide gives you step-by-step instructions based on your specific model, plus user-tested solutions that actually work.
You’ll learn how to identify your shelf type, safely remove and disassemble it, deep-clean both removable and non-removable designs, and prevent mold from returning. Let’s get your fridge shelf spotless.
Identify Your Shelf Type First
Before grabbing any cleaner, determine whether your Samsung fridge shelf has removable glass or is permanently sealed. Using the wrong method can crack glass or break brittle plastic clips.
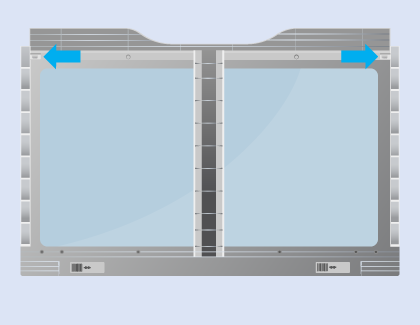
Check for Release Clips or Sealed Edges
Flip the shelf over and inspect the underside carefully. Look for these distinguishing features:
- Removable models: Yellow-arrow-marked release clips near side walls or flexible frame edges that flex when pressed
- Non-removable models: Glass appears fused into the frame with crimped or heat-sealed edges and no functional release mechanism
Pro Tip: Even if your manual says “removable,” some models (like the RF18 series) have misleading documentation. Confirm with Samsung support by sending a photo of your shelf and model number.
Common Model Compatibility
| Shelf Type | Compatible Models |
|---|---|
| Removable | RF28HMEDBSR, RF29DB9900QD (Bespoke), Family Hub, FlexZone, most French-door units |
| Non-Removable | RF18 series (2018), some 2019 residential models |
If you’re unsure, assume sealed design until verified. Attempting forced removal on a non-removable shelf risks permanent damage.
Remove the Shelf Safely
Start by clearing the fridge to access the shelf without obstruction.
Pull Out Crisper Drawers
- Fully extend vegetable and fruit drawers
- Set them on a clean, padded surface to avoid scratches
- This opens space for safe shelf removal and reinstallation
Depress Both Release Clips
For removable shelves only, follow these steps precisely:
- Locate two release clips on the underside near side walls
- Press downward on the lower portion of each clip, never pry upward
- Use fingers or a cloth-wrapped flat-head screwdriver for even pressure
- Press both clips simultaneously, uneven force causes misalignment and breakage
Warning: Forcing one side first can break the clip or crack the glass. Patience prevents costly damage.
Slide Shelf Out Gently
- Once clips release, tilt the front up slightly
- Pull straight out with both hands, supporting the full weight
- Place on a towel-covered table to prevent scratches
Detach Glass from Frame (Removable Models Only)
Only attempt this step if your shelf has accessible retaining clips.
Flip Shelf Upside Down
- Turn the unit over so the frame bottom faces up
- This exposes the side retaining clips you need to release
Press Clips Inward to Release
- Locate two plastic clips on either side of the frame
- Press the bottom of each clip inward until it snaps free
- Clips may fall out during this process, which is completely normal
User Hack: Warm clips with your hands or a low-heat hairdryer to increase flexibility in cold environments before attempting release.
Lift Glass Straight Up
- Carefully flip the shelf upright while supporting both parts
- Slide glass forward and upward out of the front retaining tab
- Place glass on a soft surface to avoid scratches
Clean Removable Glass Panels
Now that the glass is free, deep-clean it safely without damaging the tempered surface.
Wash with Mild Soap and Water
- Mix warm water and mild dish soap like Dawn
- Use a non-abrasive sponge or microfiber cloth
- For dried spills, soak for 5 to 10 minutes before scrubbing
Avoid: Steel wool, scouring pads, Comet, or Bar Keepers Friend. These scratch tempered glass permanently.
Disinfect if Needed
For mold, odors, or stubborn spills, choose from these effective solutions:
- Baking soda solution: 1 tablespoon per quart of water
- Vinegar mix: 1:1 white vinegar and water
- For mold: Use diluted bleach (1:10 bleach to water), then rinse extremely well afterward
Rinse and Dry Completely
- Rinse under running water
- Dry with a lint-free cloth
- Air-dry if needed to ensure no moisture is trapped, this prevents mold under the frame later
Deep-Clean Non-Removable Shelves
Cannot remove the glass? Use the bathtub soak method, a top-rated user solution that works.
Bathtub Soak for Sealed Shelves
Materials needed:
– Bathtub or large basin
– Hot (not boiling) water
– Dawn Original plus Dawn Powerwash
– Diluted bleach (1:10) for mold
– Soft brush, sprayer, sunlight
Steps:
1. Remove shelf from fridge carefully
2. Place in bathtub
3. Submerge in hot soapy water, mixing Dawn Powerwash with regular Dawn, and add 1:10 bleach solution if mold is present
4. Press gently on frame edges to let water seep between glass and plastic
5. Soak for 1 hour to loosen grime and kill mold
6. Rinse with high-pressure sprayer from kitchen sink or garden hose
7. Dry bottom side up in direct sunlight where most residue collects
8. Let dry fully before reinstalling
User Result: One verified user reported, “I did the bathtub soak thing, and it worked pretty well. They came out pretty clean.”
Spot-Clean Without Removal
For quick maintenance between deep cleans:
- Use kitchen sink sprayer to blast water and cleaner into the gap between glass and frame
- Inject diluted bleach into cavity if mold is visible
- Rinse thoroughly with sprayer
Warning: Never inject undiluted bleach. This degrades plastic and leaves toxic residue.
Use the Right Cleaners
Choosing safe, effective cleaners prevents damage and health risks.
Safe Cleaning Solutions
| Cleaner | Best For | Notes |
|---|---|---|
| Dish soap (Dawn) | General cleaning | Non-toxic, effective on grease |
| White vinegar (5%) | Odors, mineral deposits | Mix 1:1 with water |
| Baking soda paste | Stubborn spills | Gentle abrasive |
| Diluted bleach (1:10) | Mold disinfection | Must rinse completely |
| Dawn Powerwash | Degreasing vertical surfaces | Foams and clings well |
Cleaners to Avoid
| Product | Risk |
|---|---|
| Abrasive cleaners | Scratch glass and plastic |
| Ammonia-based products | Damage plastic, create fumes |
| Steel wool or pads | Permanent scratches |
| Undiluted bleach | Plastic degradation, residue |
Best Practice: Always rinse shelves thoroughly after using any chemical to prevent food contamination.
Reassemble Glass and Frame
Only for removable models. Reinsert glass correctly to avoid wobbling or collapse.
Align Back Corners First
- Hold glass by the edges
- Match back corners with rear slots in the frame
- This ensures proper alignment for the rest of the process
Slide Front Edge Under Retaining Tab
- Gently lower the front edge under the front tab
- Then lower the back into place
- Glass should sit flush with no gaps or wobble
Pro Tip: Work with a helper to hold clips in place during reassembly for better stability.
Reinstall Retaining Clips
Secure the frame so glass does not shift during use.
Snap Clips into Place
- Insert each clip into its side slot
- Press firmly until it snaps securely
- Ensure neither clip protrudes loosely
Replacement Part: If clips break, order DA61-05834A or your model-specific equivalent from Samsung Parts.
Reinstall Shelf into Fridge
Final step: put the shelf back safely.
Align with Mounting Points
- Hold shelf with both hands
- Position at the correct height inside the fridge
- Insert at a slight upward angle if needed
Press Down Until It Snaps
- Apply firm, even pressure on both sides
- Listen for an audible snap indicating clips engaged
- Test stability by gently tugging up. Shelf should not lift.
User Insight: Not rushing the re-snap process yields better results than forceful slamming.
Replace Crisper Drawers
- Slide drawers back into tracks
- Ensure smooth gliding motion
- Confirm no interference with the reinstalled shelf
Prevent Mold and Damage
Keep shelves clean and functional long-term with these habits.
Clean Every 1 to 3 Months
- Weekly: Wipe with damp microfiber cloth
- Monthly: Deep clean removable shelves
- Immediately: After spills or leaks
Use Shelf Liners
- Place non-adhesive, washable liners on shelves
- Simplifies cleaning and prevents direct food contact
- Replace liners regularly to avoid microbial buildup
Avoid Overloading
- Maximum weight is 35 lbs (15.9 kg), evenly distributed
- Overloading stresses glass and frame, leading to cracks
Keep Shelves Dry
- Wipe dry after cleaning
- Moisture trapped between glass and frame breeds mold
Troubleshoot Common Issues
Fix problems fast with these targeted solutions.
Shelf Will Not Release
- Cause: Only one clip pressed or wrong pressure point
- Fix: Press both lower portions of clips simultaneously
Glass Will Not Seat Properly
- Cause: Misaligned with front tab or rear slots
- Fix: Reinsert slowly, guiding front edge under tab first
Clips Will Not Stay In
- Cause: Damaged, missing, or not fully seated
- Fix: Replace with OEM part like DA61-05834A
Shelf Feels Loose
- Cause: Clips not fully engaged
- Fix: Remove and reinsert with firm downward pressure
Mold Keeps Coming Back
- Cause: Trapped moisture or inadequate cleaning
- Fix: Use bleach soak plus high-pressure rinse plus sunlight drying
Handle with Care: Safety Tips
Protect yourself and your appliance.
Do
- Depress both release clips at once
- Use padded surfaces when placing shelf down
- Let shelves warm to room temperature before washing (prevents thermal shock)
- Wear gloves when using bleach or degreasers
Do Not
- Pry clips with screwdrivers, they are brittle
- Force reinstallation, misalignment risks collapse
- Place sharp or heavy containers on glass edges
- Soak shelves in boiling water, thermal shock can crack glass
Maintain Long-Term Cleanliness
Prevention beats deep cleaning every time.
Weekly Wipe-Downs
- Use damp cloth with mild soap
- Focus on edges where spills collect
Use Odor Absorbers
- Place baking soda box or activated charcoal in fridge
- Neutralizes odors and reduces microbial growth
Store Food Properly
- Use spill-proof containers
- Avoid placing warm or uncovered food directly on shelves
Frequently Asked Questions About Cleaning Samsung Fridge Shelves
Can I remove the glass from my Samsung fridge shelf?
It depends on your model. Removable shelves have release clips on the underside marked with yellow arrows. Non-removable shelves (like the RF18 series) have glass fused into the frame with no release mechanism. Check your model or contact Samsung support to confirm.
What is the best way to clean mold between glass and frame?
For non-removable shelves, the bathtub soak method works best. Submerge in hot soapy water with diluted bleach (1:10) for one hour, then rinse with a high-pressure sprayer and dry in direct sunlight. For removable shelves, disassemble and clean each component separately.
How often should I clean my Samsung fridge shelves?
Perform weekly wipe-downs with a damp cloth and mild soap. Deep clean removable shelves monthly, and clean immediately after any spills or leaks to prevent mold and odors.
Why won’t my shelf release even though the manual says it’s removable?
Some Samsung manuals are misleading. Models like the RF18 series claim removability but actually have sealed glass. Contact Samsung support with your model number and a photo of your shelf for confirmation before forcing anything.
What happens if I break the clips during removal?
Broken clips can be replaced. Order OEM part DA61-05834A or your model-specific equivalent from Samsung Parts. Replacement shelves can cost up to $300 for a pair, so replacing clips is much more economical.
Key Takeaways for Cleaning Your Samsung Fridge Shelf
Whether your Samsung fridge shelf is removable or sealed, effective cleaning is absolutely possible. For removable models, always press both release clips simultaneously before attempting to detach the glass from the frame. For non-removable units, the bathtub soak method with Dawn Powerwash and diluted bleach delivers the best results against hidden mold and grime. Always use safe cleaners like mild dish soap, vinegar, or diluted bleach, and avoid abrasives that scratch tempered glass. Rinse thoroughly and dry completely before reinstalling to prevent mold from returning. By following these steps, you will maintain a hygienic, odor-free refrigerator and extend the life of your shelves without costly replacements.