

A sagging cabinet shelf is more than an eyesore. It signals structural strain that can lead to complete collapse if left untreated. Whether you store heavy cookware in the kitchen or stacks of books in a built-in, knowing how to fix sagging cabinet Shelf issues starts with identifying why the damage happened.
Standard particleboard shelves common in ready-to-assemble cabinets can bow under loads as light as 30 to 50 pounds. Humidity, poor hardware, and weight concentrated in the center accelerate the damage. This guide walks you through 12 proven fixes, from quick no-cost adjustments to permanent structural upgrades, so you can restore strength and safety to any cabinet shelf.
Diagnose the Cause First
Before grabbing tools, identify what is causing the sag. The right fix depends on whether the problem stems from weak materials, inadequate support, or excessive loading.
Check for Overloading and Flex
Empty the shelf completely. Place a straightedge across the surface, like a level or metal ruler. If you see a visible gap in the center, the shelf is deflecting. Perform a thumb-press test by pressing down lightly on the middle. If it bends easily, the shelf lacks rigidity. Note what was stored there previously, especially heavy pots, appliances, or canned goods. Point loading, which is weight concentrated in the center, causes more stress than distributing the same total weight across the ends.
Identify Shelf Material and Support Type
Examine the shelf closely. Particleboard feels dense but soft, chips easily, and swells in moisture. Plywood has visible layers and is more stable. Solid wood is heaviest and most resilient. Inspect the support system. Are the shelf pins metal or plastic? Wiggle them. Loose or worn pins reduce holding power. Look for enlarged pin holes in the cabinet walls, a common failure point in adjustable systems. Measure the shelf span. If it is over 30 inches wide, lack of center support is likely the issue.
Redistribute Weight Immediately
This is the fastest, no-cost fix. It works ideal for temporary relief or mild bowing.
Shift Heavy Items to Edges
Move pots, blenders, or canned goods to the outer thirds of the shelf, directly above the cabinet walls or brackets. Keep lighter items like spices, mugs, or decor in the center. This reduces bending stress at the weakest point. Even a small shift, like moving a coffee maker 6 inches toward the side, significantly reduces deflection. This method will not fix structural weakness, but it prevents further sag and buys time for a permanent repair.
Flip the Shelf for Quick Relief
If the shelf is slightly bowed but still intact, flipping it may help.
Reverse the Sag Direction
Remove the shelf and turn it over so the bottom becomes the top. Over time, wood and composites develop a memory of the sag. Flipping it temporarily reverses the curve, especially if the material has not permanently deformed. This works best on solid wood or stable plywood. Avoid flipping laminated or finished shelves unless the underside matches your cabinetry. While not a long-term solution, flipping can restore flatness for months when combined with load redistribution.
Add a Center Support Block

For immediate, high-strength support, insert a vertical block under the sag point.
Cut and Install a Wood Block
Measure the interior height of your cabinet. Cut a hardwood block or 3/4-inch plywood to fit snugly between the cabinet floor and shelf underside. Position it at the center, or slightly forward, where sag is greatest. Slide it in until it pushes the shelf upward and eliminates the bow. For deep cabinets over 14 inches, add a second block near the front edge to prevent tipping. Stain or paint the block to match your cabinetry. This method creates a triangular support structure, turning a weak span into a rigid beam. It is ideal for bottom shelves where access is easy.
Install a Wall Cleat for Permanent Support
Anchor a horizontal strip to the back wall to bear the shelf weight.
Mount a Stud-Supported Cleat
Use a 1-by-2 furring strip or hardwood cleat cut to the shelf width. Locate wall studs with a stud finder. Position the cleat flush against the back wall, just beneath the shelf. Secure it with 2.5-inch screws driven into studs. Never rely on drywall anchors for heavy loads. Reinstall the shelf on top. The cleat transfers weight directly to the wall, eliminating reliance on side pins. When painted, it is nearly invisible. This is one of the most effective permanent fixes, especially for wall-mounted cabinets.
Reinforce with a Front Molding Strip
Add rigidity and style by beefing up the front edge.
Attach a Solid Wood Face Frame
Cut a 3/4-inch to 1-inch thick hardwood strip to match the shelf width. Apply wood glue to the front edge, then clamp or nail it in place. For a cleaner look, use a rabbet joint. Cut a groove so the molding laps over the shelf edge. Or use a dado joint for a flush fit. This increases the shelf moment of inertia, dramatically improving resistance to bending. Shape the molding with a router for a custom profile. Once sanded and painted, it blends seamlessly while boosting strength by up to 40 percent.
Double the Shelf for Maximum Strength

Laminate a second layer underneath to double thickness and stiffness.
Glue and Screw a Reinforcement Board
Cut a new board, 3/4-inch plywood or solid wood, to match the shelf. Apply wood glue across the entire underside. Clamp or weight it in place and let cure overnight. Secure with countersunk screws from above, filling the holes, or from below. For extra lift, insert 1/8-inch shims at the ends before reinstallation. This creates a slight upward curve that counteracts future sag. This method transforms weak particleboard into a robust, long-lasting shelf. One user reinforced budget shelves with pine, then finished with wipe-on polyurethane, resulting in a durable, attractive upgrade.
Use Metal Reinforcement for Hidden Strength
Add high-strength support with minimal visual impact.
Install Aluminum or Steel Angle
Attach 1-by-1-inch aluminum or steel L-brackets along the back edge and front underside of the shelf. Run them the full length, securing with pan-head screws. Flip the front leg downward to avoid interfering with stored items. Aluminum is lightweight and corrosion-resistant. Steel offers higher load capacity. This method adds negligible bulk but increases rigidity by 70 percent or more. Paint the metal to match the shelf for a seamless look. It is ideal for modern kitchens or high-load applications like pantry shelves.
Add a Backer Board for Shear Stability
Prevent twisting and bowing with rear reinforcement.
Fasten a Rigid Backing Panel
Cut 1/4-inch plywood, hardboard, or pegboard to fit the rear surface of the shelf. Nail or screw it vertically from top to bottom, ensuring contact with the cabinet back. This turns the shelf into a shear panel, resisting lateral movement and deflection. It is especially effective for wide, thin shelves made of MDF or particleboard. Use a brad nailer for clean, fast installation. When combined with a front molding or cleat, it creates a fully stabilized structure.
Upgrade to Shelf Stiffeners
Use commercial-grade hardware designed specifically for reinforcement.
Slide On 3/4-Inch Edge Brackets
Steel or aluminum Hangman brackets slide over the front 3/4-inch edge of the shelf and lock in place with set screws. They provide both structural rigidity and edge protection. Available in various finishes, they are nearly invisible when installed. They are only compatible with 3/4-inch thick shelves. They slightly reduce usable depth but add significant strength. They are ideal for frequently used cabinets. No drilling is required, making them perfect for renters or quick fixes.
Replace the Shelf Entirely
When sag is permanent or the material is damaged, replacement is the best option.
Choose High-Performance Materials
If the shelf is cracked, swollen, or delaminated, replace it with 3/4-inch void-free plywood, Baltic birch plywood, or solid hardwood like oak, maple, or birch. Cut to size and install with proper supports, cleats, blocks, or fixed dados. Pre-drill screw holes to prevent splitting. For long spans over 36 inches, add center support. Replacing a sagging shelf with solid wood not only fixes the problem but increases load capacity to 80 pounds or more with proper bracing.
Prevent Future Sagging
Stop the problem before it starts with smart design and habits.
Use Proper Support Spacing
Never space supports more than 24 to 32 inches apart. Place brackets within 2 to 3 inches of each end. For shelves over 36 inches, add a center support. For shelves over 48 inches, consider four supports. Always anchor into wall studs. Use toggle bolts only if studs are not available.
Choose Strong Materials and Smart Storage
Avoid MDF and particleboard in humid areas like kitchens. Upgrade to 3/4-inch plywood or solid wood for heavy-use cabinets. Use drawer organizers to offload shelves. Place heaviest items near supports, not in the center.
Upgrade Hardware
Replace flimsy plastic pins with heavy-duty metal pins. Limit the number of pin hole rows to prevent wallering. For new builds, use fixed shelves in dados. This is the strongest method.
Key Takeaways for Fixing Your Sagging Cabinet Shelf
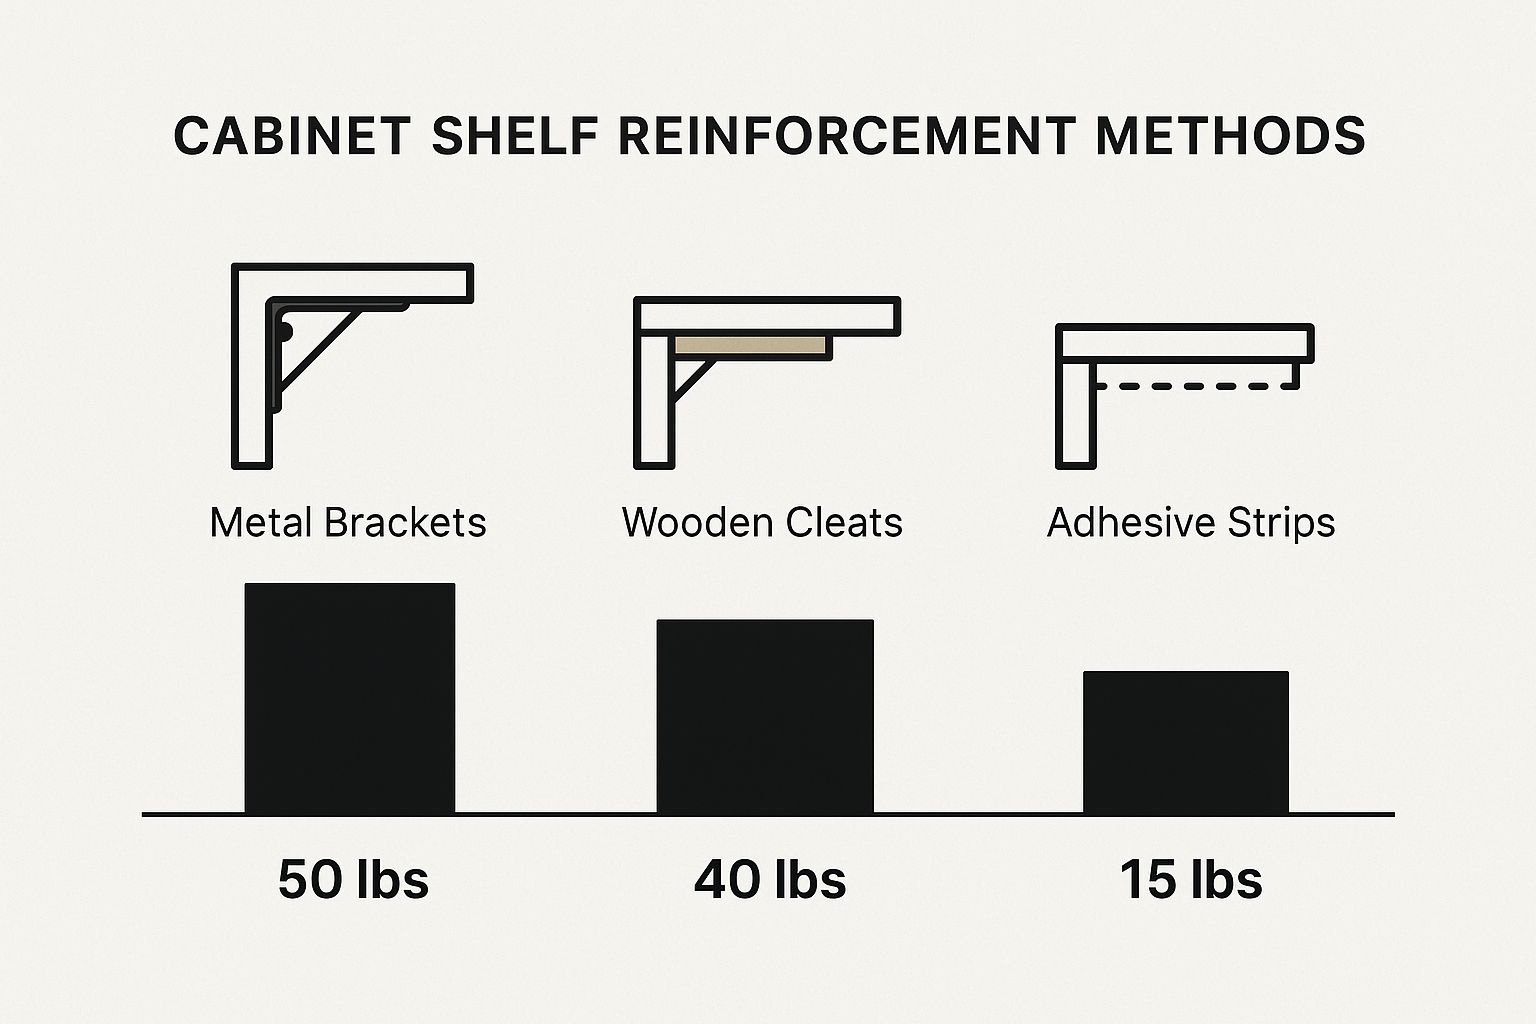
The most durable repairs combine multiple methods. Cleat plus front molding plus center block addresses both material and structural weakness. Properly reinforced shelves last 5 to 10 years or more under normal use. One DIYer spent 20 dollars reinforcing 25 dollar Walmart shelves and used them for over two years in a garage workshop. Even low-cost MDF becomes reliable with proper reinforcement. Always test your fix by loading the shelf with typical items and checking for movement. Remember that depth matters more than width. A deeper shelf resists sag exponentially better.
Frequently Asked Questions About Fixing Sagging Cabinet Shelves
What causes a cabinet shelf to sag?
Sagging results from weak materials like particleboard, excessive span without center support, heavy or point-loaded items, worn shelf pins, or humidity damage. Most sagging comes from a combination of these factors.
Can I fix a sagging shelf without removing it?
Yes. Redistributing weight to the edges provides immediate relief. Adding a center support block from inside the cabinet works without removing the shelf. Wall cleats install from above or behind without disturbing the shelf contents.
How much weight can a reinforced shelf hold?
A 3/4-inch particleboard shelf holds 30 to 50 pounds. A 3/4-inch plywood shelf holds 60 to 80 pounds. Solid hardwood with proper support holds 80 pounds or more. Adding front molding or doubling the shelf increases capacity by 40 to 70 percent.
Is it better to replace or reinforce a sagging shelf?
Replace the shelf if it is cracked, swollen, or permanently deformed. Reinforce if the material is intact but inadequate for the load. Reinforcement costs less and works well for minor to moderate sag.
How long does a reinforced shelf last?
Properly reinforced shelves last 5 to 10 years or more. Combining methods like cleat, front molding, and center block provides the longest-lasting results.
Can I use my existing shelf pins with reinforcement?
Yes, but upgrade to heavy-duty metal pins. Reinforcement reduces stress on pins, but weak pins still fail over time. Check pin holes for enlargement and repair or relocate supports if needed.


