

Shelf brackets that wobble, sag, or pull out of the wall are more than just annoying. They can be dangerous, especially when holding heavy items. Whether you’re mounting a floating shelf in the living room or installing heavy-duty kitchen brackets, learning how to fix shelf brackets properly starts with understanding your wall type and using the right hardware. Most bracket failures happen because screws are anchored only into plasterboard, or drill bits hit mortar instead of solid masonry. The fix is simple: match your method to the wall. In this guide, you’ll discover exactly how to fix shelf brackets on any surface, avoid hidden dangers, and ensure long-term stability.
Identify Your Wall Type First
Before drilling a single hole, determine what kind of wall you’re working with. The three main types are masonry, stud partition, and dry-lined. Each looks similar on the surface but behaves very differently under load.
Check for Hidden Hazards
Always scan the wall with a stud and pipe detector before drilling. Electrical cables often run vertically near outlets and switches, while water and gas lines may be hidden behind walls. A single mistake can lead to shock, leaks, or costly repairs. If you don’t have a detector, avoid drilling within 150 mm of sockets, switches, or plumbing fixtures. Use the knuckle-tap test to get a rough idea. A dull thud suggests a stud or solid backing. A hollow sound means plasterboard over a cavity. But verify with tools rather than relying solely on sound.
Spot Dry-Lined Walls
Dry-lined walls feel solid at first touch because plasterboard is glued to masonry with adhesive dots. However, they’re not load-bearing. If you’re in a recently renovated home, assume the wall is dry-lined unless proven otherwise. Look for perfectly flat surfaces with no texture. This is a telltale sign of dry-lining.
Fix Brackets to Masonry Walls
Masonry walls made of brick, concrete block, or stone are strong but require precise drilling. Done right, they support heavy shelves for decades.
Drill Into Brick, Not Mortar

Always aim for the center of bricks or blocks, not the mortar joints. Mortar is weaker and can crumble under pressure. Use a hammer drill with a masonry bit sized for your wall plug. For example, a 6 mm screw needs a 6 mm hole. Screws should penetrate at least 25 to 38 mm into solid masonry. For heavy shelves like tool racks, use 75 mm screws or wall bolts for deeper anchoring.
Choose the Right Wall Plugs
Standard plastic wall plugs work for light to medium loads in solid masonry. But if you’re drilling into soft blocks like aerated concrete, use metal expansion anchors or chemical resin anchors. They grip better and resist pull-out. If your drill bit hits flint or deflects, skip direct fixing. Instead, install a wooden batten secured with long screws into the masonry, then attach brackets to the batten.
Mount Brackets on Stud Partition Walls
Stud walls are made of vertical timber or metal frames covered in plasterboard. They cannot support weight unless brackets are screwed directly into studs.
Find Studs Accurately
Use an electronic stud finder for the most reliable results. They detect density changes behind the wall. If you don’t have one, tap the wall. A solid sound means you’ve found a stud. Standard stud spacing is 16 or 24 inches apart. Outlets and light switches are usually attached to studs. Measure 16 inches left or right to locate the next one.
Use Long Wood Screws
Once you’ve located a stud, use 50 to 75 mm wood screws. These should penetrate at least 25 mm into the timber. No wall plug is needed. Wood screws grip the stud directly. For wide brackets, attach to multiple studs for better load distribution. Pre-drill pilot holes to prevent splitting, especially near stud edges.
Handle Metal Studs Differently
Metal studs are thinner and cannot hold standard screws. Use self-tapping metal screws or toggle bolts if the bracket does not align with a stud. Never rely on drywall anchors alone. Metal studs bend under heavy loads.
Secure Brackets on Dry-Lined Walls
Dry-lined walls look solid but hide an air gap behind the plasterboard. Fixing directly into the board risks failure, especially with heavy items.
Never Use Standard Wall Plugs
Plastic plugs expand against the back of plasterboard and can tear through under load. They are unsafe for anything beyond lightweight decor.
Use Toggle Bolts or Hollow-Wall Anchors
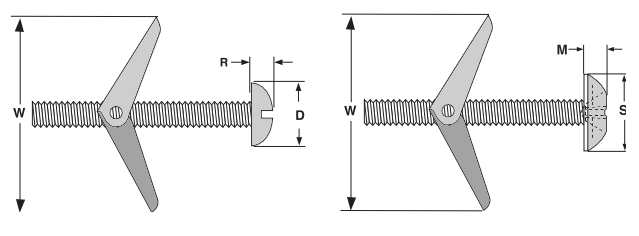
For reliable support, use toggle bolts or snap-toggle anchors. These expand behind the plasterboard, spreading the load. Install them by drilling a hole slightly larger than the toggle, inserting the folded wings through the hole, and tightening the screw until the wings open and press flat against the back. Each toggle bolt can hold 25 to 50 kg, depending on type and installation.
Reinforce With a Wooden Batten
For heavy shelves, install a horizontal wooden batten like 38 by 25 mm across the wall using multiple toggle bolts. Then fix the shelf brackets to the batten with wood screws. This spreads the load and creates a solid mounting surface. Ensure the batten is level and secured every 300 to 400 mm for stability.
Level and Align Brackets Correctly
Even the strongest fixings fail if brackets are not aligned. A misaligned shelf puts uneven stress on screws, leading to gradual loosening or collapse.
Mark Bracket Positions Precisely
Hold the bracket against the wall and use a pencil to mark screw holes. Use a spirit level to ensure it is horizontal. For long shelves, check level at both ends and the center.
Match Bracket Height Across Walls
When installing multiple brackets, measure from the floor or ceiling to maintain consistent height. Walls are not always perfectly vertical. Measuring from a fixed point prevents visible misalignment. Use laser levels for long runs or multi-shelf installations. They project a straight line across the wall for fast, accurate marking.
Choose the Right Hardware for the Load
The weight the shelf will carry determines your fixing method. Match hardware to expected load to avoid failure.
Light Loads Up to 10 kg
For decorative items or small books, use these options. For masonry, use plastic wall plugs and screws. For drywall, use hollow-wall anchors. For studs, use short wood screws.
Medium Loads 10 to 25 kg
For kitchen shelves or display cabinets, use these options. For masonry, use longer screws with heavy-duty plugs. For drywall, use toggle bolts. For studs, use 50 mm wood screws into studs.
Heavy Loads Over 25 kg
For bookshelves, tool storage, or appliances, use these options. For masonry, use wall bolts or resin anchors. For drywall, use wooden batten with multiple toggles. For studs, fix brackets into two or more studs. Always over-specify when in doubt. Use stronger fixings than the minimum required.
Prevent Bracket Loosening Over Time
Even well-installed brackets can loosen due to vibration, humidity, or wood movement.
Check and Retighten Regularly
Inspect shelf brackets every 6 to 12 months, especially in high-traffic areas. Gently wiggle the shelf. If it moves, tighten the screws. If screws spin freely, the anchor may be damaged. Remove and replace with a larger or stronger anchor. For example, switch from plastic plug to toggle bolt.
Replace Corroded or Stripped Fixings
In humid areas like bathrooms or kitchens, screws and plugs can corrode. Replace them with stainless steel screws and nylon or metal anchors to resist moisture. Never overtighten. This can crack plasterboard or strip threads. Stop when the bracket is snug and level.
Reinforce With a Wooden Batten
When wall conditions are uncertain or loads are heavy, a wooden batten is the most reliable solution.
Install the Batten First
Cut a length of 38 by 25 mm timber to span the shelf area. Position it at the desired height and secure it to the wall using wall plugs and screws every 300 mm for masonry, screws into each stud for studs, or toggle bolts every 300 to 400 mm for drywall. Ensure the batten is perfectly level before fixing.
Attach Brackets to the Batten
Once the batten is secure, fix shelf brackets to it using wood screws. This method eliminates guesswork and provides a solid base regardless of wall type. For extra strength, use two brackets per shelf end and screw through the batten into the wall behind.
Avoid Common Installation Mistakes
Even small errors can compromise shelf safety. Watch out for these frequent issues.
Drilling Into Mortar Joints
Brick walls have weak mortar between units. Screws in mortar can pull out under load. Always drill into the center of bricks or blocks.
Mounting Into Plasterboard Only
Screwing into drywall without hitting a stud or using proper anchors is a top cause of shelf collapse. If you cannot find a stud, use toggle bolts, not plastic plugs.
Using Under-Sized Screws
Short or thin screws will not hold heavy loads. Always use screws long enough to penetrate at least 25 mm into solid material.
Skipping the Level Check
A slightly tilted bracket causes uneven weight distribution. Always use a spirit level during marking and installation.
Frequently Asked Questions About Fixing Shelf Brackets
Can I use regular screws for shelf brackets?
Regular screws are not always sufficient for shelf brackets. You need screws appropriate for your wall type. For masonry, use wall plugs with screws. For stud walls, use wood screws long enough to penetrate at least 25 mm into the timber. For dry-lined walls, use toggle bolts or hollow-wall anchors. Always match the screw length and type to the expected load.
How do I know if my wall is dry-lined?
Dry-lined walls feel solid but have plasterboard glued to masonry with adhesive dots. Look for perfectly flat surfaces with no texture. These are telltale signs. You can also check by tapping. A hollow sound indicates a cavity behind the plasterboard. If you are unsure, assume the wall is dry-lined and use toggle bolts for safety.
What is the strongest fixing for shelf brackets?
The strongest fixing depends on your wall type. For solid masonry, resin anchors or wall bolts provide the highest load capacity. For stud walls, screws directly into timber studs offer excellent strength. For dry-lined walls, a wooden batten secured with multiple toggle bolts provides the most reliable support. Always over-specify fixings when in doubt.
Why do my shelf brackets keep loosening?
Bracket loosening happens for several reasons. Vibration, humidity, and wood movement can cause screws to gradually lose tension. Using the wrong type of anchor for your wall is a common cause. Plastic wall plugs in dry-lined walls often fail. Check for corrosion in humid environments. Inspect brackets every 6 to 12 months and retighten as needed. If screws spin freely, the anchor is damaged and must be replaced.
Can I fix shelf brackets without finding a stud?
You can fix brackets without finding a stud, but you must use appropriate anchors. For dry-lined walls, use toggle bolts or hollow-wall anchors. For masonry, use wall plugs or resin anchors. Never rely on plastic wall plugs in plasterboard alone. If you cannot locate studs and need heavy-duty support, install a wooden batten secured with multiple toggle bolts, then mount brackets to the batten.
How much weight can toggle bolts hold?
Toggle bolts can hold 25 to 50 kg per anchor, depending on the type and proper installation. Standard toggle bolts support lighter loads, while snap-toggle anchors offer higher capacity. Always check the manufacturer’s rating and install according to instructions. For heavy shelves, use multiple toggle bolts per bracket and consider reinforcing with a wooden batten.
Key Takeaways for Fixing Shelf Brackets
Fixing shelf brackets correctly comes down to three essential principles. First, always identify your wall type before choosing hardware. Masonry, stud walls, and dry-lined walls each require different fixings. Second, match the fixing method to the expected load. Light decorative items need different anchors than heavy bookshelves or tool storage. Third, use the right hardware for your specific wall. Standard plastic plugs fail in plasterboard, and short screws cannot hold heavy loads.
When in doubt, reinforce with a wooden batten. This universal solution works across all wall types and provides a solid mounting surface for heavy shelves. Always check for hidden utilities before drilling, use a spirit level for precise alignment, and inspect brackets periodically for signs of loosening. With these steps, your shelves will stay secure, level, and stable for years.


