

You’ve picked out the perfect floating shelf—sleek and modern, ready to elevate your space. But if you’re wondering How to Install Floating Shelf units securely and level, the real challenge is avoiding costly mistakes. Hidden dangers like electrical wires, weak drywall anchors, or missed wall studs can quickly turn a simple DIY project into a wall-damaging disaster.
The key to success is learning How to Install Floating Shelf systems by attaching them to wall studs and using the right hardware for your wall type. Whether you’re mounting a lightweight display shelf or a heavy-duty storage unit in the kitchen, this guide walks you through every step. You’ll learn how to avoid common pitfalls, maximize load capacity, and achieve a clean, professional finish that lasts for years.
Gather the Right Tools and Hardware
Before touching a drill, gather all the tools and supplies you need. Using the correct equipment ensures accuracy, safety, and long-term stability for your floating shelf installation.
Essential Installation Tools
You will need several key tools to complete this project successfully. A cordless or corded drill with adjustable torque provides the power and control needed for precise drilling. You’ll also need drill bits matched to your wall type, whether wood, drywall, or masonry. For concrete, brick, or stone walls, hammer drill mode becomes essential. A 24-inch spirit level or laser level ensures precise alignment across your installation. Additional must-have tools include a tape measure, pencil, stud finder, wall scanner, safety goggles, step ladder, and screwdriver or socket wrench for tightening screws.
Pro Tip: A laser level is worth the investment if you’re installing multiple shelves. It projects a straight line across walls, ensuring perfect alignment even in large rooms.
Choose Matching Fixings and Hardware
The strength of your shelf depends on the anchors and screws, not just the bracket system. Different wall types require different fixings to achieve maximum hold.
| Wall Type | Recommended Fixings |
|---|---|
| Drywall (plasterboard) | Toggle bolts, hollow wall anchors |
| Masonry (brick/concrete) | Masonry anchors or sleeve anchors |
| Wood studs | Wood screws (no plug needed) |
Use shimming washers to fine-tune bracket height if one side sits slightly off-level. Finish with decorative caps or wooden plugs to hide screw heads and maintain a seamless, professional appearance.
Identify Your Wall Type and Structure
Not all walls are created equal. Installing a floating shelf into drywall without hitting a stud is like building on sand. It might hold temporarily, but it won’t last under real weight.
Check Wall Composition
Use a stud finder to determine what lies behind the surface before drilling. Drywall over studs provides the ideal mounting surface, allowing you to attach directly into wood for maximum strength. Solid masonry requires hammer drilling and masonry anchors. Solid concrete or brick falls into the same category as masonry but demands more effort to drill.
Critical Rule: Always anchor floating shelves into wall studs when possible. Drywall alone supports only 5–10 kg, even with heavy-duty anchors.
Scan for Hidden Hazards
Before drilling, use a wall scanner to detect electrical wiring, which is common near outlets and switches. Also check for water or gas pipes, especially in bathrooms and kitchens. Look for metal fire blocking or nailing plates that could interfere with your installation.
Warning: Never drill within 1 inch vertically above or below sockets, switches, or fixtures unless you’ve confirmed it’s safe.
Select the Best Bracket System

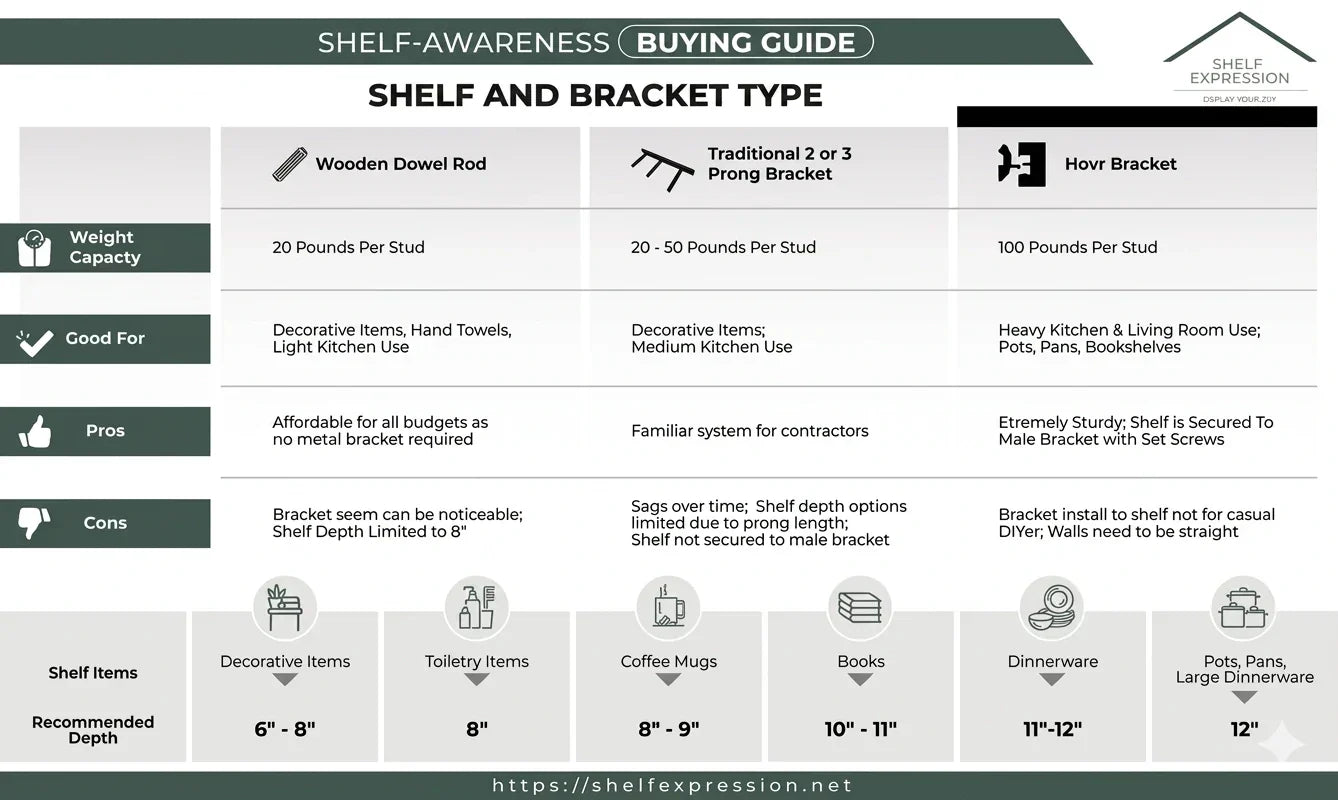
The bracket serves as the hidden backbone of your floating shelf. Choosing the right bracket system determines how much weight it can hold and how easy the installation becomes.
Compare Bracket Types
Different bracket types offer varying load capacities and installation complexities. Metal rod brackets support up to 35 kg when mounted into studs, making them suitable for light to medium shelves. Custom steel brackets handle 50+ kg, ideal for heavy solid wood shelves. Wire-channel brackets provide moderate to high capacity for long spans with multiple supports. Adjustable brackets offer flexibility for DIYers who need post-installation tweaking ability.
Expert Insight: Custom-welded steel brackets allow minor adjustments with shims, making them ideal for thick wood shelves of 1.5 inches or more. They forgive small measurement errors during installation.
Plan Shelf Placement and Leveling
Getting the height and alignment right makes all the difference in both function and appearance. Poor planning leads to crooked shelves that detract from your room’s aesthetic.
Set Standard Mounting Heights
Above countertops, mount shelves 18–19 inches from the surface. In living rooms or bedrooms, aim for 48–60 inches from the floor, which places items at eye level. For double-tier shelves, space the second shelf 14–15 inches above the first. Mark the center point of the shelf location with a pencil, then measure the distance between bracket holes on the back of the shelf or bracket system. Transfer that spacing to the wall, centered on your mark.
Use a Level for Perfect Alignment
Draw a straight reference line using a spirit level. For multiple shelves or installations across corners, use a laser level to project a consistent plane. Recheck level after each drilling step to catch any errors immediately.
Pro Tip: Install the first bracket as your reference point, then use the laser to align others across the room for a gallery-like setup.
Drill Pilot Holes Accurately
Precision drilling prevents wall damage and ensures a snug fit for anchors and screws. Rushing this step leads to wobbling shelves or damaged walls.
Mark and Measure Hole Positions
Double-check bracket hole spacing before marking. Use a pencil to mark each drill point clearly. Confirm alignment with a level before proceeding to drill.
Drill with Control
Wrap masking tape around the drill bit to mark depth, equal to the anchor length plus 1/8 inch. Drill slowly to avoid bit wandering. Use hammer mode for masonry and regular rotation for drywall or wood. Clear dust from holes with a brush or compressed air after drilling.
Warning: Drilling too deep can hit pipes or wires. Always use a depth marker and verify wall contents first.
Insert Anchors and Secure Brackets
With pilot holes ready, it’s time to set the anchors and mount the support system that will hold your floating shelf securely.
Install Wall Plugs Correctly
Tap anchors gently into drywall or masonry until flush with the surface. Do not overdrive, as this can crack the anchor or damage the wall. For wood studs, skip anchors entirely and use wood screws directly into the stud.
Attach the Bracket Firmly
Align the bracket with the pilot holes and insert screws. Tighten fully with a screwdriver or socket wrench. Check with a level, and if uneven, add shimming washers under the bracket arm before final tightening.
Adjustment Tip: If one side sits higher, slip a thin metal or plastic washer between the bracket and wall to level it before final tightening.
Prepare Custom Wood Shelves
If you’re using solid wood instead of a pre-made shelf, proper preparation becomes essential for strength and proper fit.
Build Strong Joints
For wide or long shelves made from multiple boards, use half-lap (rabbit) joints for seamless, durable connections. Cut grooves with a router, with depth approximately half the board thickness. Glue joints with wood adhesive, clamp until dry, then reinforce with hidden screws.
Drill Precise Alignment Holes
Use a dowel jig to drill clean, straight holes in the back of the shelf that match bracket rod positions. Mark drill depth with tape to avoid drilling through the front face. Clean out all sawdust from holes so the shelf slides smoothly onto the rods.
Pro Tip: Clean out sawdust from holes so the shelf slides smoothly onto the rods without resistance.
Mount the Shelf and Finalize Installation
With brackets secure and the shelf prepared, the final step involves mounting and securing everything in place.
Slide Shelf Onto Brackets
Carefully align both ends with the protruding bracket rods. Push evenly until fully seated. If tight, check for debris or misalignment before forcing.
Fix Tip: Use a rubber mallet or tap with a 2×4 block to avoid damaging the finish when guiding the shelf into place.
Lock Shelf in Place
Fasten underside screws through the shelf into the bracket. These prevent lifting and vertical movement. Tighten securely but avoid over-torquing, which can strip wood or crack MDF materials.
Hide Hardware for a Clean Look
Cover screw heads with decorative stickers, wooden plugs, or magnetic caps. Match the finish to the shelf for a seamless, floating effect that appears professional and polished.
Handle Special Installation Cases

Some installations require extra care due to unusual locations or challenging materials.
Install Corner Floating Shelves
Use a single heavy-duty bracket at the inner corner for support. Build the shelf with a half-lap joint for strength at the angle. Fill small gaps with wood glue and shims for a flush fit. Add hidden corner braces for extra support under heavy loads.
Drill Into Tile or Stone
Use diamond-coated or carbide-tipped bits designed for hard surfaces. Start at low RPM with light pressure to prevent cracking. Keep the bit cool with a water drip if possible. Mark hole centers precisely because re-drilling can crack tile.
Best Practice: Mount brackets before tiling whenever possible, so they’re hidden beneath the finished surface.
Maximize Weight Capacity and Safety
A floating shelf should look light but be strong enough to handle real use without sagging or failing.
Know Your Shelf’s Load Limits
| Material | Max Load | Best Use |
|---|---|---|
| MDF / Particleboard | 5–10 kg | Decor only |
| Engineered wood | 10–20 kg | Books, small items |
| Solid pine | 25–35 kg | Vases, books, kitchen tools |
| Hardwood (oak, walnut) | 35–50+ kg | Heavy storage |
Manufacturer Note: Ben Simpson Furniture’s solid pine shelves support up to 35 kg when installed into studs.
Distribute Weight Wisely
Spread heavy items evenly across the shelf surface. Avoid placing weight at the front edge, which creates leverage that can loosen brackets over time. For frequently moved items, reduce the max load by 25% to account for dynamic forces. Never exceed the rated capacity stated by the manufacturer.
Warning: Shelves mounted only in drywall should not exceed 10 kg total, regardless of bracket quality.
Avoid Common Installation Mistakes
Even small errors can ruin your project. Learning from others’ mistakes saves time, money, and frustration.
| Mistake | How to Prevent |
|---|---|
| Drilling too deep | Use tape depth marker on drill bit |
| Mounting only in drywall | Always find and use studs for heavy loads |
| Missing the stud | Re-scan and remeasure before drilling |
| Uneven brackets | Level at every step, use shims if needed |
| Overloading | Respect weight limits and distribute load |
Golden Rule: Measure twice, drill once, and always attach to the stud.
Maintain and Reinstall Floating Shelves
A well-installed shelf lasts for years, but it needs occasional care to remain secure and attractive.
Annual Maintenance Checklist
Inspect for loose screws or sagging at least once per year. Retighten bracket and underside screws as needed. In bathrooms or kitchens, check for wood warping or metal corrosion caused by humidity.
Relocating or Removing
Patch old holes with spackle for drywall or mortar for masonry before repainting. For broken anchors in masonry, patch carefully before applying new finish. Contact the manufacturer for replacement fixings if relocating the shelf.
Style Your Floating Shelves Professionally
Floating shelves aren’t just functional storage. They’re design features that showcase your personal style.
Choose the Right Material
Solid wood options like pine, oak, or walnut offer durability and timeless appeal. Engineered wood with veneer provides a budget-friendly alternative but proves less durable over time.
Eco Note: Solid wood uses fewer chemicals than MDF or particleboard, making it a greener choice for environmentally conscious homeowners.
Match the Finish to Your Decor
Rustic natural finishes suit farmhouse or cottage style. Smooth contemporary finishes complement modern or minimalist spaces. Distressed shabby-chic works in vintage or eclectic rooms. Industrial finishes with metal accents fit lofts or urban settings.
Style Like a Pro
Follow the rule of threes by grouping items in odd numbers for visual balance. Mix heights, textures, and functional pieces for dynamic appeal. Leave negative space to avoid a cluttered appearance. Rotate displays seasonally to keep your space feeling fresh.
Frequently Asked Questions About Installing Floating Shelves
Are floating shelves hard to install?
Installing a floating shelf is straightforward if you have the right tools and take your time. The key challenges involve ensuring perfect leveling and locating wall studs accurately. Mistakes like drilling at an angle or missing the stud can lead to a slanted or unstable shelf. Proceed slowly, measure twice, and verify alignment at each step.
Can I hang a floating shelf on drywall?
Yes, you can mount a floating shelf on drywall, but only with proper anchors and for light loads. For heavier shelves exceeding 10 kg, always anchor into wall studs. Drywall alone cannot support significant weight over time, regardless of how sturdy your brackets appear.
How much weight can a floating shelf hold?
Weight capacity depends on the shelf material and mounting method. MDF holds 5–10 kg, engineered wood supports 10–20 kg, solid pine handles 25–35 kg, and hardwood with steel brackets carries 35–50+ kg. Always attach to studs for maximum capacity.
Do I need to find wall studs for floating shelf installation?
Yes, finding and attaching to wall studs provides the strongest and most secure installation. Studs offer holding power that drywall anchors simply cannot match. Use a stud finder to locate studs accurately before drilling.
What happens if I drill into a pipe or wire?
Drilling into hidden pipes or wires causes serious damage and potential safety hazards. Always use a wall scanner before drilling to detect electrical wiring, plumbing, and metal obstructions. If you suspect damage after drilling, stop immediately and consult a professional.
Can I install a floating shelf on tile?
Yes, tile installation requires diamond-coated or carbide-tipped drill bits. Start at low RPM with light pressure to prevent cracking. Mark hole centers precisely because tile cannot be repaired once cracked.
Key Takeaways for Installing Floating Shelves
Installing a floating shelf doesn’t have to be intimidating. With the right tools, a reliable stud finder, and attention to detail at every step, you can achieve a clean, secure, and stylish result. The most critical factors are anchoring into wall studs rather than relying solely on drywall, using proper hardware matched to your wall type, and double-checking level alignment throughout the installation process.
Remember that weight capacity varies significantly based on materials and mounting method. A solid pine shelf attached to studs supports up to 35 kg, while the same shelf mounted only in drywall might hold just 10 kg. Always respect these limits and distribute weight evenly across the shelf surface.
Now that you know how to install a floating shelf the right way, you’re ready to add functional elegance to any room in your home. Take your time with the preparation, follow each step carefully, and you’ll enjoy beautiful, wobble-free shelves for years to come.


