

Installing shelf brackets might seem simple, but doing it right ensures your shelves stay level, secure, and capable of holding their intended load for years. Whether you’re mounting a floating shelf in the living room or a heavy-duty pantry rack, how to install shelf brackets correctly comes down to planning, precision, and using the right hardware for your wall type. This guide walks you through every step, from locating studs to securing the shelf, with pro tips, common mistakes to avoid, and solutions for tricky surfaces like tile and concrete.
Plan Shelf Height and Position
Set Correct Mounting Height
Most people install shelves at 54 inches from the floor to the top of the shelf, a standard eye-level height ideal for display and accessibility. If your shelf is ¾ inch thick, mark the bracket mounting line at 53¼ inches to account for the shelf thickness.
For multi-shelf units like bookcases or pantries, use 14-inch vertical spacing between shelves. This provides balanced proportions and enough room for most items.
Visualize Placement with Tape
Before drilling, use painter’s tape to outline the shelf position on the wall. Apply the tape at your marked height and use a level to keep it straight. This low-risk method lets you see how the shelf will look, check for obstructions, and confirm symmetry with nearby furniture or cabinets.
Locate and Mark Wall Studs

Scan with a Stud Finder
Use an electronic stud finder to locate studs along your level line. Most walls have studs spaced 16 inches apart, but this is not guaranteed. Always verify. Mark the center of each stud with a pencil.
If you are installing multiple brackets, adjust their positions slightly to align with studs whenever possible.
Know Your Wall Composition
Standard drywall is ½ inch thick, so screws need to be at least 1½ inches long to penetrate ½ inch into drywall plus 1 inch into the stud for solid support. Never rely on drywall alone for heavy loads.
For plaster or lath walls, be extra cautious. Plaster can crack easily and is not load-bearing. Use toggle bolts if no stud is available.
Pre-Drill All Necessary Holes
Pilot Holes in Wood Studs
Always pre-drill pilot holes before driving screws into wood. This prevents splitting and makes installation easier.
Use a 3/16-inch drill bit for lag bolts going into studs. Drill to a depth that allows full screw penetration without going too far through the back of the stud.
Pre-Drill Shelf Attachment Points
To prevent splitting the shelf when securing it to brackets, use a 3 mm drill bit. Drill 1 cm deep at each bracket contact point on the bottom of the shelf. These pilot holes allow screws to grip without cracking the wood.
Choose the Right Fasteners by Wall Type
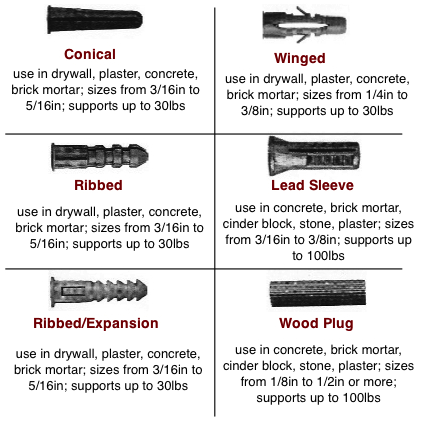
Into Wood Studs
Use 1½-inch sheetrock screws or lag bolts. The recommended drill bit is 3/16 inch. Lag bolts offer superior strength for heavy shelves. Use a 7/16-inch wrench to tighten, but do not over-tighten or the bolt head may snap.
Into Drywall Without Studs
For light loads, use threaded drywall anchors. Tap in with a hammer until flush. Do not pre-screw, as it can shear the tip. For heavy loads, use toggle bolts or snap toggles. Drill a 5/8-inch hole, insert the toggle, and tighten until snug.
On Tile Surfaces
For tile over studs, drill through tile first with a diamond or carbide-tipped masonry bit. Use XL lag bolts to span tile plus drywall plus stud. For tile with no studs, use toggle bolts with a 5/8-inch diamond core bit. Apply painter’s tape to the tile surface before drilling to reduce chipping.
Brick or Concrete Walls
Use an 8 mm masonry bit to drill at least 7 cm deep. Insert plastic or metal wall plugs, then drive in screws or use engineered masonry bolts. Secure with a socket wrench for proper torque.
Install Brackets: Stud vs. Drywall Mounting
Mount Outer Brackets in Studs
Position brackets so the long leg is vertical, attached to the wall. This orientation provides better load distribution. Align with marked stud centers. Insert lag bolts through bracket holes into pre-drilled pilot holes and tighten securely with a wrench.
For a 48½-inch shelf, place outer brackets about 4 inches from each end.
Add Center Bracket on Drywall If Needed
Even if ends are in studs, long shelves need center support. If no stud is behind the center, use a toggle bolt. Drill a 5/8-inch hole, insert the toggle, and tighten until firm. Alternatively, use threaded drywall anchors for medium loads.
Set Correct Bracket Spacing
Two-Bracket Rule
Every shelf needs at least two brackets, one near each end. Place them 3 to 4 inches from the shelf ends to prevent tipping and edge stress.
Add a Center Bracket for Long Shelves
Use three brackets for shelves over 36 inches. For a 48-inch shelf, center bracket goes at 24¼ inches from either end. For heavy loads like books or tools, reduce spacing to 10 to 12 inches between brackets. A 120 cm shelf can use four brackets spaced 30 cm apart, adjusted to hit studs.
Determine Bracket Orientation
Long Leg Down Is Recommended
The recommended orientation for most shelves is long leg vertical on the wall. The vertical leg should be at least ¾ the depth of the shelf. For example, a 12-inch vertical leg supports up to a 16-inch deep shelf. Top two screws bear the most load, resisting the shelf pulling away from the wall.
Short Leg Down for Wide Shelves
This orientation is used for very wide shelves where horizontal reach is more important. It is less common and generally less stable under heavy loads.
Level Brackets Before Securing
Use the Shelf to Check Level
After installing all brackets, place the shelf on top. Lay a small level across the surface. If the bubble is off-center, one bracket is higher than the others.
Adjust Bracket Height
Loosen the bracket screws slightly, not fully removed. Tap up or down with a hammer or shift by hand. Use plastic shims behind the bracket if the wall is uneven. Recheck level after each adjustment. Once level, re-tighten all screws securely. For heavy shelves, have a helper support the load during adjustments.
Mount and Secure the Shelf
Position the Shelf Correctly
Set the shelf onto the brackets and check for even overhang. For example, a 48-inch shelf on a 60-inch wall should have 6 inches of overhang on each side. Adjust bracket positions if needed before final fastening.
Fasten Shelf to Brackets
For stability, especially with L-brackets, drive 1-inch screws from the bottom of the bracket up into the shelf. Use pre-drilled 3 mm holes to prevent splitting. Do not exceed ¾ inch in depth to avoid poking through the top.
J-Brackets vs. L-Brackets
J-brackets have a front lip that holds the shelf in place, so less fastening is needed. L-brackets require direct fastening since the shelf just rests on the arm.
Handle Special Surfaces Carefully
Drilling Through Tile
Use a diamond-tipped or carbide masonry bit. Apply low speed and light pressure. Cool the bit with water or spray to prevent overheating and cracking. Tape the tile surface first to reduce chipping.
Installing on Brick or Concrete
Use a hammer drill with masonry bit for clean holes. Insert wall plugs before driving screws. Match bolt length to bracket thickness and expected load.
Working with Plaster Walls
Plaster is brittle. Never rely on it alone. Drill carefully to avoid cracking. Use toggle bolts or masonry anchors if no stud is available.
Avoid Common Installation Mistakes
Skipping the Stud Finder
One installer reported redoing the job after assuming stud locations. Always verify with a stud finder.
Over-Tightening Screws
This can break lag bolt heads or crack drywall. Tighten until firm, not forced.
Forgetting Pilot Holes
Drilling into wood or shelf without a pilot hole risks splitting the material.
Misaligned Brackets
Even 1/8 inch off can cause sagging or wobbling. Use a level and double-check.
Maximize Weight Capacity and Safety
Know Your Bracket Load Limit
Light-duty brackets support 11 to 22 lbs per bracket for decorative shelves. Medium-duty supports 33 to 55 lbs for standard storage. Heavy-duty supports 66 to 110+ lbs for bookshelves and pantries. Never exceed 80% of rated capacity for long-term safety.
Distribute Load Evenly
Place heavier items near the wall and over brackets. Avoid overloading the front edge.
Maintain and Inspect Over Time
Check for Loosening
Screws can loosen in the first 3 to 6 months due to settling. Retighten as needed.
Inspect Annually
Look for cracks around anchor points, pull-through in drywall, rust on metal brackets, and loose screws or wobbling. Clean with a damp cloth and avoid abrasive cleaners that damage finishes.
Match Brackets to Your Decor
Coordinate Finishes
Choose bracket finishes that match other hardware. Use matte black for modern kitchens, brass or antique bronze for vintage looks, and stainless steel for bathrooms or garages.
Design Tips
Use hidden or floating brackets for a minimal look. Exposed black iron or ornate brackets can become design features. Replace standard screws with decorative bolts for a custom touch.
Troubleshoot Common Problems
Shelf Sags Over Time
Cause: Wide bracket spacing or undersized hardware. Fix: Add a center bracket or upgrade to heavy-duty toggles or studs.
Brackets Pull Out of Wall
Cause: Drywall anchors too small or over-tightened. Fix: Replace with toggle bolts or relocate to studs or masonry.
Shelf Is Not Level
Cause: Uneven bracket mounting. Fix: Loosen screws, use shims, re-level, and retighten.
Tile Cracks During Drilling
Cause: Excessive pressure or wrong bit. Fix: Use low speed, tape, and diamond bit. Drill slowly.
Shelf Wobbles
Cause: Loose screws or uneven wall. Fix: Retighten all fasteners and check bracket flushness.
Pro Tips from Experienced Installers
Skip the Bottom Wall Screw
Some pros omit the bottom screw when mounting in studs. It makes future removal easier and reduces patching.
Avoid Particleboard Mounting
A 16-year-old cabinet failed due to back disintegration. Use solid wood or metal supports for long-term durability.
Document Your Work
Take photos during installation. They help spot alignment issues early and serve as guides for future projects.
Final Checklist: 10-Step Installation Summary
- Plan height. Mark 53¼ inches for a ¾-inch shelf at 54-inch finished height.
- Visualize position. Use tape and level line.
- Find studs. Mark centers with stud finder.
- Pre-drill holes. Use 3/16-inch for studs, 5/8-inch for toggles, 8 mm for masonry.
- Install outer brackets. Place in studs, long leg vertical.
- Add center bracket. Use toggle or anchor if no stud.
- Level brackets. Use shelf plus level. Adjust with shims.
- Mount shelf. Center evenly. Check overhang.
- Secure shelf. Use 1-inch screws from bracket bottom. Pre-drill holes.
- Inspect final setup. Confirm level, tightness, alignment.
Key Measurements at a Glance
Standard shelf height is 54 inches from the floor. Shelf thickness is ¾ inch. Mounting line for a ¾-inch shelf is 53¼ inches from the floor. Stud spacing is 16 inches on center. Bracket setback from end is 4 inches. Maximum bracket spacing for medium load is 12 to 16 inches. Heavy-duty bracket spacing is 10 to 12 inches. Masonry hole depth must be at least 7 cm. Shelf pilot hole depth is 1 cm.
Frequently Asked Questions About Installing Shelf Brackets
How Do I Know If My Wall Can Support Shelf Brackets?
Check your wall composition first. Drywall alone cannot support heavy loads. You must anchor into wood studs, use toggle bolts for drywall, or use masonry anchors for brick and concrete. Standard drywall is ½ inch thick, so screws need at least 1½ inches to reach studs.
What Is the Best Height to Install Shelf Brackets?
The standard finished height is 54 inches from the floor to the top of the shelf. For a ¾-inch thick shelf, mark your mounting line at 53¼ inches. Adjust based on your specific needs and shelf thickness.
How Many Brackets Does Each Shelf Need?
Every shelf needs at least two brackets, one near each end. Add a center bracket for shelves over 36 inches long. For heavy loads, reduce spacing between brackets to 10 to 12 inches.
Can I Install Shelf Brackets on Tile?
Yes. Use a diamond-tipped or carbide masonry bit. Apply painter’s tape to the tile surface first to reduce chipping. Drill at low speed with light pressure. If studs are behind the tile, use XL lag bolts. If no studs are available, use toggle bolts.
What Happens If I Skip Pre-Drilling Pilot Holes?
Without pilot holes, screws can split wood studs and shelf material. Pilot holes prevent this damage and make screw insertion easier. Use a 3/16-inch bit for lag bolts and a 3 mm bit for shelf attachment points.
How Often Should I Inspect My Installed Brackets?
Check brackets 3 to 6 months after installation, as screws often loosen during this settling period. Perform annual inspections thereafter. Look for loose screws, wall cracks, rust, or any signs of pulling away from the wall.
Key Takeaways for Installing Shelf Brackets
Installing shelf brackets properly takes a little more time upfront, but it pays off in safety, durability, and a professional appearance. Always anchor into studs when possible, use the right fasteners for your specific wall type, and level meticulously at every step. Remember the three-quarters rule for bracket orientation, and never exceed 80% of your bracket weight capacity. With this guide, you are equipped to handle any shelf installation, whether it is a simple floating shelf or a heavy-duty storage system. Take photos during the process to reference later, and check all fasteners periodically to ensure long-term stability.


