

If you’re searching for a practical way to organize your entryway, a DIY coat hook shelf offers the perfect blend of storage and style. This wall-mounted project gives you a dedicated spot for coats, bags, and leashes while providing a small shelf surface for keys, sunglasses, or everyday essentials. Best of all, learning how to make a coat hook shelf requires only basic tools, affordable materials, and a few hours of your time. Whether you’re a beginner or experienced builder, this guide walks you through every step from cutting and shaping to finishing and mounting. You’ll end up with a custom piece that costs under $30 and adds real value to your home.
Materials and Tools Needed for Your Coat Hook Shelf
Before starting your project, gather all required materials and tools to ensure smooth construction. Having everything ready prevents interruptions during the building process.
Essential Wood Materials
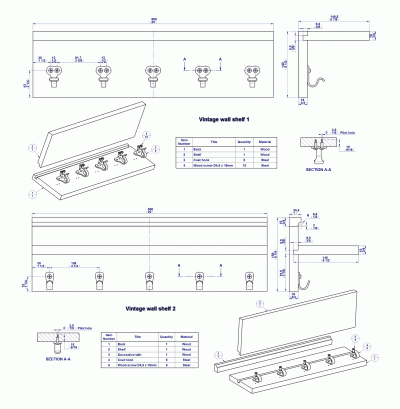
You can use scrap wood or purchase new lumber for this build. The main components needed include a vertical back board measuring 29 inches long by 5¾ inches wide, and a top shelf board cut to 30½ inches long by 6¼ inches deep. This extra length creates a ¾-inch overhang on each side for visual balance. You will also need two support pieces, either triangular braces or decorative coral-shaped supports, each approximately 4½ inches square.
Required Tools
The following tools will handle most of your work. A miter saw or circular saw handles straight cuts, while a band saw proves useful if you want curved coral supports. A drill with countersink bit creates pilot holes and secures fasteners. You need clamps to hold pieces steady during assembly, a router with an ogee bit for decorative edges, and a block sander for smoothing surfaces. A level ensures accurate wall mounting, and a stud finder locates wall framing for secure attachment.
Cut Wood Components to the Correct Size
Precision in cutting directly affects the quality of your finished project. Take time to measure twice and cut once for professional results.
Cut the Main Boards
Start by cutting your vertical hook board to 29 inches long by 5¾ inches wide. This board serves as the backing that holds your hooks and supports the entire structure. Next, cut the top shelf board to 30½ inches long by 6¼ inches deep. The additional length beyond the backing board creates the balanced overhang that gives your shelf a polished look. If you prefer a larger build for a mudroom, you can extend to 36 inches long using 4½-inch-wide boards.
Prepare the Support Pieces
Your supports attach the shelf to the back board and can be functional or decorative. For simple triangular braces, cut two right triangles with legs measuring 4 inches and 5 inches. The hypotenuse calculates to approximately 6.4 inches using the Pythagorean Theorem. For decorative coral-shaped supports, start with a 4½-inch by 4½-inch square and use a gallon paint can as a template to trace a curved edge. Cut the curve with a band saw, then sand smooth.
Shape Decorative Elements and Edges
Adding profiled edges elevates your shelf from basic to beautiful. These details catch light and add visual interest to your finished piece.
Route an Ogee Edge on the Shelf
Use an ogee router bit on the top front edge of your shelf board for a classic, elegant profile. Secure the shelf in a vise or with clamps, then run the router from right to left for smooth cutting. Lightly sand after routing to remove any tear-out or rough spots. This detail works beautifully with farmhouse, modern, or transitional décor styles.
Soften All Support Edges
Regardless of your support shape, round over all exposed edges for safety and appearance. Use a ¾-inch round-over bit on your router, or sand by hand progressing through 120-grit to 220-grit paper. The goal is smooth, splinter-free curves that feel good to the touch and won’t snag clothing.
Apply a Weathered Wood Finish
Finishing before assembly ensures complete coverage and makes touch-ups easier. Choose a method that matches your style preference.
Create a Cerused Weathered Effect
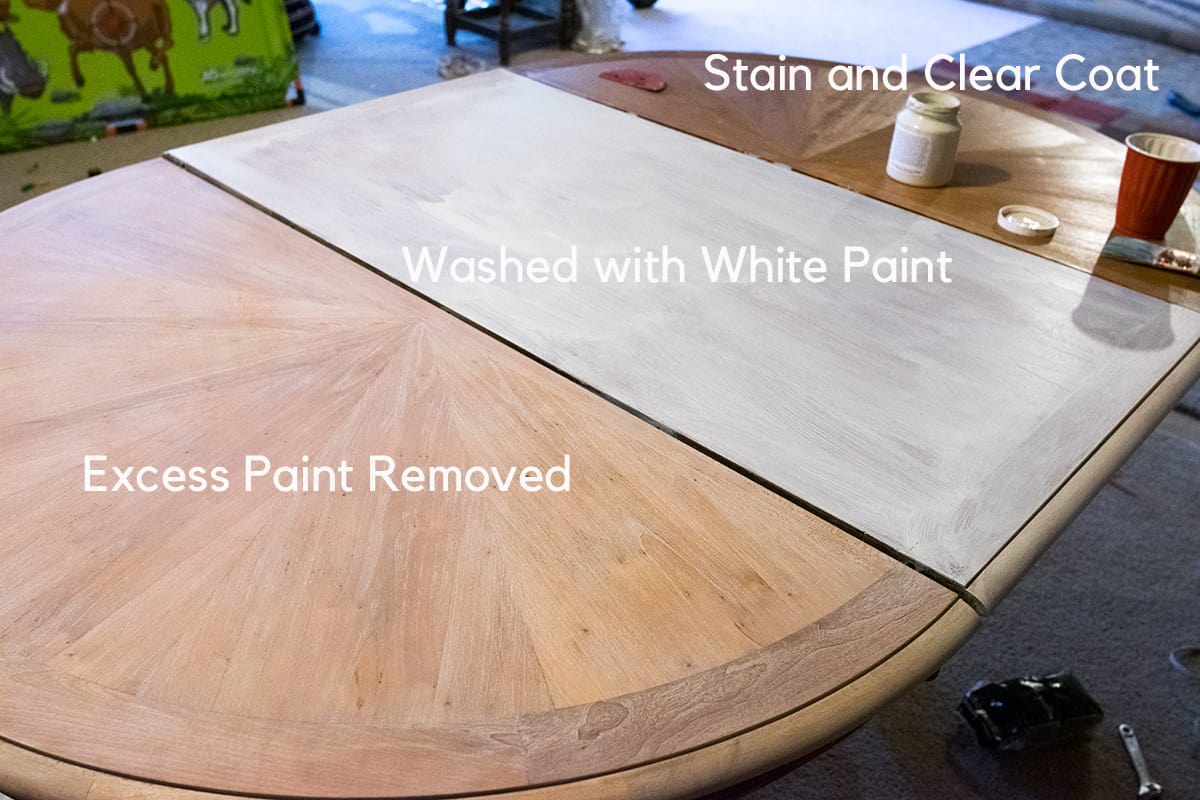
This technique highlights wood grain while adding vintage character, perfect for pine or softwood. Apply Minwax Jacobean water-based stain with a cloth, let sit 5 minutes, then wipe off excess. Lightly brush on diluted beige-grey paint, immediately wiping back with a cloth to leave residue in the grain. Repeat the stain-paint-wipe cycle until achieving your desired tone, usually two to three layers. Let dry completely, then apply two coats of clear furniture wax, buffing between layers with a clean cloth. Final polish with extra-fine steel wool creates a silky matte finish that resists fingerprints.
Try a Glazed Finish for White Ash
If using hardwood like white ash, a Unicote glaze enhances depth and shadow in routed details. Mix three parts glaze to one part activator, then wait 5 minutes before use. Brush the mixture over the wood surface and wipe excess with a paper towel, leaving pigment in recesses. This method dries to a waterproof, weathered look in a single coat and pairs excellently with ogee edges or carved supports.
Attach Supports to the Back Board

This step anchors your shelf and requires careful attention to prevent splitting or misalignment. Proper support placement ensures your shelf holds weight without sagging.
Position and Fasten Triangular Braces
Place triangular braces 2.5 inches from each end of your 29-inch back board. Align the 4-inch leg horizontally to support the shelf, with the 5-inch leg fastening to the backboard. Clamp the vertical board and brace together, then drill countersunk pilot holes through the backboard into the brace. Use one 1.5-inch screw and one 2-inch screw per brace, driving slowly to prevent wood splitting. The shorter screw avoids poking through the tapered end.
Attach Coral-Shaped Supports
For decorative coral supports, attach them to the back of the vertical board using three 18-gauge 1½-inch nails per side. Space nails evenly and angle slightly for improved grip. No clamping is needed since nails provide quick, secure fastening. This method works faster than screws but requires careful hammer technique to avoid denting the wood.
Mount the Shelf Board Securely
With supports attached, you can now secure the shelf board to complete the main structure. This connection must be solid to prevent wobbling.
Align and Fasten the Shelf
Center the 30½-inch shelf over the 29-inch back board so the ¾-inch overhang appears equal on both sides. Clamp the shelf to the vertical board to maintain alignment during fastening. Drive 1½-inch nails horizontally through the shelf into the supports, using two nails per side. For coral supports, add one vertical nail from the top down into each support for front stability. Avoid glue-only joints since mechanical fasteners ensure long-term durability.
Add Optional Trim Pieces
Trim pieces increase functionality and visual polish. These additions are optional but significantly enhance the finished appearance.
Install a Backstop Strip
Cut a 1-inch-wide strip to 28¼ inches point-to-point, mitering both ends at 45 degrees so they meet cleanly at corners. Glue and nail this strip to the rear edge of the shelf to prevent small items from sliding off the back. This detail proves especially useful in high-traffic areas where items get placed quickly.
Attach Side Trim
Cut two trim pieces, each 5½ inches long, with ends mitered at 45 degrees and the long point facing outward. Glue and nail to the sides of the shelf to create a framed look. Use stain-matched wood filler to conceal nail holes, then touch up with a small brush.
Install the Coat Hooks
Hooks provide the functional purpose of your shelf. Proper selection and placement maximize usability while maintaining visual balance.
Select and Space Your Hooks
Choose hooks that complement your finish, such as oil-rubbed bronze or black iron for rustic charm. Available at most home improvement stores, these hooks use two front-mounted screws each. Mark hook positions along the 29-inch span, centering at 14.5 inches and spacing hooks every 5 inches from center at positions 5, 10, 15, 20, and 25 inches. Use a Vex centering bit to drill pilot holes for perfect alignment, marking the centerline on the backboard before drilling.
Trim Excess Screw Length
Factory screws provided with hooks are often too long for your wood thickness. Use diagonal pliers to cut excess length while retaining the oil-rubbed bronze heads for consistent finish appearance.
Mount the Shelf to Your Wall
Final installation determines how well your shelf performs over time. Secure mounting into solid wall framing supports significant weight.
Locate Wall Studs and Drill Pilot Holes
Use a stud finder to identify 16-inch-on-center framing behind your wall. Mark stud positions corresponding to mounting points on the back of your unit. Drill countersunk pilot holes in the back board beneath each hook location. Mounting into studs safely supports 20 to 30 pounds.
Secure With Appropriate Fasteners
For stud mounting, use 2.5-inch wood screws driven fully into the framing. In drywall-only areas without accessible studs, install toggle bolts or heavy-duty drywall anchors. Never rely on screws alone in drywall as they will pull out under load. Hold the unit against the wall, use a level to ensure it sits straight, then tighten all screws fully. One person can install, but two make alignment easier.
Customize Your Coat Hook Shelf Design
This design adapts easily to your specific needs and décor preferences. Simple modifications accommodate various spaces and styles.
Adjust Dimensions for Your Space
For narrow walls, reduce the overall length to 24 inches or use only three hooks. For larger mudrooms, extend to 36 inches with six or seven hooks. Increase shelf depth from 6¼ inches to 10 inches if you need to hold larger items like baskets or bins.
Match Your Home Décor
Choose finishes and hardware that complement your existing style. Farmhouse settings pair well with cerused finishes and oil-rubbed bronze hooks. Modern spaces benefit from glazed white ash with sleek black metal hooks. Minimalist interiors work with natural wood and clear sealant plus simple brass hooks.
Frequently Asked Questions About Making a Coat Hook Shelf
What type of wood works best for a coat hook shelf?
Softwoods like pine or cedar work well for budget builds, while hardwoods like white ash offer durability and prominent grain. Scrap wood from old furniture or flooring also works if the dimensions allow.
How much does it cost to build a coat hook shelf?
Total cost runs under $30, especially when using scrap wood. New lumber costs approximately $10 to $15, hooks run $5 to $10, and finishing supplies add another $5 to $10.
How long does the project take?
Experienced builders complete the project in under 2 hours. Beginners should allow a half day, with most time spent on finishing and careful measurement.
Can I mount this shelf on drywall only?
You can mount on drywall using toggle bolts or heavy-duty anchors, but the capacity is limited. For best results, locate and mount into wall studs for 20 to 30 pounds of support capacity.
What is the best finish for high-traffic areas?
A cerused finish with furniture wax provides excellent durability and tactile quality. The wax layer resists fingerprints and can be refreshed annually without heavy refinishing.
Key Takeaways for Building Your Own Coat Hook Shelf
Building a coat hook shelf represents an affordable, satisfying project that delivers practical storage and personal pride. The total cost stays under $30 with most materials, and you can complete the build in less than two hours as an experienced maker or a single afternoon as a beginner. Focus on precise measurement during cutting, pre-finish all pieces before assembly for complete coverage, and always mount into wall studs for secure, wobble-free performance. With attention to detail throughout the process, your handmade coat hook shelf will serve your family for years while adding custom character to your home.


