

If you’ve ever admired the elegant trim work in high-end homes but thought it was out of reach for a DIYer, here’s the secret: you can create a stunning crown molding shelf with just a few basic tools and less than $25 in materials. This project transforms simple lumber and standard crown molding into a custom wall shelf that looks like it came from a luxury bathroom remodel. Originally featured in WOOD Magazine, the design has gained popularity among beginner and intermediate woodworkers for its professional look, simple construction, and versatility in small spaces like hallways, half baths, or above toilets.
You don’t need advanced trim skills, especially if you use a Kreg Crown Pro, which takes the guesswork out of cutting perfect outside corners. Whether you’re finally checking off a honey-do list item or adding architectural detail to a blank wall, this guide walks you through every step from assembling the base to gluing the molding, caulking seams, painting, and installing creative hardware.
Gather Materials and Tools for Your Crown Molding Shelf
Before starting, collect all required materials from your local hardware store or scrap inventory. Having everything ready prevents interruptions during assembly and ensures a smoother building process.
Materials Needed
You will need two pieces of 1×6 pine boards cut to your desired length, typically 25 inches for tight spaces. One board serves as the horizontal top surface while the other becomes the vertical backer that prevents items from falling behind the shelf. You’ll also need standard crown molding long enough to span the front edge plus two return stops, construction adhesive, painter’s tape, caulk, and white paint or your preferred finish color.
Tools That Simplify the Process
A miter saw is essential for making precise angled cuts on crown molding. A Kreg Jig creates hidden pocket holes for joining the shelf base boards, while the Kreg Crown Pro jig eliminates the math and guesswork typically required for crown molding cuts. You’ll also need clamps, a straight edge, caulking gun, sandpaper, and basic safety equipment including safety glasses and hearing protection.
Build the Shelf Base with Pocket Holes
The foundation of your crown molding shelf consists of two boards forming an L-shape that provides both a horizontal display surface and a vertical back splash. This simple construction uses pocket hole joinery to create strong, invisible connections.
Create Pocket Holes for Hidden Joints
Drill pocket holes along the back edge of the top board using a Kreg Jig set to your desired thickness. Then, clamp the vertical backer flush with the rear of the top board and secure it with 1¼-inch pocket screws. This method creates strong, invisible connections and ensures perfect alignment without complex joinery.
Pro Tip: If you’re new to pocket holes, pre-drill pilot holes in the backer board near the top to prevent splitting when driving screws.
Once assembled, the base should form an L-shape with a 5.5-inch-deep shelf and roughly 7.25 inches of height from the wall. Sand all surfaces lightly to remove splinters and prepare for finishing.
Cut Crown Molding for Perfect Outside Corners
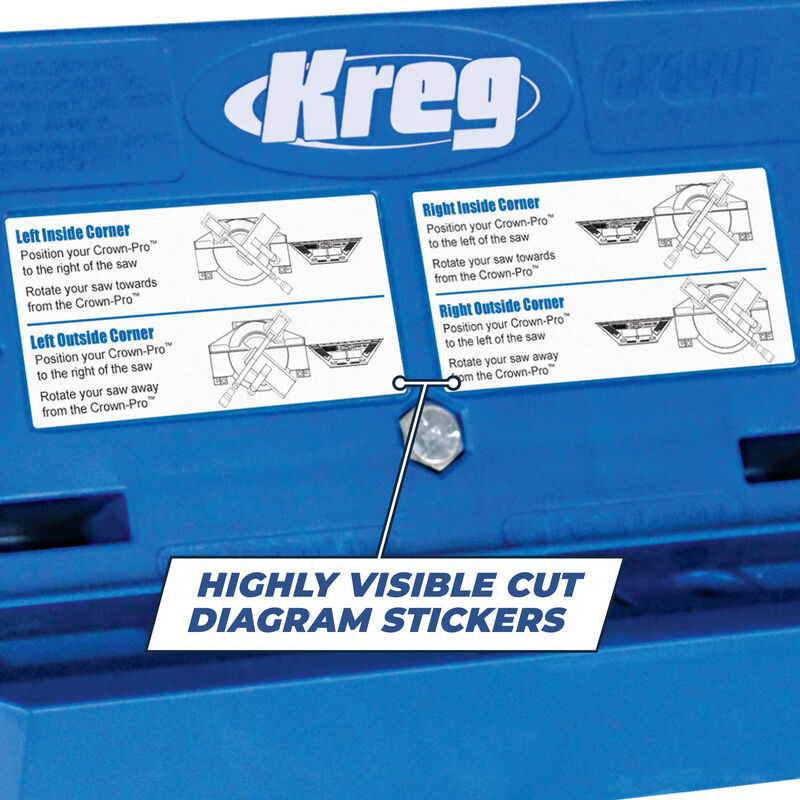
The visual impact of this shelf comes from decorative crown molding wrapped around the front edge. Getting clean corners requires precise 45-degree angle cuts, and the Kreg Crown Pro makes this surprisingly straightforward.
Use the Kreg Crown Pro for Foolproof Cuts
Place the molding upside down on the jig for accurate setup. For the left end, position the molding on the right side of the blade and set your miter saw to 45 degrees away from the jig. Flip the setup for the right end by placing molding on the left side at the same 45-degree angle. This creates matching left and right outside corner cuts that fit together perfectly when assembled.
No Kreg Crown Pro? Nest the molding in the sprung position, pressed between the saw fence and table at a 45-degree spring angle, to achieve accurate compound miters manually.
Cut three pieces total: one long center piece spanning the full shelf width, plus two short return stops (3-4 inches long) with opposing angles that cap each end like a picture frame.
Assemble the Molding Before Attaching
Don’t glue the molding directly to the shelf. Instead, pre-assemble the three pieces into one solid molding unit first. This dry-fit method ensures tight seams and reduces stress during installation.
Glue and Tape the Corners
Apply construction adhesive to the mitered ends of the center piece. Press the return stops into place to form closed corners. Then, wrap painter’s tape over each joint to hold alignment while the glue dries, typically 15-30 minutes for fast-drying adhesives.
Visual Cue: The crown should project slightly forward and sit flush with the bottom edge of the shelf.
Once cured, test-fit the entire molding assembly on the shelf front to confirm coverage and alignment before proceeding to attachment.
Attach Crown Molding to the Shelf Base
Now it’s time to secure the molding to the shelf. Accuracy here ensures a professional finish that hides all fasteners and creates clean lines.
Use a Straight Edge as a Guide
Clamp a straight edge to the underside of the shelf, aligned flush with the front edge. This acts as a support and angle reference so the crown sits consistently across the entire length. Hold the assembled molding in place against the front edge, pressed snugly to the straight edge.
Drive 18-gauge finish nails through the back of the molding into the shelf base, using two nails at each end and one in the center. Pre-drill nail holes slightly smaller than the nail diameter, especially near joints, to avoid splitting the thin molding.
Keep gentle pressure on the molding during nailing to maintain contact and alignment. Remove the straight edge once the molding is secure.
Seal Joints with Caulk for Professional Results
Even perfect cuts leave tiny gaps at the seams. That’s where caulk transforms rough joints into clean, seamless transitions that look professionally finished.
Tape Before You Caulk
Run painter’s tape along both sides of each seam, where return stops meet the main molding and where molding meets the shelf. This prevents messy caulk bleed and creates razor-sharp lines.
Apply a thin bead of painter’s caulk along each joint using a caulking gun. Immediately remove the tape while the caulk is still wet to avoid peeling. Let dry completely, usually 1-2 hours, then lightly sand any ridges with 220-grit paper. Wipe clean with a tack cloth before painting.
Pro Tip: Choose latex caulk that matches your paint color for invisible blending.
Paint for a Flawless Finish
Painting transforms raw wood into a polished architectural feature that complements any bathroom or hallway decor. The right technique ensures smooth, even coverage without brush marks.
Sand, Prime, Then Paint
Lightly sand all surfaces, including molding and joints, to create a smooth base. Wipe away dust with a tack cloth. Apply primer if using raw wood or porous MDF-style molding, as this improves paint adhesion and coverage.
Then, apply 2-3 coats of semi-gloss or satin white paint using a mini roller for flat areas and a small brush for crevices. Allow full drying between coats following manufacturer recommendations.
Why White? A crisp white finish highlights the molding’s detail and gives a clean, timeless look perfect for bathrooms and hallways.
Let the final coat cure for at least 24 hours before handling or installing to avoid smudges and ensure hard finish.
Add Functional Hardware (Optional)
Turn a purely decorative shelf into a practical bathroom accessory by adding towel hangers or hooks. This upgrade increases functionality without complicating the build.
Install Hose Spigot Handles
One popular upgrade uses repurposed wheel handles from garden hose spigots as towel hangers. Mount them below the shelf or on the back panel using existing screw holes. Pre-drill mounting holes to prevent splitting, then use short wood screws or machine bolts depending on handle type. Position one or two handles based on shelf length and intended use.
Users report these industrial-chic accents boost both function and visual appeal, especially in half baths. Alternative options include brass cup hooks, small towel bars, or vintage drawer pulls for different aesthetic styles.
Mount the Shelf to the Wall
The final step secures your masterpiece to the wall. Proper anchoring ensures the shelf supports items without sagging or pulling away from the wall over time.
Anchor Into Studs or Drywall
Hold the shelf against the wall at desired height, commonly 72-78 inches from the floor in bathrooms. Mark screw locations through the backer board. If possible, drive screws into wall studs for maximum hold. If studs don’t align, use drywall anchors rated for at least 50 pounds.
Tip: Use a level to ensure the shelf is perfectly horizontal before tightening screws.
Once mounted, step back and admire the transformation: a custom-built look achieved with simple materials and smart techniques.
Customize Your Crown Molding Shelf Design
This basic build is highly adaptable. Once you understand the core construction, you can modify dimensions, materials, and finishes to match your specific needs and aesthetic preferences.
Adjust Size and Style
Cut longer boards (36 inches) for wider walls or shorter (18 inches) for tight corners. Use 1×8 boards for deeper shelves or hardwood for a stained finish instead of painted. Choose a crown molding profile with moderate detail, avoiding overly ornate styles that prove harder to cut and assemble.
Try black, navy, or stained wood for modern or rustic variations. Just ensure the backer board is wide enough to hide mounting hardware and provide sufficient stability for your intended load.
Avoid Common DIY Mistakes
Even simple projects can go wrong without attention to detail. Knowing these pitfalls in advance helps you achieve professional results on your first attempt.
Watch Out for These Errors
Skipping the dry fit guarantees alignment problems later. Always test-fit the molding before gluing. Rushing caulk removal causes torn seams, so pull tape at the right moment. Over-applying caulk creates messy blobs that require sanding. Using dull blades results in rough, chippy cuts that ruin the finished appearance. Ignoring pre-drilling leads to splits near edges, especially in thin molding.
Take your time. The difference between DIY and pro-level work lies in the details.
Frequently Asked Questions About Making a Crown Molding Shelf
What type of wood works best for a crown molding shelf?
1×6 pine boards work well because they’re affordable, readily available, and easy to cut and finish. You can upgrade to hardwoods like oak or maple if you prefer a stained finish rather than painted.
Do I need special tools to cut crown molding?
A miter saw is essential for accurate angle cuts. The Kreg Crown Pro jig simplifies the process significantly by providing labeled positions for inside and outside corners, but you can also achieve good results using the spring angle method with a standard miter saw.
How long does it take to build a crown molding shelf?
The build takes 2-4 hours total, including time for glue drying and paint curing. Most of this time is active work, not waiting, so you can complete the project in a single afternoon.
Can I install this shelf in a bathroom with high humidity?
Yes. The shelf performs well in humid environments when properly finished with paint and sealed with caulk. Use semi-gloss or satin paint for better moisture resistance, and re-caulk joints periodically if needed.
How much does it cost to build a crown molding shelf?
Total material cost is under $25, excluding tools. This includes the lumber, crown molding, adhesive, nails, caulk, and paint. The Kreg tools are one-time investments that pay for themselves after a few projects.
Key Takeaways for Building a Crown Molding Shelf
Building a crown molding shelf is an accessible, high-impact DIY project that transforms simple materials into a custom architectural feature. The Kreg Crown Pro eliminates the biggest challenge: cutting accurate crown molding angles. Combining construction adhesive with mechanical fasteners (pocket screws and finish nails) creates durable joints that withstand daily use.
The secret to professional-looking results lies in proper caulking technique: tape the seams first, apply thin beads, and remove tape while the caulk is still wet. This produces crisp lines that hide minor imperfections. Choosing white paint highlights the craftsmanship and maintains a clean, timeless look perfect for bathrooms.
With total costs under $25 and build times around half a day, the crown molding shelf represents a win-win for homeowners seeking style, utility, and satisfaction on a budget. Once you’ve mastered this project, consider scaling up to built-in cabinets, window casings, or whole-room wainscoting. The crown molding shelf isn’t just a project, it’s a gateway to bigger things.


