Jingling keys in your pocket or missing them at the door? You are not alone. Millions struggle with noisy, bulky keys that are easy to lose. The fix is simple: build your own key organizer. This guide shows you how to make a custom, quiet, and durable key organizer using basic tools and hardware store parts.
Whether you need a sleek wall-mounted holder or a compact pocket carry solution, there is a build here for every skill level and lifestyle. From minimalist metal designs to rustic wooden wall holders, we cover every style and material.
Wall-Mounted Key Holders for Your Entryway
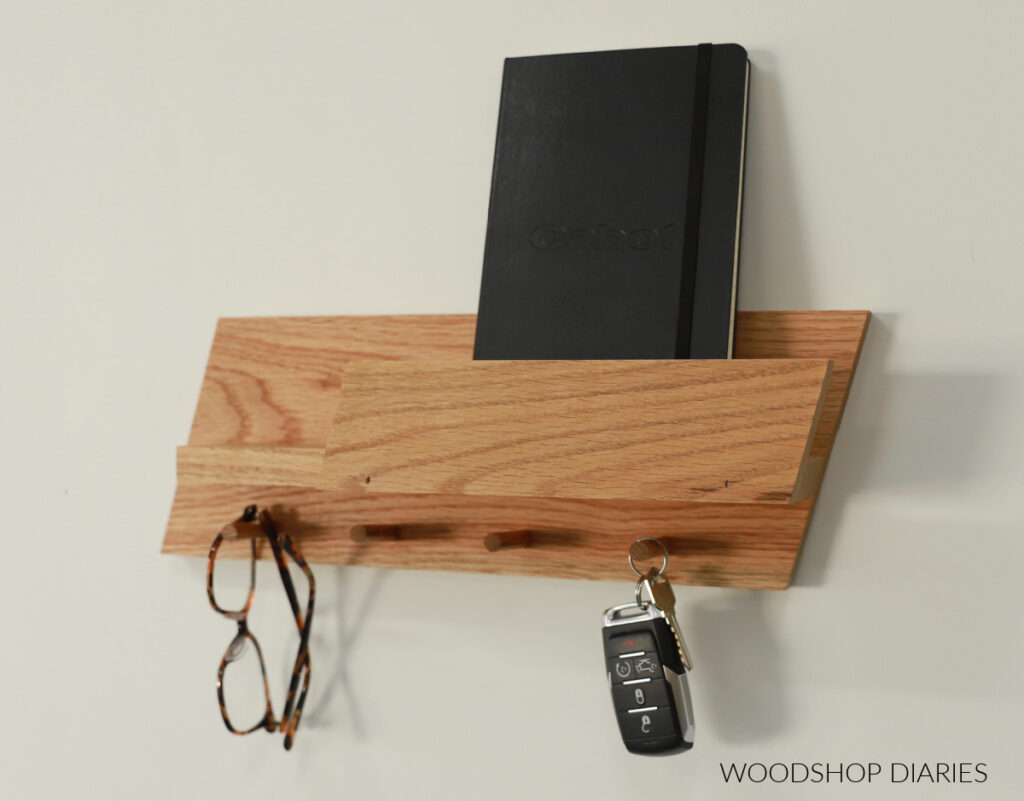
Wall-mounted key organizers keep keys visible, labeled, and coordinated. These are perfect for entryways, mudrooms, or shared homes.
Dowel Key Holder Design
Turn wooden dowels into removable keychains for fast grab-and-go access. Each dowel holds a full key set, so you pull it out with keys attached.
Build Steps:
- Cut a wooden base between 6 and 12 inches long.
- Drill holes sized to fit your dowels snugly.
- Insert dowels and label each with marker or paint.
- Optional: color-code ends with acrylic paint for visual identification.
Pro Tip: Use three-quarter inch dowels for stability. Sand and stain for a polished look that matches your decor.
Rustic Wooden Slab Holder
Achieve a high-end, personalized look with reclaimed wood and crisp paint. This design works beautifully in farmhouse or modern industrial spaces.
Materials Needed:
- Reclaimed wood slab between 8 and 16 inches
- Wood stain or spray paint
- Letter stickers
- Painter’s tape
- Clear sealant
Assembly:
- Clean and sand the wood thoroughly.
- Use tape and letter stickers to mask off words like Keys or Home.
- Apply spray paint in thin, even coats.
- Remove stickers carefully and seal with clear spray.
Visual Tip: Use black paint on light wood for modern contrast that pops.
Farmhouse Style Stirrer Holder
Build a shiplap-style holder using paint stirrers. This option is cheap, fast, and delivers serious style.
What You Will Need:
- 3 to 5 wooden paint stirrers
- Shadowbox frame (optional)
- Key hooks
- Wood glue or screws
Steps:
- Arrange stirrers vertically or horizontally based on your preference.
- Glue or screw them together securely.
- Mount inside a shadowbox frame or hang directly on the wall.
- Attach black iron hooks beneath for authentic farmhouse appeal.
Style Hack: Distress edges with sandpaper for vintage charm that looks expensive.
Suede Cord and Bead Holder
A minimalist modern design with tactile appeal and easy key access. This pairs well with Scandinavian or Japandi interiors.
Components:
- Wood block (2 by 4 inches)
- Suede cord (3 to 4 millimeters)
- Wooden beads (15 to 20 millimeters)
- Drill
Build:
- Drill 3 to 5 evenly spaced holes through the block.
- Thread suede cord through each hole and tie a knot underneath.
- Slide wooden bead onto the top end before adding keys.
Function: Beads act as stoppers and grab handles for easy retrieval.
Chalkboard Paint Holder
Label your keys dynamically with erasable, changeable writing. Perfect for families or rentals.
Steps:
- Paint a wood board with 2 to 3 coats of chalkboard paint.
- Use tape to create color-blocked sections for visual interest.
- Seal with clear coat to prevent chipping.
- Install hooks below the writing surface.
Use Case: Rotate labels for guests, seasonal keys, or different family members.
Hexagon Wall Organizer
Modern geometric shape with minimal build time. This contemporary design works in clusters or alone.
How to Build:
- Buy or cut a stained wood hexagon (6 to 8 inches wide).
- Attach 3 to 6 hooks to one flat edge.
- Hang with a standard picture hanger.
Design Flexibility: Cluster multiple hexagons for a stunning feature wall.
Portable Key Organizers for Pocket Carry
For daily carry, noise reduction, and EDC efficiency. These designs eliminate jingling and reduce pocket bulk.
Metal Shackle Organizer with Chicago Screw
The ultimate five dollar, five-minute fix for jingling keys. This design outperforms fifty dollar commercial versions.
Parts List:
- Brass anchor shackle (3 to 4 dollars)
- Chicago screw (6 to 7 dollars for a pack)
- Flat washer (1.20 dollars for a pack)
- Optional: titanium split ring and carabiner
Source: Hobby Lobby, Amazon, or Lowe s.
Assembly:
- Thread Chicago screw through the shackle eyelet.
- Add flat washer between screw head and shackle to prevent metal-on-metal contact.
- Attach keys to the shackle.
- Tighten screw fully.
Why It Wins:
- Silent operation thanks to the washer
- Weighs under 25 grams
- Fits in your pocket without bulk
- Outlasts Orbit Key and Key Bar by 12 or more months
Folding Wooden Key Holder
Swiss-Army knife style handcrafted elegance. This pocket-perfect design feels premium and looks handmade.
Materials:
- Black walnut or maple
- Half-inch steel binding posts
- Neoprene washers
- Loctite (blue 242)
Tools:
- Band saw
- Drill
- Sandpaper (80 to 400 grit)
- Propane torch
Step-by-Step:
- Cut two quarter-inch wood slabs and shape with a band saw.
- Sand to smooth, rounded edges.
- Drill holes for the binding posts.
- Modify your keys: file the hole if too small, or for car fobs, heat the plastic with a torch for 2 to 3 seconds, peel off the casing, and drill a hole.
- Assemble with posts, neoprene washers, and Loctite.
- Let cure and test the fold.
Key Tip: Leave slight play in the post to avoid wood stress and ensure smooth operation.
Paracord Key Organizer

Durable, colorful, and customizable with knotting flair. This beginner-friendly project delivers serious style.
Materials:
- Gold or black paracord (550-pound test)
- Brass Chicago screw
- Filler (hex nut, washer)
- Jet lighter
Build Steps:
- Melt paracord ends and press together to form the top loop.
- Tie cobra knots with contrasting cord for visual interest.
- Thread the female screw end through the loop.
- Continue knots downward, stopping at 5.5 inches for the bottom loop.
- Trim, melt, and flatten the ends.
- Assemble: screw through loop, add keys, insert filler to prevent rattle.
Noise Control: The filler eliminates slack and keeps your keys silent.
Universal Design Rules for Any Key Organizer
Follow these principles whether you build wall-mounted or portable organizers.
Minimize Your Key Count
Carry only 2 to 3 essential keys. Leave spares at home or with a trusted contact. This reduces bulk and improves access speed.
Benefit: Less clutter means faster retrieval and less pocket bulk.
Eliminate Rattling
Noise is the enemy of professionalism and comfort. Use flat washers, neoprene, or O-rings to prevent direct metal-on-metal contact. Add filler in paracord builds.
Solutions: Flat washers for metal organizers, neoprene washers for wood designs, O-rings as alternatives.
Reduce Pocket Bulk
Flat designs beat stacked ones. Thin beats thick. Choose the shackle and screw design, slim folding wood holder, or paracord flat wrap.
Avoid: Key Bars and Orbit Key because they are bulky and lint-prone.
Ensure Rapid Access
One-handed deployment is essential. Add a carabiner clip, magnetic quick-release, or thumb notch on wooden holders.
Test: Can you grab your keys while walking through the door?
Use Available Materials
Stick to hardware store screws, shackles, and washers. Use craft store wood, cord, and resin. Repurpose frames or wood scraps.
Skip: Brand-specific key systems that require proprietary replacement parts.
Sourcing Guide: Where to Buy Parts
Get everything fast without special orders.
| Item | Where to Buy |
|---|---|
| Chicago screws | Hobby Lobby, Amazon, Michaels |
| Brass shackles | Amazon, marine stores |
| Flat washers | Lowe s, Ace Hardware |
| Binding posts | True Value, McMaster-Carr |
| Black walnut | Woodcraft, Etsy |
| Loctite 242 | Any hardware store |
Budget Tip: Buy multi-packs and save extras for future projects.
Maintenance Tips for Long-Lasting Organizers
Keep your key organizer functional for years with simple care routines.
Metal Organizer Care
Check screw tightness monthly. Replace O-rings every 6 months. Wipe with rubbing alcohol if exposed to salt or sweat. For brass polish, use a vinegar and salt mix.
Wooden Holder Care
Avoid moisture exposure. Re-oil every 6 to 12 months with boiled linseed or tung oil. Sand light dings with 400-grit paper. Re-tighten binding posts if they become loose.
Wall Holder Maintenance
Dust wooden holders monthly and reseal every 1 to 2 years. Spot clean fabric or cork options. Wipe resin with a damp cloth and avoid abrasives. Inspect paracord knots and replace if frayed.
Who Should Build What: Match Your Lifestyle
Choose the right organizer for your specific needs.
For Daily Carry: Metal Shackle Organizer
This five dollar build takes 5 minutes and requires beginner skills. Best for office workers, truck owners, and EDC users who value silence and durability.
For Craft Lovers: Folding Wood Holder
This 15 to 30 dollar build takes 2 to 4 hours and requires intermediate skills. Perfect for woodworkers and gift-makers who want a premium, tactile experience.
For Families: Chalkboard or Mail Holder
This under one-hour build offers dynamic labeling for kids, guests, or shared responsibilities. Ideal for homes that need flexible organization.
For Renters: Frame or No-Drill Holder
These options cause no wall damage and are removable anytime. Use adhesive hooks or over-the-door hangers to keep your security deposit safe.
Frequently Asked Questions About Making a Key Organizer
What is the easiest key organizer to make at home?
The metal shackle organizer using a Chicago screw and anchor shackle is the easiest. It costs under ten dollars, requires no tools, and takes about 5 minutes to assemble.
How do I stop my keys from jingling?
Use flat washers, neoprene washers, or O-rings between metal components. Add filler like a hex nut to paracord designs. The key is preventing direct metal-on-metal contact.
What materials do I need for a wooden key holder?
You need hardwood (walnut or maple), binding posts, neoprene washers, Loctite, sandpaper, and basic tools like a band saw and drill. Hardware stores and craft stores carry everything.
Can I make a key organizer with no tools?
Yes. The metal shackle design requires no tools at all. Wall-mounted options like the photo frame holder can use adhesive hooks instead of drills.
How long do DIY key organizers last?
The metal shackle design has lasted over 18 months for real users, outperforming commercial brands. Wooden holders last years with proper maintenance and re-oiling.
Are DIY key organizers better than commercial products?
Yes in most categories. DIY versions cost less than ten dollars, weigh less, stay silent, and use readily available replacement parts. Commercial products like Key Bar and Orbit Key fail in durability and noise control.
Key Takeaways for Building Your Own Key Organizer
You do not need a fifty dollar key organizer. The best key organizer is the one you build yourself. It is quiet, compact, and tailored to your life.
Whether you choose the five-minute metal shackle or the handcrafted walnut folder, DIY wins on cost, performance, and pride. The five dollar Chicago screw and shackle design has lasted over 18 months for real users, outperforming every brand.
For home use, chalkboard or farmhouse stirrer holders bring order and style to your entryway. For pocket carry, wood or paracord options offer elegance and silence. Build one today: save money, stop the jingle, and never lose your keys again.
A smarter key system costs less than lunch and works better than anything you can buy. Start with the metal shackle design if you need quick results. Choose the wooden folder if you want a beautiful, handcrafted piece. Your keys deserve better than jingling in your pocket.