
If you are tired of waiting for delivery or shocked by the price tag on commercial squat racks, you are not alone. Building your own squat rack at home is a smart, cost-effective way to create a durable, custom-fit power station for your workouts. Whether you are working with steel, wood, or even concrete, this guide shows you exactly how to make a squat rack that is safe, strong, and tailored to your space and lifting goals.
From budget-friendly wooden stands under $40 to full steel power racks rivaling Rogue Fitness, every design in this guide is field-tested and built on real-world data. You will learn how to choose materials, cut precise joints, anchor structures securely, and install safety features like adjustable barbell pins and pull-up bars.
Choose Your Squat Rack Type Based on Budget and Skill
Before cutting or welding, decide which design fits your budget, tools, and training needs.
Steel Power Rack for Serious Lifters
Best for lifters who want maximum durability and do not mind investing in tools. Uses 2.5″ × 2.5″ 11-gauge steel tubing, same as top brands. Fully weldable, supports heavy squats, bench press, and pull-ups. Can be made mobile with casters. Estimated build cost is approximately $500, saving $1,000 compared to retail.
Wooden 2×4 Stand for Beginners
Ideal for beginners or tight budgets. Built from common lumber, this minimalist stand supports barbell squats and bench press. Some wobble is expected under load, best for light to moderate use. Cost comes in under $100, making it a great starter rack.
4×4 Wooden Power Rack for Best Balance
A step up from 2×4 builds. Uses 4×4 lumber with reinforced corners and adjustable safety features. Extremely stable, supports full-body training. Add pipe pins, pull-up bar, and casters. Cost ranges from $300 to $400, offering the best balance of strength and affordability.
Concrete-Anchored Rack for Maximum Stability
The most stable option under $60. Two variants exist: dual-pillar or integrated frame. Laminated 2×4s set in concrete provide immovable support with no tipping or wobble. Perfect for garages or outdoor spaces. Cures in 24 hours. Total cost ranges from $38 to $54.
Build a Steel Power Rack for Maximum Durability
For serious lifters who want a pro-level rack, follow these steps.
Cut and Drill Uprights Accurately
Use 2.5″ × 2.5″ 11-gauge steel tubing for uprights at 80″ tall. You will need four pieces. To ensure perfect hole alignment, build a clamp-on jig for your drill press. Mark one upright with 37 to 38 holes spaced 2″ apart, starting 1″ from the top. Use the jig to replicate this pattern on all four tubes, eliminating manual measuring.
Drill sequence involves starting with a 1″ metal-cutting bit, then following with a 1/8″ step-down bit to widen for J-hooks. Use cutting oil to prevent overheating and tune your drill RPM for clean cuts in thick steel.
Pro Tip: Drill all pieces at once in a vise to maintain consistency.
Weld the Frame for Strength
Tack-weld corners first to keep the frame square, then complete full welds on side panels. Attach 14″ angled supports with 3/4″ bolts for lateral stability. Add rear bracing top and bottom using matching 2.5″ tubing. Weld the front pull-up bar from 1″ steel tubing with 11-gauge brackets.
Critical: Load is carried by frame geometry, not welds alone. But welds must be clean and continuous at joints.
Finish and Assemble the Rack
After welding, sand rough spots and spray with high-gloss green and black paint, using 4 to 6 cans. Coat the pull-up bar with truck-bed liner for grip, then apply clear topcoat and cure for 24 hours before use.
Final assembly uses 3/4″ bolts, washers, locking washers, and nuts. Tighten evenly and do not over-tighten. Always dry-fit all parts first to check alignment.
Construct a Budget-Friendly 2×4 Wooden Stand

Fast, cheap, and functional, this design works for basic needs.
Assemble Backing and Bar Support
Cut one 64″ 2×4 for the vertical backing, one 58″ 2×4 for the bar support, and one 38″ 2×4 for the bench extension. Attach the 58″ piece to the 64″ backing using 3″ wood screws with glue. Then attach the 38″ offcut to the 58″ piece for bench press support. This forms an L-shape with dual functionality.
Install Interlocking 45° Posts
Cut two 15″ and two 17″ 2×4s, mitered at 45°. Fit them like puzzle pieces on both sides. Remove small bits from mating faces for a tight lock. Position so the longer post supports the bar directly. These posts provide lateral stability and allow the rack to stand freely.
Add Diagonal Braces
Use 45° offcuts as diagonal braces between vertical and horizontal members. Screw into place with 3″ screws. Braces reduce side-to-side wobble.
Warning: This design has undetermined max load. Test with empty bar first, then add weight slowly.
Build a 4×4 Wooden Power Rack for Full-Body Training
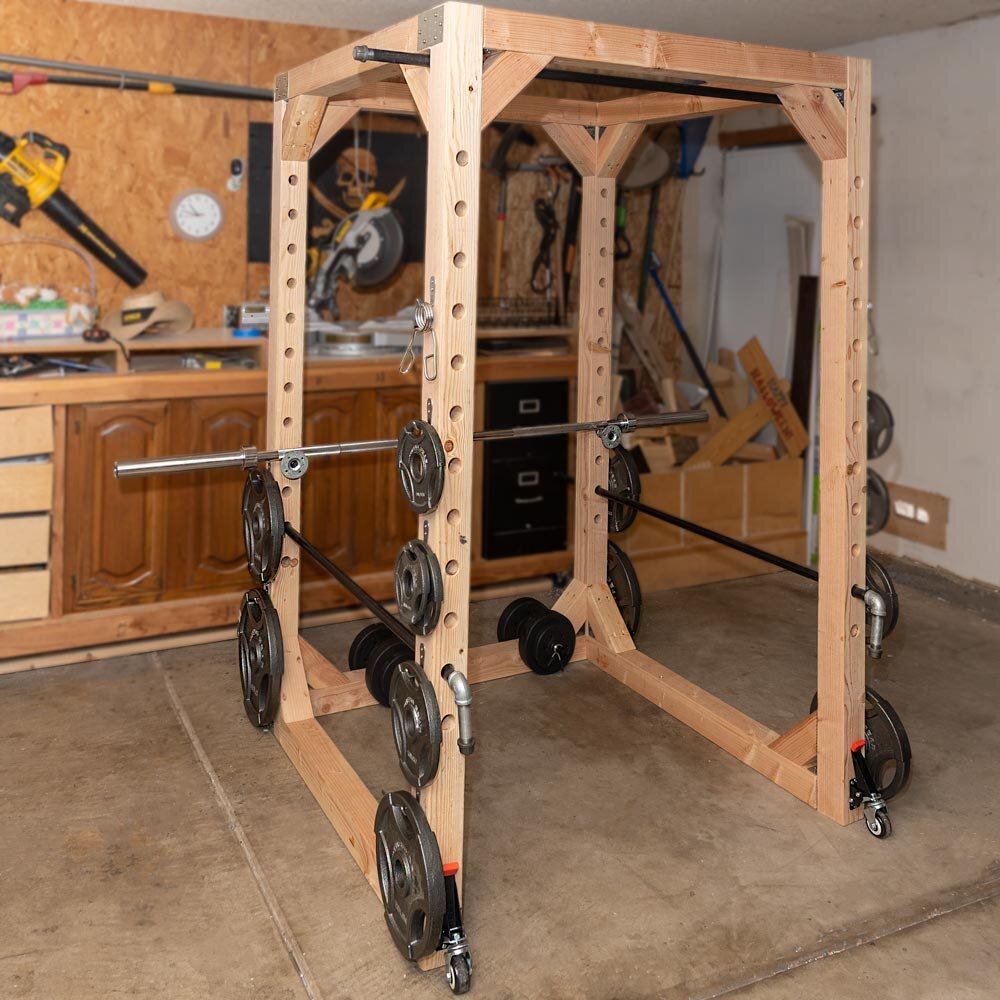
Strong, safe, and fully enclosed, this design handles serious training.
Cut Lumber to Size
From 4×4s, cut four uprights at 80″, five cross members at 43″, and four corner braces with a 10″ long leg, mitered at 45°. Cut largest pieces first and use offcuts for braces.
Drill Pin Holes for Adjustability
Mark each upright 13″ down from the top for the first hole center. Space holes 4.5″ apart vertically, resulting in 12 holes per upright. Use a 1¼” spade bit on a drill press with a clamped workpiece and sacrificial backing board to prevent blowout.
For smoother function, use a piloted round-over router bit to clean hole edges, removing splinters and easing pipe insertion.
Sand and Reinforce the Frame
Sand all surfaces with a random orbital sander to eliminate splinters. Assemble one side at a time using Simpson Strong-Tie A23 and TP35 plates at joints. Fasten with 2½” self-drilling Torx screws and pre-drill for 3″ screws on corner braces.
Check squareness using a framing square and measure corner-to-corner diagonals, which must be equal. Attach 45° corner braces on all four corners to resist racking.
Create an Ultra-Stable Concrete-Anchored Rack
Most stable option under $60, perfect for immovable setups.
Option 1: Dual-Pillar Laminated Design
For a user’s shoulder height, cut three lengths from six 2×4s. For example, with a 68″ shoulder height, cut short at 66″, medium at 68″, and long at 70″. Cut three of each.
Laminate boards by laying the longest board flat, applying wood glue across the surface, stacking the medium board on top flush at one end, and nailing with three at each end plus spaced singles. Repeat with the short board on top. This creates a tapered notch at the top to catch the barbell.
Set in concrete using two 5-gallon paint buckets as molds. Place each pillar upright in a bucket, level perfectly using a bubble level, insert the barbell into notches to stabilize, and pour 30 lbs Quikrete per bucket. Add water to soupy consistency and stir with rebar to remove air pockets. Cure 24 hours before use.
Result: Immovable, wobble-free rack. Total cost comes to approximately $38.
Option 2: Integrated Frame with Single Base
Supports squats and bench press. Cut key pieces for a 6’6″ builder from five 10-foot 2×4s: backstop at 78″, front support at 39.5″, bar catch at 59.5″, and platform at 38″.
Assemble the frame by attaching the 39.5″ front piece to the 38″ platform with glue and four 1″ deck screws per joint. Add the 59.5″ bar catch, install the 58″ top platform, and attach the 78″ backstop.
Set in concrete by placing the entire frame in a bucket on level ground. Mix half a 60-lb Quikrete with 2 to 3 cups water, add the second half and mix to firm consistency, then pour slowly while rotating to prevent tilt. Smooth the top with a trowel and check level before the set. Cure for 24 or more hours and verify plumb and squareness.
Bonus: Doubles as barbell storage and bench press station.
Install Essential Safety Features on Your DIY Rack
Never skip these critical components.
Add Adjustable Barbell Pins
Use ¾” threaded steel pipe to build two pins. Each requires a chair flange, 1½” pipe, coupling, 4½” pipe, and end cap. Assemble with Channel Locks, leaving the cap loose for quick height changes. Insert into matching holes on both sides to secure the bar at any height.
Mount Safety Rails
Build two rails using a 60″ straight pipe, 90° elbow, 4″ pipe, and end cap. Install below working height on both sides to catch the bar if you fail a rep.
Install Pull-Up Bar
Drill 1¼” holes through corner braces using a long ¼” guide bit to align both sides. Insert a 60″ steel pipe and cap both ends. This has been tested and supports full-body pull-ups.
Add Weight Storage
Mount stainless steel robe hooks to the frame exterior. Pre-drill holes and use provided screws to hang plates for easy access.
Test and Maintain Your Squat Rack for Longevity
Proper testing and maintenance ensure safety and durability.
Load Test Gradually
Start with an empty barbell and perform test squats. Add weight in 25 to 50 lb increments while watching for wobble, flex, or shifting. Steel and concrete racks should show zero movement.
Follow Maintenance Checklist
Inspect welds for cracks every 3 to 6 months. Re-torque 3/4″ bolts every 3 to 6 months. Reseal wood every 1 to 2 years. Inspect casters monthly. Clean pin holes as needed and verify level after major moves.
Frequently Asked Questions About Making a Squat Rack
How much does it cost to build your own squat rack?
Costs range from under $40 for a basic concrete-anchored design to approximately $500 for a commercial-grade steel power rack. The 4×4 wooden power rack falls in the $300 to $400 range, while a simple 2×4 stand costs under $100.
What tools do I need to build a squat rack?
Basic builds require a drill, tape measure, level, and impact driver. Steel builds need a chop saw, drill press, and welder. Wood builds require a miter saw and spade bits. Concrete builds need a circular saw and trowel.
Which squat rack design is the most stable?
The concrete-anchored dual-pillar design provides the most stability because the cured concrete base resists tipping and lateral movement completely. The 4×4 wooden power rack with reinforced corners is the next most stable option.
Can I make my DIY squat rack mobile?
Yes, add 660 lb-rated outrigger casters to any wooden or steel rack. Note that the frame will flex slightly when lifted, so consider reinforcing with tie plates if you move it frequently.
How long does it take to build a squat rack?
The concrete-anchored designs take about 1.25 hours of active work plus 24 hours curing time. Wooden builds typically take 4 to 8 hours depending on complexity. Steel builds require 6 to 10 hours including finishing.
What is the best wood for a squat rack?
4×4 lumber provides the best strength for full power racks. For budget builds, standard 2×4s work but have lower load capacity. Use pressure-treated lumber for outdoor or humid environments.
Key Takeaways for Building Your Own Squat Rack
You do not need to spend over $1,000 to get a rock-solid squat rack. Whether you weld steel, screw wood, or pour concrete, you can build a safe, strong, and custom rack in under a weekend. The concrete-anchored 2×4 rack is the ultimate budget winner at under $40. The 4×4 wooden power rack offers the best all-around performance with maximum safety features. And if you have the tools, the steel build is a lifetime investment that rivals commercial brands.
Now you know how to make a squat rack that fits your space, budget, and lifting style. Pick a design, gather your tools, and build with confidence. Your home gym starts here.