Is your KitchenAid dishwasher upper rack sagging or failing to stay locked in the raised position? This common issue affects many KitchenAid owners and can significantly impact cleaning performance. The good news is that this repair is straightforward and takes most DIYers under an hour. In this guide, you’ll learn exactly how to diagnose the problem, replace the failed adjuster arm, and restore your dishwasher rack to full functionality.
Diagnose Upper Rack Sagging Issues
The first step in KitchenAid dishwasher rack repair is identifying the exact problem. Your upper rack should stay elevated when you raise it, with both sides clicking firmly into place. If one side drops while the other remains locked, you’ve likely identified the issue.
Confirm One-Sided Rack Collapse
When your KitchenAid dishwasher upper rack collapses on one side, it typically happens on the left. You’ll hear a firm click on the functioning side while the problem side remains silent. During wash cycles, the rack drops downward, reducing usable space and interfering with spray arm rotation. This means your dishwasher runs less efficiently, and you lose the ability to use the upper rack for additional dish placement.
Identify the Broken Adjuster Arm
The culprit is usually part WPW10546503, the upper rack adjuster arm. This component uses a ratcheting mechanism to lock the rack into various height positions. Over time, the plastic housing cracks, the locking lever strips, or the stop clip becomes dislodged. Since the left and right adjusters operate independently, one can fail while the other continues working normally. Even if only one side shows obvious damage, both adjusters have endured identical wear, so replacing both prevents a repeat repair just months later.
Verify Model Compatibility and Order Parts
Before purchasing replacement parts, confirm your specific model supports the WPW10546503 adjuster. This genuine Whirlpool part fits numerous KitchenAid and Whirlpool-family dishwashers, including the KDTE204DSS0 and KDTM704ESS0 through KDTM704ESS3 models.
Check Your Model Number
Locate your model number tag inside the dishwasher door frame. Enter this number into part lookup tools at appliancepartspros.com, repairclinic.com, or searspartsdirect.com to verify compatibility. The WPW10546503 also works across Whirlpool, Maytag, Amana, Jenn-Air, Kenmore, and select IKEA models due to shared platform design.
Order the Correct Replacement Part
Purchase genuine WPW10546503 (also listed as W10546503 or PS11736629). While aftermarket versions exist, OEM parts from Whirlpool Corporation offer superior durability and precise fit. Third-party adjusters may crack or slip under load, costing you more in the long run. Average price runs around $40.76 per unit with a 1-year limited warranty when purchased from authorized sellers.
Gather Essential Repair Tools
You need only a few simple items for this KitchenAid dishwasher rack repair:
- Small flat-head screwdriver for releasing clips and tabs
- Replacement adjuster(s) – WPW10546503
- Soft towel or mat to protect rack tines during disassembly
No power tools, screws, adhesives, or internal dishwasher disassembly required.
Safety First: Disconnect Power
Before starting, unplug the dishwasher or turn off the circuit breaker. This prevents accidental activation or electric shock during the repair. Place a towel under your work area to protect the rack’s finish and prevent scratches to your countertop.
Remove the Upper Dish Rack
Pull the upper rack fully forward to access the locking mechanism. Locate the four plastic locking tabs: two at the front ends of the rails and two at the rear ends.
Release Front and Rear Locking Tabs
Using your fingers or a flat-head screwdriver, press inward on each tab. Start with the front tabs, then press the rear tabs while lifting the rack upward to disengage from the tracks. The process is identical for both left and right sides, though you may find one side more stubborn than the other.
Set Rack on Protected Surface
Place the rack on a towel or mat to avoid scratching stainless steel tines or damaging brittle plastic parts. Handle all clips gently, as they’re fragile and prone to snapping if forced.
Disassemble the Adjuster Assembly
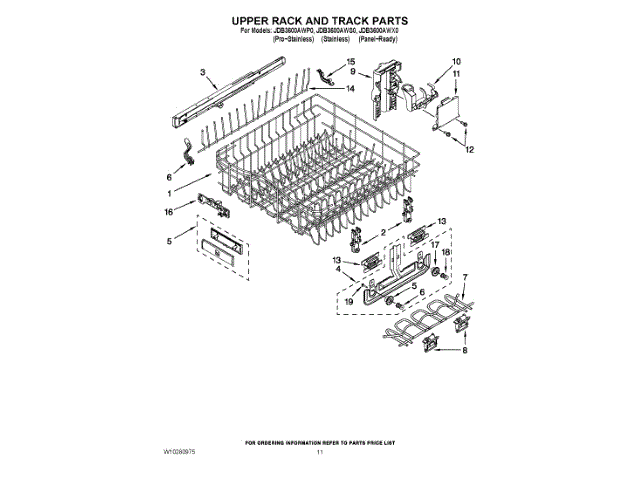
With the rack removed, you can now access the adjuster components. Work systematically through each part to avoid damaging any clips.
Remove Rear Side Guide
Find the rear tab on the plastic guide. Insert your flat-head screwdriver and press the tab inward. Slightly flex the guide and lift it up, aligning it with the bottom slot. Rotate it away from the rack to remove the component.
Unclip Middle Retainer
Insert the screwdriver into the back of the middle clip. Press the rear tabs inward and pull the clip straight out from the rack frame. This clip secures the middle section of the adjuster assembly.
Detach Final Guide and Adjuster Cover
Unhook the guide from the rack structure, then lower it until the internal tab aligns with the cutout. Pull it off completely. Next, use the screwdriver to flex the locking tabs inside each slot on the adjuster cover. Lower the cover slightly until the top tabs clear the housing, then pull it straight out.
Extract Old Adjuster Housing
Gently push the housing backward and lift it off the support bar. Remove the broken WPW10546503 unit. The mounting area is now clear and ready for the new part.
Install New Adjuster Arm

Before installing, compare the old and new WPW10546503 units. Verify identical shape, matching lever orientation, correct tab placement, and proper cutout alignment. Take a photo of the original adjuster before removal to ensure correct installation.
Position and Secure New Adjuster
Lift the new adjuster into place on the rack. Hook the housing over the frame and align the adjustment button so the small cutout rests on the internal tab. Lift until the support bar sits securely across the top. An alternative method involves prying off the stop clip from the old adjuster, installing the new adjuster, and snapping the stop clip back into place to lock it down.
Reassemble Adjuster Components
Reinstallation reverses the disassembly process. Work carefully to ensure all components seat properly.
Reinstall Cover and Guides
Align the cover tabs with the housing holes. Insert the tabs first, then snap the cover into place. Press firmly on the bottom edge to ensure a full seal. Reattach the rear guide by inserting the tab through the cutout and lifting to clip on. Snap the middle clip back in, ensuring both tabs engage. Rotate the final guide into position and snap securely.
Verify All Components Click Into Place
All components should click into place without gaps or wobble. Run your fingers along each connection to confirm secure attachment. Any loose feeling indicates the component isn’t fully seated.
Reinstall Upper Rack
Align the rear locking tabs with the dishwasher track slots. Push the rack back gently until it begins to seat. Lower the front tabs into place to lock. Test movement by sliding the rack forward and backward. It should glide smoothly without binding or catching.
Test Repair Success
Restore power to the dishwasher before testing.
Manually Check Locking Action
Raise and lower the upper rack through all height settings. Both sides should click firmly into each position. No sagging or misalignment should occur. If either side fails to click, you’ll need to reopen the assembly and verify proper seating.
Run a Test Wash Cycle
Start a rinse or quick wash cycle. Observe that the rack remains stable during spray arm rotation with no vibration or noise from loose parts. Also confirm no disengagement during operation. After the cycle completes, verify the rack stayed locked in place and moved freely throughout.
Troubleshoot Post-Repair Issues
Several common issues may occur after completing your KitchenAid dishwasher rack repair.
Rack Still Sags
This usually means the adjuster isn’t fully seated or the clip is misaligned. Reopen the assembly and verify the housing is fully engaged and the stop clip is snapped in place.
Lever Won’t Click
The adjustment button is likely misaligned. Recheck that the cutout rests precisely on the internal tab and reposition if needed.
Noisy Operation
A loose guide or unseated clip causes rattling sounds. Resnap all plastic components and ensure no parts are twisted or partially attached.
Stiff Rack Movement
Track obstruction or friction is the culprit. Clean side tracks with a damp cloth and apply light silicone spray (never oil-based) to reduce resistance. Lubricate tracks every six months to maintain smooth operation.
Restore Rack Appearance
Even after fixing alignment, aging racks often show chipped coating or exposed metal tines that scratch dishes. The genuine KitchenAid 4396840RC repair kit solves this problem.
Apply Tine Tips and Touch-Up Paint
Slide rubber caps onto all damaged or exposed tine ends, ensuring a snug fit. For touch-up paint, clean scratched areas with mild soap and water, then dry thoroughly. Apply thin coats using the built-in brush and allow 24 hours to cure before reinstalling the rack. This kit prevents rust and corrosion, protects fine dishware and glass, and improves aesthetic appearance while extending rack life.
Maintain Rack Longevity
Regular maintenance prevents premature failure and keeps your KitchenAid dishwasher rack repair lasting for years.
Monthly Inspection Checklist
Check your upper rack regularly for these warning signs:
- Chipped coating exposing metal
- Loose or missing tine tips
- Worn or cracked adjuster housings
- Binding or uneven movement
Preventative Maintenance Tips
Clean racks monthly with mild detergent to prevent buildup. Avoid overloading, as excess weight stresses adjusters and guides. Lubricate tracks with silicone spray every six months. Replace both adjusters if one fails. Use genuine parts for reliable performance. Apply touch-up paint at the first sign of chipping to prevent rust formation.
Access Visual Repair Guides
Consider watching a step-by-step video guide before starting your repair. KitchenAid’s official “Manuals and Literature” webpage features instructional videos showing proper tool use, clip removal techniques, housing reassembly, and rack reinstallation alignment. Exploded diagrams are also available on KitchenAid’s support site to help verify part placement and understand component relationships.
Contact Support if Needed
For part verification, repair questions, or warranty claims, contact KitchenAid customer service at 1-800-422-1230 for major appliances including dishwashers. Have your model and serial number ready for faster assistance. The WPW10546503 includes a 1-year limited warranty (parts only), and support is available for troubleshooting and installation help.
Quick Repair Checklist
- Disconnect power at outlet or breaker
- Remove upper rack using flat-head screwdriver
- Disassemble adjuster: guides, clips, cover, housing
- Compare old and new WPW10546503 for correct orientation
- Install new adjuster and secure with stop clip
- Reassemble all components in reverse order
- Reinstall rack, rear first, then front
- Test manual adjustment: both sides must click and lock
- Run test wash cycle to verify stability
Final Thoughts on KitchenAid Dishwasher Rack Repair
This DIY repair restores full functionality to your KitchenAid dishwasher with minimal effort. By replacing the failed WPW10546503 adjuster arm and maintaining your rack properly, you ensure reliable performance, optimal cleaning, and long-term durability without professional service costs. The entire procedure takes 20-40 minutes with just a flat-head screwdriver, making it accessible for any homeowner. Remember to replace both adjusters simultaneously, lubricate tracks biannually, and address cosmetic damage promptly to maximize your rack’s lifespan.
Frequently Asked Questions About KitchenAid Dishwasher Rack Repair
How do I know if my KitchenAid dishwasher rack adjuster needs replacement?
If your upper rack sags on one side, fails to click when raised, or drops during wash cycles, the adjuster arm is likely failed. The most common symptom is one side (usually the left) not locking into place while the other side functions normally.
Can I replace just one adjuster or do I need both?
While you can replace only the failed side, experts recommend replacing both adjusters simultaneously. They’ve endured identical wear, so if one has failed, the other is likely to fail soon after.
How long does the repair take?
Most homeowners complete the repair in 20-40 minutes, depending on their familiarity with DIY appliance repairs. The process is straightforward and requires no special skills.
What tools do I need for this repair?
You only need a small flat-head screwdriver, the replacement part(s), and a soft towel or mat to protect surfaces. No power tools, plumbing work, or electrical modifications are required.
Where can I buy genuine WPW10546503 replacement parts?
Purchase from authorized retailers like appliancepartspros.com, repairclinic.com, or searspartsdirect.com. Always verify compatibility with your specific model number before ordering.