

Installing a boltless rack can transform your storage space in under an hour without requiring any tools, bolts, or complicated hardware. These racks use a secure interlocking system that clicks together with precision, making them ideal for garages, warehouses, offices, and retail backrooms. This guide walks you through exactly how to install boltless rack safely and correctly, from preparing your workspace to finishing with safety caps.
Prepare Your Workspace
Setting up the right environment before assembly ensures a smooth, safe installation process.
Choose a Level, Hard Surface
Always assemble your boltless rack on a flat, solid floor like concrete or hardwood. Soft or uneven surfaces such as carpet, gravel, or warped flooring can misalign posts and weaken structural integrity. If the floor is uneven, the rack may wobble even after complete assembly, so test with a spirit level before starting.
Wear Protective Gloves
Metal edges on uprights and beams can have sharp burrs. Wear work gloves to prevent cuts and improve your grip during assembly.
Gather Essential Tools
While boltless racks require no power tools, these items make installation easier:
• Rubber mallet for tapping beams into place without damage
• Wooden block or cloth to protect beam surfaces when hammering
• Measuring tape to verify frame squareness
• Spirit level to ensure uprights and shelves are plumb
• Instruction manual for model-specific details
Organize All Components
Lay out all parts and sort them by type. You should have upright posts with keyhole slots, shelf boards in particleboard or steel, short beams for front-to-back connections, long beams for side-to-side connections, center beams for wide spans, post-joint inserts for stacking uprights, and plastic end caps. Double-check the part count in your manual before proceeding.
Assemble the Base Frame
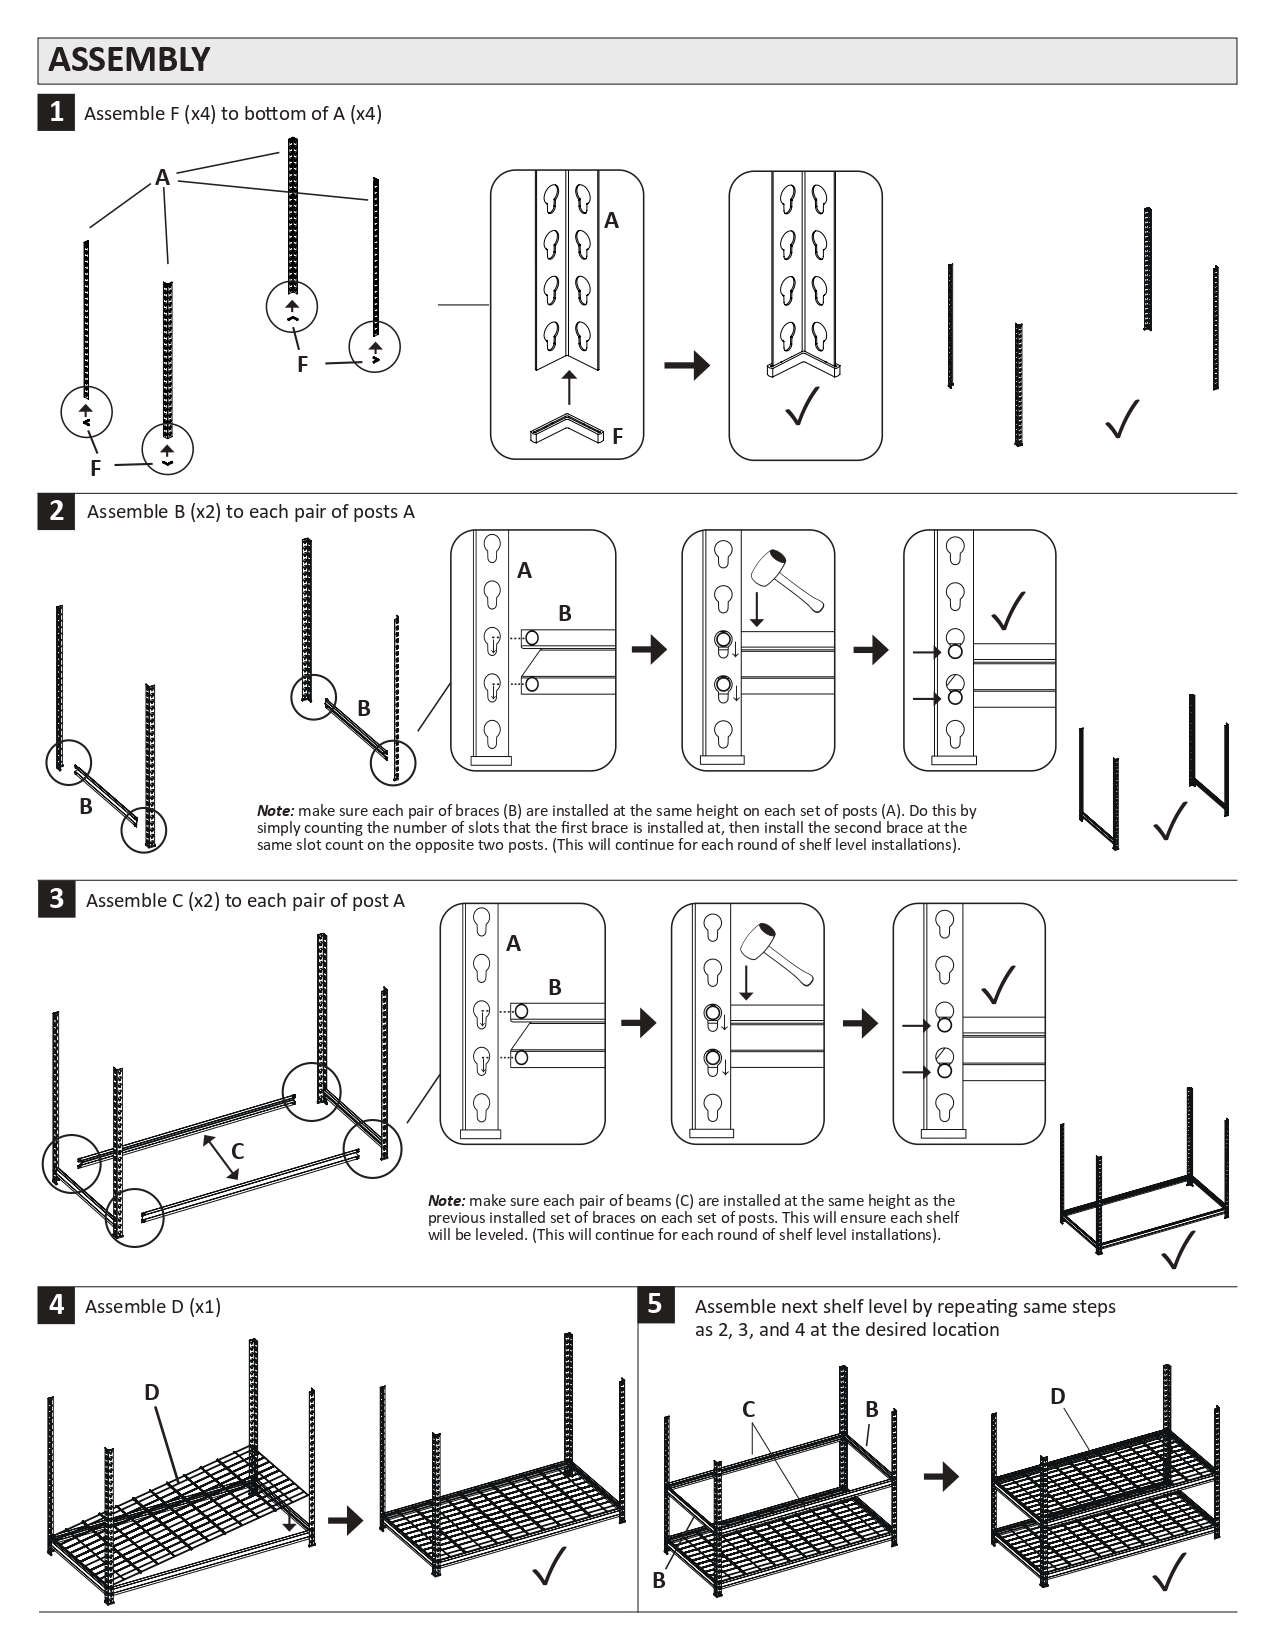
A solid foundation is critical, so start with a square, level bottom frame.
Position Upright Posts Correctly
Place two upright posts parallel to each other at the desired depth, typically 450 mm or 600 mm. Ensure the narrow end of each keyhole slot faces downward, as this orientation allows beams to lock securely when twisted or seated into place.
Install Short Beams at the Base
Take a short beam and insert each end into the lowest keyhole slot on both uprights. The lip of the beam must face inward toward the center of the rack. This creates a stable pocket for shelf boards later. Use a rubber mallet to gently tap the beam ends until fully seated. When you hear a click or feel resistance drop, the beam is locked. Repeat on the opposite side to create two vertical corners.
Connect with Long Beams
Now attach long beams between the left and right upright pairs at the same height. Insert each end into the keyhole slot and tap firmly with the mallet. Once all four beams are in place, you have a complete rectangular base.
Verify Frame Squareness
Use a measuring tape to check diagonal distances from corner to corner. Measure from front-left to rear-right, then front-right to rear-left. If both measurements are equal, the frame is square. If they differ, adjust by gently pushing the longer diagonal inward and re-tap the beams. Use a spirit level across beams to confirm they are level front-to-back and side-to-side.
Stack Uprights for Height
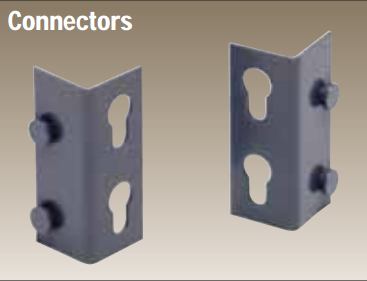
For multi-shelf units, extend uprights vertically using joint inserts.
Insert Post-Joint Connectors
Slide a post-joint insert into the top of each upright. These metal or plastic connectors allow you to stack additional upright sections. Ensure all inserts are flush with the top edge of the post and aligned at the same height.
Attach Upper Uprights
Place the next set of uprights onto the inserts. They should slide down smoothly and sit flush. Check that the keyhole slots on upper sections align perfectly with those below, as misalignment prevents beam installation.
Build Upper Shelf Levels
Repeat the base assembly process at each desired shelf height.
Install Beams at Desired Heights
At the next shelf level, insert short and long beams just like in the base. Short beams go front-to-back, and long beams go side-to-side. Tap all ends with a mallet to lock them in place. Ensure beam height is identical across all four corners, as even a 5 mm difference can cause shelf boards to sit unevenly.
Add Center Beams for Wide Spans
If your rack is wider than 36 inches, install a center beam for support. Place it along the middle axis between front and rear uprights. Center beams prevent shelf sagging under heavy loads and are required for safety in medium and heavy-duty models.
Lock Support Beams Securely
Some boltless systems use rotating support beams for added rigidity.
Slide and Rotate Support Beams
After installing long beams, place support beams across them. These run perpendicular and add cross-bracing. Once positioned, rotate the beam 180 degrees to engage the locking mechanism. You will feel it click or lock into place. This twist-lock design is tool-free and enhances load-bearing strength without fasteners.
Install Shelf Boards
Now add the decking where your items will rest.
Place Boards Carefully
Set shelf boards onto the beam framework. Ensure they are centered, fully supported on all sides, and not overhanging more than 1 inch unless specified. Avoid dragging boards across beams, as they can chip or scratch.
Match Shelf to Duty Level
Choose shelf material based on your load needs. Particleboard suits light-duty storage up to 500 kg per shelf. Plywood handles medium-duty loads of 600 to 800 kg. Steel shelves support heavy-duty requirements of 1,000 kg and above.
Cap Uprights for Safety
Finish with plastic end caps to complete the installation.
Press On End Caps
Snap a plastic cap onto the top of each upright post. These caps block dust and debris from entering hollow tubes, prevent injuries from sharp metal edges, and improve visual appearance. If caps do not fit, check for misaligned inserts or bent posts.
Final Safety and Stability Check
Never load a rack without inspecting it first.
Test for Wobbling
Gently shake the unit side-to-side and front-to-back. Minimal movement indicates stability, while wobbling means you should check beam seating and floor levelness. Re-tap any loose beam ends with a mallet.
Confirm Levelness
Place a spirit level across multiple beams and shelves. Adjust the rack position or place shims under feet if needed.
Validate Load Capacity
Each shelf has a uniformly distributed load rating usually labeled on a tag or beam. Never exceed this limit or stack heavy items on one side, as this creates unsafe point loads.
Optimize Load Distribution
Proper loading prevents tipping and extends rack life.
Place Heavier Items Low
Keep heavy tools, boxes, or machinery on lower shelves. This lowers the center of gravity and improves overall stability.
Balance Weight Evenly
Avoid stacking all weight on one corner. Place heavy items near the center and distribute boxes across the entire shelf. Match weights on left and right sides for equilibrium.
Use Upper Shelves for Light Storage
Store files, small parts, or seasonal items up top. Light loads reduce stress on tall structures and keep frequently used items accessible.
Maintain and Expand Your Rack
Boltless racks last for years with proper care and can grow with your needs.
Schedule Routine Inspections
Every 3 to 6 months, check for loose beams, look for bent or damaged parts, and clean dust and debris from slots. Retighten connections with a mallet if needed.
Replace Damaged Parts Immediately
Cracked shelf boards or bent beams compromise safety. Replace them using OEM parts from the manufacturer to maintain load ratings.
Expand Side-by-Side or Upward
Boltless racks are modular. Add height by stacking more uprights and beams, increase width by connecting identical units side-to-side, or create rows for warehouse-scale storage. Always follow manufacturer guidelines when expanding.
Troubleshoot Common Issues
Even experienced users face hiccups. Here is how to fix them fast.
Rack Wobbles After Assembly
Cause: Uneven floor or loose beams. Fix: Move to a hard surface, re-tap all beam ends, and use leveling shims under feet if necessary.
Shelf Board Sags Under Weight
Cause: Overloading or missing center beam. Fix: Reduce the load and install a center support beam immediately.
Beam Will Not Insert or Lock
Cause: Wrong orientation or misaligned slot. Fix: Rotate the upright so the narrow end of the keyhole faces down, and ensure the beam lip faces inward.
Difficulty Assembling on Carpet
Cause: Soft surface absorbs impact, preventing beam seating. Fix: Move to concrete or use plywood under the rack during assembly.
Frequently Asked Questions About Installing Boltless Racks
How long does it take to install a boltless rack?
Most boltless racks take 20 to 60 minutes to install depending on size and experience level. First-time users should allow approximately 60 minutes for completion.
Do I need any tools to install a boltless rack?
Boltless racks require no power tools. A rubber mallet is the only tool needed for tapping beams into place, though a wooden block or cloth helps protect surfaces.
Can I install a boltless rack on carpet?
It is not recommended. Carpet is too soft and absorbs the impact needed to properly seat beam connections. Move to a hard surface like concrete or hardwood, or place plywood under the rack during assembly.
What is the maximum weight a boltless rack can hold?
Load capacity varies by duty type. Light-duty racks hold up to 500 kg per shelf, medium-duty handles 600 to 1,000 kg, and heavy-duty supports 1,000 kg and above. Always check the manufacturer label for exact ratings.
How do I make my boltless rack more stable?
Place heavier items on lower shelves to lower the center of gravity, ensure weight is distributed evenly across each shelf, and verify the rack is on a level surface. Adding center beams for wide spans also significantly improves stability.
Can I expand my boltless rack after initial installation?
Yes, boltless racks are modular and can be expanded by adding height with additional uprights and beams, connecting identical units side-by-side, or adding rows for larger storage systems. Always follow manufacturer guidelines for expansion.
Key Takeaways for Installing Your Boltless Rack
Boltless racks offer unmatched speed, strength, and flexibility for both residential and commercial storage needs. By following this guide on how to install boltless rack, you ensure a safe, level, and durable storage solution. Focus on correct orientation with narrow keyhole ends facing downward, secure beam locking by tapping until you hear a click, and even load distribution with heavier items on lower shelves. Perform routine inspections every 3 to 6 months to catch loose connections or damaged parts early. With proper installation and maintenance, your boltless rack will serve you reliably for years, whether you are storing holiday decorations in a garage or industrial inventory in a warehouse.


