
Struggling to keep bikes organized in your garage or shed? A wooden bike rack offers a sturdy, customizable, and budget-friendly solution that outperforms many off-the-shelf models. Whether you’re storing kids’ bikes, adult mountain bikes, or need a cargo-carrying frame rack, building a bike rack out of wood is easier than you think. Using common tools and affordable lumber, you can create a space-saving, long-lasting storage system tailored to your exact needs.
This guide breaks down three field-tested wooden bike rack designs. You’ll learn exact cut lists, spacing rules, material choices, and pro tips from real builders who have used these racks for years.
Build the L-Shaped Wall-Mounted Bike Rack
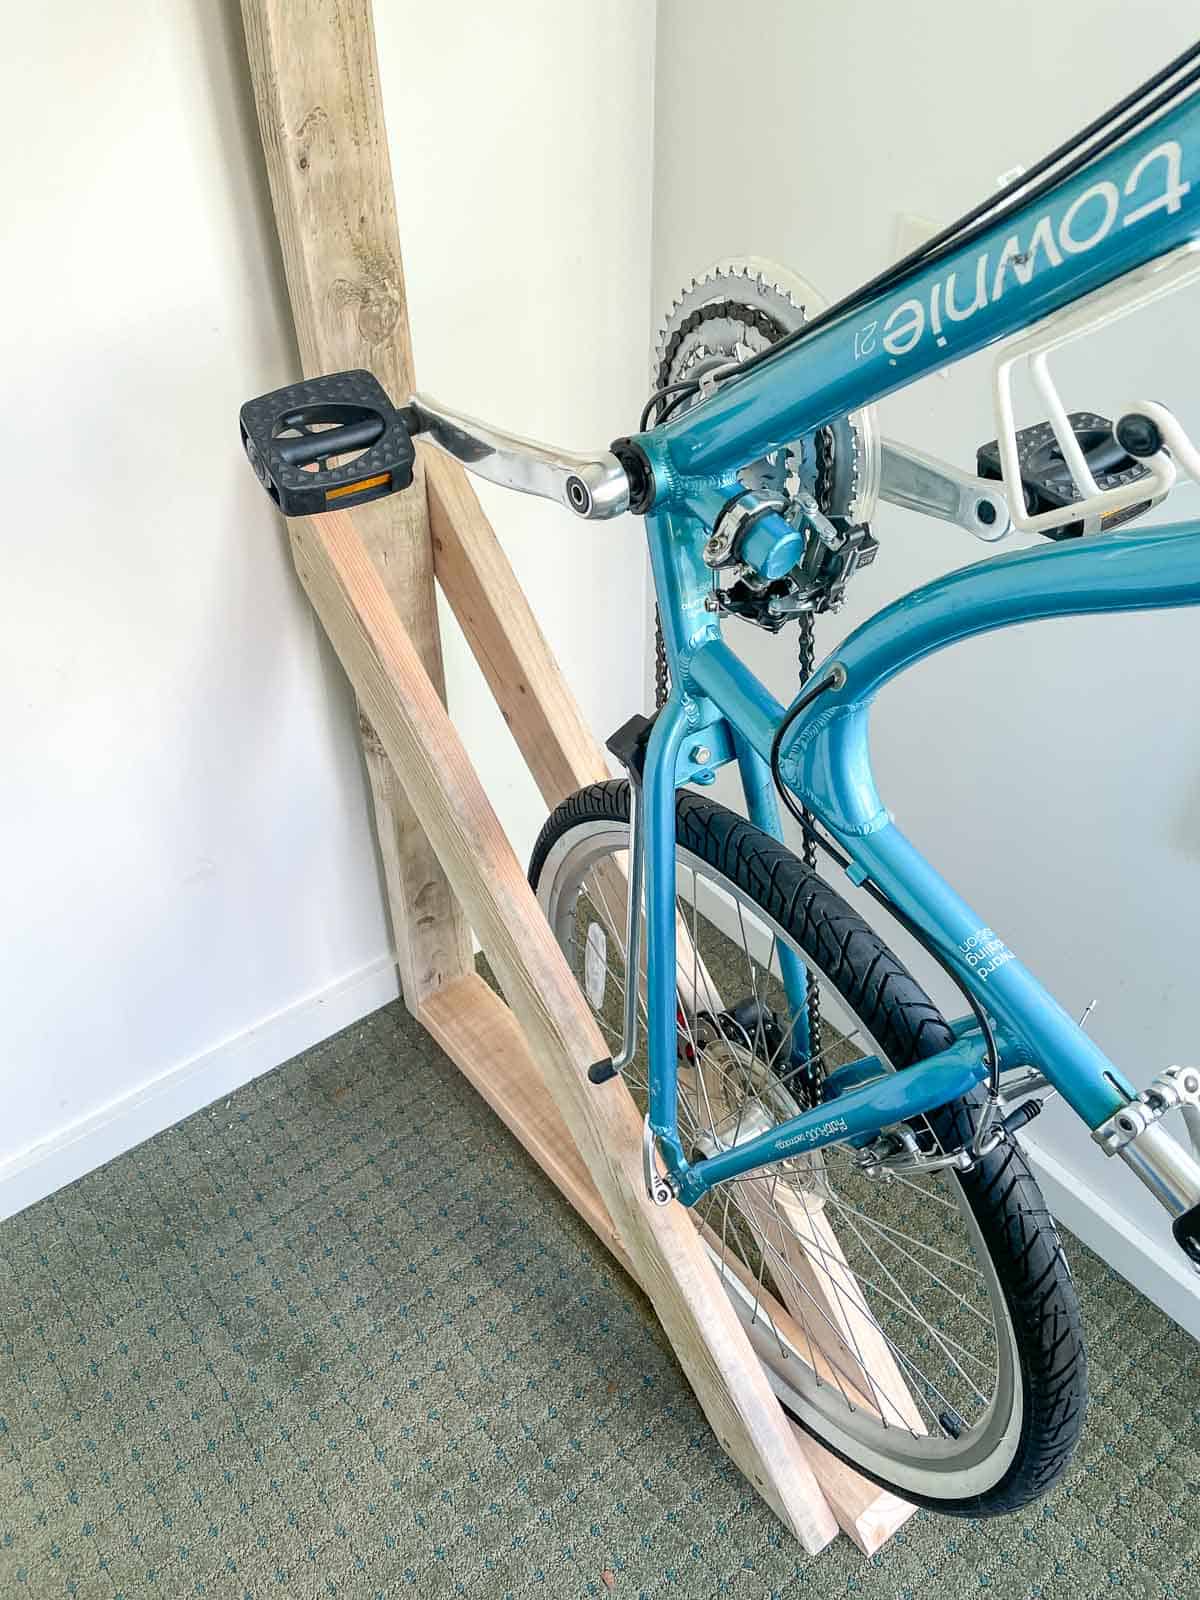
The L-shaped wall-mounted rack is the gold standard for home garages. It securely holds adult and child bikes upright, prevents tipping, and scales from one to four bikes. Unlike U-shaped cradles, this design works with all wheel sizes (20″ to 29″) and avoids drivetrain interference by supporting the front wheel and guiding the rear tire.
Cut Lumber to Size
Start with 2×6 pressure-treated or cedar boards for durability. For each bike slot, cut two base pieces at 24 to 30 inches long to match your longest bike’s wheelbase. You also need one rear upright at 12 to 18 inches long for the vertical leg of the L, one front stop block made from 2×3 lumber at 11 to 12 inches, and one rear spacer at 1.5 inches wide for road bikes or 2 inches wide for mountain and fat tires.
Pro Tip: Chamfer the front and side edges of the 2x6s with a circular saw to prevent splinters and improve aesthetics.
Install Front Stop Block
Position the two 2×6 base pieces parallel, spaced to match your tire width. Use a circular saw to notch both boards at the front edge, creating a recess for the 2×3 crosspiece. This block acts as a wheel stop, ties the base together, and prevents lateral flex. Secure it with 3-inch deck screws driven at an angle. No glue allows future adjustments.
Attach Rear Upright and Spacer
Mount the 12 to 18-inch 2×6 upright at the back end of the base using two 3-inch screws from underneath. Then install the rear spacer between the base and upright. This narrow board cradles the rear tire and prevents side-to-side wobble. Screw through the upright into the spacer for a tight fit.
Mount Rack to Wall
Cut a 6-inch wide strip of half-inch exterior plywood to run vertically along the back of the rack. Attach it to the rear uprights with screws to create a broad surface for wall mounting. Anchor into wood studs using 3-inch screws with a minimum of two per section. The top of the rack should sit 30 to 40 inches off the floor, and the bottom can rest on the floor for added stability.
Warning: Never rely on drywall anchors alone. This rack must be secured to structural framing.
Expand for Multiple Bikes
For 2 to 4 bikes, space each slot 23 to 25 inches apart center-to-center. Use 25 inches if bikes have wide handlebars. Screw all units to a shared half-inch plywood underframe beneath the bases to prevent twisting. Continue the wall flange across all sections. This modular design lets you swap spacers (1.5 inches vs 2 inches) to switch between road and mountain bikes.
Make a Pallet Bike Rack for Kids
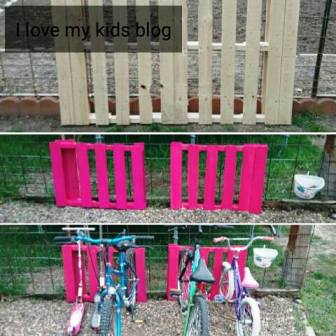
Need a quick, cheap, and portable solution for kids’ bikes? A repurposed pallet rack costs almost nothing, takes under an hour to build, and holds up to five bikes. It is perfect for renters or seasonal use.
Split a Double-Wide Pallet
Find an extra-long, double-wide pallet common in shipping yards or warehouses. Use a circular saw to cut it lengthwise down the middle, creating two narrow racks with parallel slats.
Reposition Slats for Tire Grip
Most pallets have wide gaps too big for tires to stay upright. Fix this by flipping one half so the bottom becomes the top. Use a crowbar as a lever to pry up individual slats and shift them closer to adjacent boards. The goal is quarter-inch gaps between slats. This creates a cradle that grips tires firmly while allowing easy insertion.
Smooth and Finish
Hammer down any protruding nails. Sand rough edges. Apply spar varnish or outdoor paint to protect against moisture and splinters.
Note: This rack works best with bikes that have kickstands. They lean slightly inward and stay upright without a backstop.
Position and Use
Place the rack on a flat surface. Slide bikes in one wheel at a time, letting the tire rest between slats. No tools, screws, or wall mounting needed.
Advantages include cost under $10, lightweight and portable design, and kids can park bikes themselves. Limitations are that it is not ideal for adult bikes, less stable than wall-mounted racks, and requires kickstands for security.
Build a DIY Wood Cargo Rack for Your Bike
This is not a storage rack. It is a wooden platform rack mounted directly to your bike frame for carrying bags, baskets, or cargo. It is ideal for commuters or bikepackers who want a custom, lightweight alternative to metal racks.
Cut and Finish Wood Platforms
Use hardwood scrap or three-quarter-inch exterior plywood. Cut the front rack to 6 by 8 inches and the rear rack to 6 by 13 inches to fit most panniers. Sand smooth. Drill a grid of 1-inch holes spaced 1.75 inches apart (called “drillium”) to reduce weight and add style. Apply three coats of tung oil or spar urethane, allowing full cure between coats. This protects against rain, mud, and UV damage.
Fabricate Steel Brackets
Use half-inch wide by one-eighth-inch thick flat steel bar from hardware store tool hangers. For the front L-bracket, bend in a vise to L-shape with one leg mounting to the fork crown and the other supporting the platform. Drill holes for M5 bolts with washers. Ensure clearance for rim brakes. For the rear U-brace, bend into U-shape to fit seat-stay rack mounts and drill holes to bolt to frame bosses. This works best on older 26-inch mountain bikes or steel frames.
Attach Rack Struts and Platform
Use a rack strut kit (about $17) with 32cm steel rods. Bolt struts to lower frame mounts. Attach brackets to corners of the wood platform. Secure the assembly to the bike with M5 pan-head bolts that will not abrade cargo bags.
Mount a Basket (Optional)
To install a Wald 137 Half Basket, cut two short pieces of aluminum bar and drill holes to match the basket grid. Clamp over the wire frame and bolt through. This eliminates the need for zip ties.
Performance shows weight comparable to commercial racks at 600 to 650 grams. It is strong under load, tested with 30-plus pounds, and costs under $40 versus $80 or more for store-bought racks.
Choose the Right Wood and Finish

Selecting the correct lumber and finish ensures your rack lasts for years.
Lumber Guidelines
Use 2×6 lumber for bases and uprights because it handles heavy loads. Use 2×3 for stop blocks and spacers. Use half-inch plywood for wall flanges and underframes, choosing exterior grade. Avoid untreated pine in damp areas because it warps and rots.
Finish Recommendations
For indoor garage racks, use stain plus polyurethane. For outdoor or humid areas, use spar varnish (UV-resistant). For on-bike racks, use tung oil that penetrates deeply. For kids’ racks, use paint for durability and colorful appeal.
Never skip finishing because it prevents moisture damage and extends lifespan.
Set Correct Spacing and Dimensions
Getting dimensions right prevents bikes from wobbling or colliding.
Tire Width Compatibility
Use 1.5-inch spacers for road, hybrid, and kids’ bikes. Use 2-inch spacers for mountain, fat-tire, and cruiser bikes. Too narrow causes bike wobble. Too wide causes tire shifting side-to-side.
Handlebar Clearance
Maintain minimum 23 inches center-to-center spacing. The recommended spacing is 25 inches. Measure your widest bike’s handlebars before finalizing layout.
Wheel Size Support
Base depth should be 24 to 30 inches. Shorter lengths work for 20-inch bikes, longer for touring or mountain bikes.
Avoid Common Mistakes
Learn from others’ errors to build right the first time.
Common mistakes and fixes include rack wobbles from not securing the back flange to wall studs. Fix by anchoring into studs. Wood splits during assembly from failing to pre-drill holes. Fix by pre-drilling all screw holes. Bikes tip over from incorrect spacer width. Fix by installing proper-width rear spacer. Wheels roll forward from missing front stop block. Fix by adding 2×3 stop block. Tires hard to insert from pallet rack slat spacing too narrow. Fix by adjusting to quarter-inch gaps. Moisture damage from unfinished wood. Fix by applying finish and elevating off floor.
Add Storage for Helmets and Scooters
Maximize utility by integrating extra features. Screw command hooks into the wall behind the rack for helmets. Install a pegboard section for lights, gloves, or tools. Add dedicated 4-inch slots for Razor scooters. Use overhead baskets for seasonal gear.
For mixed use, build a 2×4 mitered rack with staggered spacing. Use 3-inch gaps between supports for bikes and 4-inch gaps for scooters. Paint with team colors or add engraved name tags.
Final Recommendations for Your Bike Rack Project
For permanent garage storage, build the L-shaped wall rack using 2×6 and 2×3 lumber. Space slots 25 inches apart. Screw to wall studs and add plywood underframe. Make it reversible with no glue, just screws.
For kids’ bikes and portability, convert a pallet rack by adjusting slat gaps to quarter-inch. Apply outdoor finish. Use only with kickstand-equipped bikes.
For cyclists needing cargo space, fabricate a wood frame rack using hardwood and tung oil. Bend steel brackets carefully. Test with light loads first.
For families with bikes plus scooters plus helmets, build a multi-use rack mixing bike and scooter slots. Add wall hooks and labels. Paint for fun, kid-friendly appeal.
Frequently Asked Questions About Building a Wooden Bike Rack
How much does it cost to build a wooden bike rack?
A wall-mounted L-shaped rack costs $30 to $60 in lumber plus screws. A pallet rack costs under $10 (mostly finish). A DIY cargo rack costs under $40 total. This is far cheaper than commercial racks that run $80 to $200.
What tools do I need to build a wooden bike rack?
You need a circular saw or miter saw, drill with bits, measuring tape, pencil, and safety glasses. For the cargo rack, you also need a vise and metal-bending tools. All designs use common homeowner tools.
Can I build a wooden bike rack for adult bikes?
Yes. The L-shaped wall rack handles adult bikes of all sizes. Use 2-inch rear spacers for mountain bikes and 1.5-inch spacers for road bikes. Base depth of 24 to 30 inches accommodates most adult wheelbases.
How do I make my wooden bike rack weather-resistant?
Apply spar varnish or exterior polyurethane to all wood surfaces. Use pressure-treated or cedar lumber. Elevate the rack off concrete floors. Reapply finish every 2 to 3 years in harsh climates.
Can I customize the spacing for different bike types?
Yes. The L-shaped design uses screw-only assembly so you can swap spacers. Replace a 2-inch mountain bike spacer with a 1.5-inch road bike spacer in minutes. This makes the rack adaptable as your bike collection changes.
Key Takeaways for Building Your Wooden Bike Rack
Building a bike rack out of wood is smarter, cheaper, and more satisfying than buying one. With just a few boards, screws, and a few hours, you can create a custom storage solution stronger, more adaptable, and better-looking than most commercial options. Choose the L-shaped wall rack for permanent garage storage, the pallet rack for kids or temporary needs, or the cargo rack for on-bike carrying capacity. Measure twice, cut once, and enjoy your perfectly tailored bike storage system.