

Installing a wire shelf is a fast, affordable way to add durable, ventilated storage to closets, pantries, garages, and utility rooms. With the right tools and technique, most setups take under 30 minutes, and experienced installers can finish in as little as 10 minutes. These shelves support up to 300 lb per linear foot when properly supported and fastened. Whether you are organizing shoes, tools, or pantry items, this guide walks you through every step from measuring and cutting to final stability checks.
You will learn how to avoid common mistakes like uneven leveling, sagging shelves, or wall damage. We will cover essential tools, fastener types, bracket spacing, and expert tips like cutting the shelf 1 inch short for easier installation. By the end, you will have a level, secure, long-lasting wire shelf system tailored to your space.
Plan Your Wire Shelf Installation
Before cutting or drilling, assess your storage needs and measure accurately. The success of your wire shelf installation depends entirely on precise planning, so take your time at this stage.
Measure Your Space Correctly
Start by measuring the wall at multiple heights, since walls are rarely perfectly plumb. Use a tape measure to record the length from wall to wall, the depth from wall to desired shelf front, and the height from floor to shelf position.
Adjust your shelf length based on your setup. If one end will be against a wall, subtract half an inch. If both ends sit between walls, subtract 1 inch total. When allowing for bracket housing that measures 1.5 to 2 inches wide, leave a quarter inch extra per end.
Choose the Right Shelf Type
Match your shelf type to its intended purpose for the best results.
• Tight mesh works best for small items or shoes and can be installed upside down as a toe stop
• Ventilated wire is ideal for moisture-prone areas like pantries
• Heavy-duty gauge suits garage tools or heavy objects
• Closet gauge is standard for light to medium household use
Gather Essential Tools for the Job
Having the right tools ensures a smooth, safe installation. Professional installers recommend gathering everything before starting.
Essential Tools List
• Tape measure for accurate wall and shelf measurement
• Level, preferably a bubble stick that rides over uneven walls better than rigid levels
• Drill with quarter-inch drill bit for pilot holes in drywall
• Three-sixteenths-inch drill bit for tighter anchor engagement
• Bolt cutter or hacksaw for cutting shelf to size
• Hammer for tapping pushpins or brackets
• Sharpie for high-visibility marking on metal
• Eye protection for safety during cutting
• Push tool for setting preloaded pushpins, available from Closet Maid for about $25
• Phillips head screwdriver or impact driver for fastening screws
A bubble stick level is recommended for accuracy on imperfect surfaces, as it conforms to wall irregularities better than standard levels.
Cut the Wire Shelf to Fit Your Space
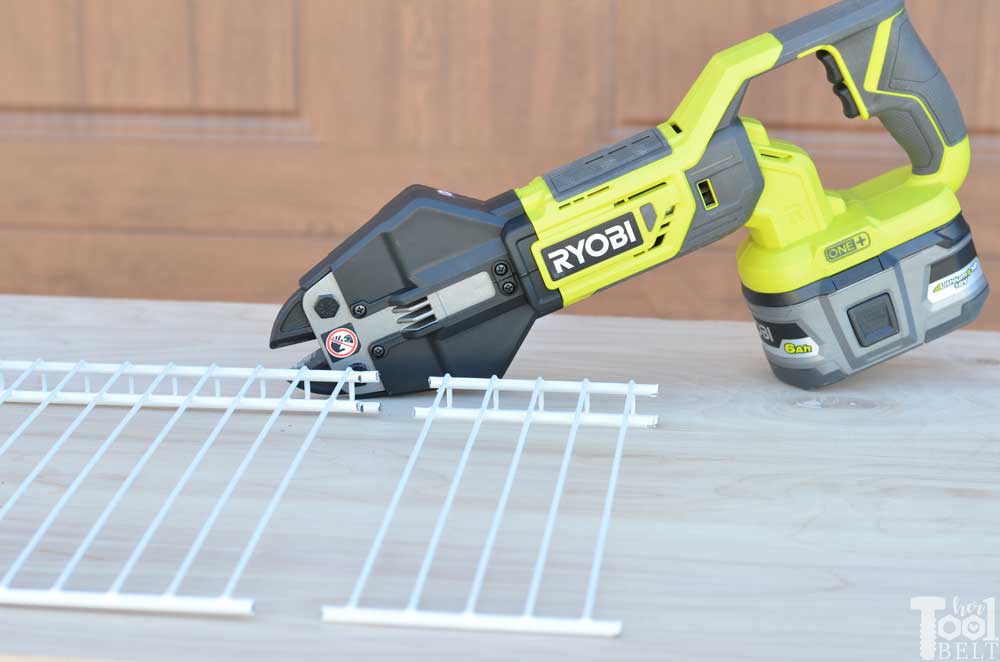
Cutting the shelf properly prevents injury and ensures a clean, professional fit. Always cut before installing end caps.
Mark and Cut the Shelf
Mark the cut line using a Sharpie for maximum visibility on the metal surface. Align your cut with the wire grid lines for a cleaner result.
Use a bolt cutter for fast, clean cuts by stabilizing the shelf and applying firm pressure. Alternatively, use a hacksaw or angle grinder with a metal-cutting blade. Always deburr cut edges to remove sharp metal fragments.
Install End Caps
Snap plastic end caps onto all exposed wire ends after cutting. This step is mandatory for safety, especially in homes with children, because it prevents snagging and cuts. End caps are usually included in kits but are available separately if needed.
Install Back Wall Clips
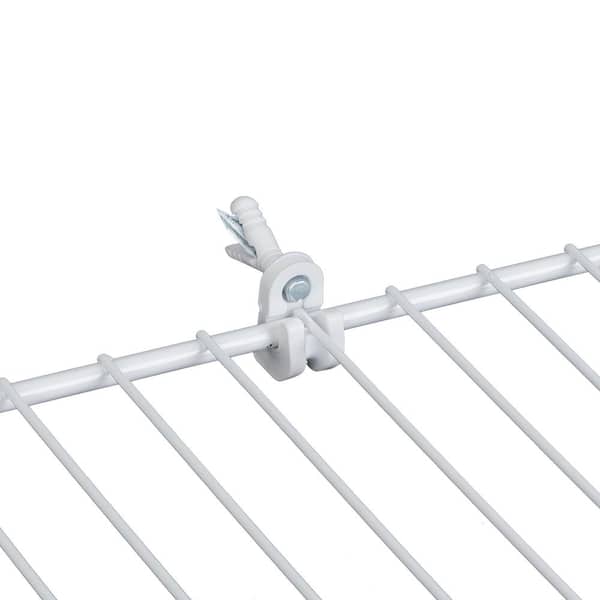
The back wall clips anchor the shelf to the wall and must be installed first before placing the shelf.
Draw a Level Reference Line
Use a bullet level or bubble stick to draw a horizontal line around the wall at shelf height. This ensures all clips are aligned perfectly, which is critical for a level final result.
Mark and Install Clip Positions
Place the first clip 2 to 3 inches from each end of the planned shelf location. Space remaining clips every 10 to 12 inches on center. Avoid drilling into studs, since pushpins are designed specifically for drywall anchoring.
Drill straight and perpendicular to the wall using a quarter-inch bit. Insert the pushpin or Tri-Loc anchor into the hole. If a clip lands on a stud, use a screw instead of a pin for a more secure hold.
Mount the Wire Shelf
With clips installed, you are ready to place the shelf. This step requires attention to detail to ensure proper fit.
Slide Shelf onto Back Clips
Align the shelf with the back wall clips and slide it into position. The shelf should sit half an inch below the pin installation point due to the bracket design. When installing long shelves, hold one end upright for better control.
Check for Level
Use a level across the front edge, back edge, and center of the shelf. If the shelf is unlevel, adjust individual clip heights by loosening, repositioning, and retightening until perfectly horizontal.
A level shelf prevents tipping and ensures even weight distribution across all support points.
Add Front Support Braces
All wire shelves must be front-stabilized to prevent tipping under load. This step is mandatory for safety.
Install Shelf Support Braces
With the shelf in place, insert the brace into the front wire grid. Rotate it back toward the wall until it lies flat. Mark the wall through the mounting hole, then drill a quarter-inch hole and insert a Tri-Loc anchor. Secure the brace with a screw until it sits flush against the wall.
Space support braces every 36 inches for standard loads and every 24 inches for heavy loads. Always install braces near open ends. Consider adding an inverted Versa-Clip above the brace as an anti-lift device for extra security.
Reinforce for Heavy Loads

Long shelves or those carrying heavy items need additional reinforcement to prevent sagging and lifting.
Add Extra Support
Install additional back clips at the ends of shelves over 36 inches, especially for unsupported ends. Use face-mounted brackets to replace or supplement support braces, as they offer higher load capacity and extreme durability.
For shelves over 6 feet with front-heavy loads like hanging clothes, you must install a retaining clip. This clip must be screwed into a wall stud to prevent the back edge from lifting under pressure. Install in the center stud for maximum effectiveness.
Customize for Special Uses
Wire shelving adapts to special storage needs with a few modifications.
Build a Shoe Shelf
Use a tight mesh shelf installed upside down so the raised lip becomes a toe stop. Attach shoe shelf brackets to the bottom of the shelf, mounting them to the wall or letting them rest on the floor. Allow a 5 to 10 degree downward tilt for easy access to shoes.
Install Corner Shelves
Maximize unused corner space by measuring both walls from the corner. Run the first shelf to the corner at full length. The second shelf starts at the corner with a length equal to the wall measurement minus the shelf depth, ending at the front edge of the first shelf to form an L-shape. Use a corner bracket to support the floating end and ensure both shelves are level and aligned at the same height.
Optimize Pantry Shelves
Prevent small items like jars and spices from falling through the wire grid by capping the shelf with quarter-inch pegboard. Secure the pegboard with white zip ties. A 4 by 8-foot sheet costs under $20 and dramatically improves pantry organization.
Follow Load Capacity Guidelines
Even the strongest shelf fails with poor weight distribution. Understanding load limits helps you plan storage appropriately.
Max Load by Setup
Fixed-mount installations at 16 inches depth support up to 180 lb, while ShelfTrack systems at the same depth handle up to 300 lb. In general, wire shelves support up to 300 lb per linear foot when properly supported. Distribute weight evenly and avoid placing heavy items at the front edge or unsupported ends.
Final Inspection and Safety Check
Before loading your shelf, verify stability and safety with this checklist.
Complete This Checklist
Ensure all back wall clips are secure and activated. Confirm the shelf is level front-to-back and side-to-side. Verify that front support braces, poles, or brackets are installed. Check that end caps cover all cut edges. Feel for any sharp edges or protrusions. Test that the shelf does not tip when the front is pressed. Confirm a retaining clip is installed if the shelf exceeds 6 feet and carries front-heavy loads. Tighten all fasteners and conceal any unused holes.
Maintain and Troubleshoot Your Wire Shelf
Ensure long-term durability with simple maintenance and address problems quickly.
Common Issues and Solutions
If the shelf will not slide in, recut it a quarter to half inch shorter. For sagging, add braces every 24 inches and redistribute weight. If the shelf is not level, adjust clip height or re-drill the holes. When clips pull out, replace them with toggle bolts. For wobbling, tighten screws and check anchor engagement. If the back lifts, install a retaining clip into a stud. Wall scratches are prevented by cutting the shelf shorter and measuring precisely.
Wipe the shelf with a damp cloth to remove dust. Recheck level and tightness annually. Replace damaged end caps immediately and inspect anchors in humid areas.
Frequently Asked Questions About Installing Wire Shelves
How long does it take to install a wire shelf?
Most installations take under 30 minutes. Experienced installers can complete a standard shelf in as little as 10 minutes with the right tools and preparation.
Do wire shelf brackets need to hit wall studs?
No, back wall clips use pushpins designed for drywall and do not require studs. However, retaining clips for long shelves must be screwed into studs for proper load support.
How much weight can a wire shelf hold?
Wire shelves support up to 300 lb per linear foot with proper support spacing and appropriate fasteners. Fixed-mount installations typically handle 180 lb at 16-inch depth, while ShelfTrack systems support up to 300 lb at the same depth.
Can I cut a wire shelf to fit my space?
Yes, cut the shelf using a bolt cutter or hacksaw. Cut 1 inch shorter than your measured space to prevent binding and wall damage during installation. Always deburr sharp edges and install end caps after cutting.
What tools do I need to install a wire shelf?
You need a tape measure, level, drill with bits, bolt cutter or hacksaw, hammer, Sharpie, eye protection, and a screwdriver. A push tool for setting pushpins and a bubble stick level are also recommended for professional results.
Key Takeaways for Installing Wire Shelves

Proper wire shelf installation requires accurate measuring, correct tool selection, and careful attention to support spacing. Cut your shelf 1 inch shorter than measured to prevent binding, and always install front support braces to prevent tipping. Use retaining clips for shelves over 6 feet with front-heavy loads. For pantries, add pegboard capping to keep small items from falling through. With these techniques, your wire shelf will provide years of sturdy, adjustable storage.


