

You’ve admired them in design magazines and Pinterest boards—those sleek floating corner shelves that add storage without visible brackets cluttering your walls. If you’re wondering How to Install Floating Corner Shelf units without sacrificing their clean, modern look, the process requires careful planning. Unlike standard floating shelves that slide in from one side, corner versions demand precise alignment with two walls meeting at a 90-degree angle, along with hidden structural support.
This guide explains How to Install Floating Corner Shelf systems step by step. You’ll learn how to locate wall studs for secure anchoring, build a sturdy internal support frame, mount it safely, and achieve a professional finish with no visible screws or gaps.
Plan Your Floating Corner Shelf Layout
Before purchasing materials or picking up tools, map out exactly where your shelf will go. Proper planning prevents costly mistakes and ensures a professional result.
Measure Wall Space and Locate Studs
Start by measuring the corner space where two walls meet. Most interior corners appear to be 90 degrees, but use a level or digital angle finder to verify. Many rooms have slight deviations that can throw off your alignment.
Use a stud finder to locate wall studs on both sides of the corner. Mark stud positions with painter’s tape. Your floating shelf must anchor into at least two studs per wall for stability. Standard stud spacing is 16 inches on center, but corners often have extra framing for reinforcement.
Pro Tip: Adjust your desired shelf height to align with studs. Never rely on drywall anchors alone—they will fail over time under load.
Calculate Shelf Dimensions
Determine how far each shelf arm will extend along the walls. A common layout uses 20 to 30 inches per side with a depth of 8 to 10 inches. For deeper shelves over 10 inches, add cross braces every 18 inches for support.
Use the corner offset rule: if one wall gets a 40-inch shelf and depth is 10 inches, cut the second shelf to 30 inches (40 minus 10 equals 30). This ensures both shelves meet cleanly at the corner without overlapping or gaps.
Select Materials and Hardware
The strength and appearance of your floating corner shelf depend heavily on material choices. Pick based on load requirements, finish style, and your wall type.
Choose Wood for the Shelf Frame
Select kiln-dried lumber that resists warping. Cedar and poplar work well for painted or stained finishes. Plywood (½-inch or ¾-inch) offers stability and affordability for shelf surfaces. Avoid green lumber—it shrinks and warps as it dries, leading to gaps and misalignment.
Your cut list should include support blocks from ripped 2×4s, horizontal rails from 1×8s, and plywood for skinning the underside. A typical single shelf uses five support blocks, two horizontal rails, and bottom skin panels.
Pick Fasteners and Reinforcements
Use 3-inch construction screws for securing frames into studs. HeadLOK fasteners provide high pull-out resistance with their long shank design. Wood glue reinforces all joints and increases rigidity—never skip this step. Pocket-hole screws (1¼-inch) work well for hidden internal frame assembly.
Never skip glue: Mechanical fasteners alone loosen over time due to vibration or wood movement.
Build the Internal Support Frame
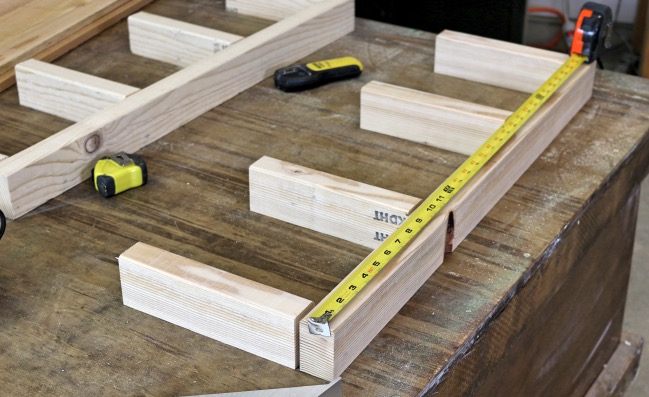
The hidden frame is the backbone of your floating shelf. It must be strong, square, and precisely sized to fit within the corner.
Cut Frame Components to Size
Using a table saw or miter saw, cut all frame pieces according to your design. Typical components include support blocks (6½ inches by 3½ inches from ripped 2×4s), horizontal rails (26½ inches and 46 inches from 1×8s), and rear support rail (20 inches for back edge).
Work efficiently: Cut all pieces at once to minimize setup changes and ensure consistency.
Assemble the Frame with Pocket Holes
Lay out support blocks and clamp them in position. Attach horizontal rails using a Kreg pocket-hole jig and 1¼-inch wood screws. Apply wood glue to all joints before screwing—this creates a rock-solid frame.
Check for squareness by measuring diagonally across the frame. Both measurements should match. Adjust clamps if needed before final tightening.
Visual cue: The frame should sit flat against the wall with no rocking. Sand any high spots on the mounting surface.
Mount the Frame to Wall Studs
This is the most critical step. A poorly anchored frame will sag or pull out under weight.
Level and Mark Mounting Height
Use a laser level or bubble level to draw a horizontal line across both walls at your desired shelf height. Extend the line past the corner using painter’s tape as a visual guide.
Transfer stud locations to this line. Mark screw points on the frame where it will contact each stud.
Secure Frame with Heavy-Duty Fasteners
Hold the frame against the wall, aligned with your level line. Pre-drill pilot holes through the frame into each stud.
Drive 3-inch construction screws or HeadLOK fasteners through the frame and deep into the studs. Use at least two screws per stud for maximum hold.
Warning: Do not overtighten—this can strip the wood or warp the frame. Tighten until snug, then stop.
Pro Tip: Install shelves from bottom to top when doing multiple units. This gives you better access and helps maintain consistent spacing.
Attach Outer Shelf Components
With the support frame secure, build out the visible parts of the shelf.
Install Face Boards and Skinning
Attach the 1×8 shelf face to the front edge using finish nails or countersunk screws. This creates a thick, premium look.
Cut ¼-inch plywood to size for the bottom skin and end caps. Glue and nail these in place to enclose the underside and hide the frame.
For a seamless look: Miter the corners of the face and skin panels at 45 degrees and glue them together before attachment.
Add Cross Braces for Long Spans
If your shelf extends more than 36 inches along a wall, install 2×2 cross braces every 18 inches. These prevent sagging and increase load capacity.
Secure braces with wood glue and 2.5 to 3-inch screws driven at an angle (toe-screwing) into the horizontal rails.
Handle Imperfect Wall Corners

Few corners are perfectly square. Here is how to adapt.
Align With the Flatter Wall
If one wall is flatter than the other, align the sliding side of the shelf or bracket with that wall. Let the opposite side conform naturally to the angle. This prevents gaps and ensures a flush fit on the more visible side.
Scribe and Trim for Precision Fit
For high-end results, scribe the shelf edge to match the wall’s angle. Hold a compass or scribing tool against the adjacent wall, trace the contour onto the shelf edge, then cut carefully with a jigsaw and sand smooth.
This technique is essential for live-edge shelves or when walls are significantly out of square.
Finish With Gap Concealment
Even a perfectly installed shelf looks amateurish if gaps show between it and the wall.
Fill and Sand Screw Holes
Use spackle or wood filler to cover all visible nail and screw holes. Let dry completely, then sand smooth with 220-grit paper. Wipe clean with a tack cloth to remove dust before painting.
Caulk the Top Seam
Apply paintable, flexible caulk along the top edge where the shelf meets the wall. Run a damp finger over the bead to smooth it.
Why it matters: Caulking hides minor gaps, improves finish quality, and prevents moisture from getting behind the shelf.
Install on Tile or Masonry Walls
Installing in bathrooms or kitchens with tile requires special care to avoid cracking.
Use the Right Drill Bit and Technique
Use a carbide-tipped masonry bit for ceramic or porcelain tile. Use a diamond core bit for stone or thick tile. Drill at slow speed with light pressure—let the bit do the work. Cool the tile by pressing a damp sponge against it during drilling.
Helper recommended: Have someone apply water while you drill to dissipate heat.
Anchor With Appropriate Fasteners
Drill holes slightly deeper than the wall plug length. Insert plastic or metal anchors, then screw in mounting brackets.
Never skip anchors: Tile and grout cannot support direct screw threads.
Choose the Right Hardware System
Not all floating shelves use the same mounting method. Pick one that suits your skill level and wall type.
Cleat Systems Work Best for DIY
A wooden or metal cleat is screwed into the studs. The shelf rests on it and is secured from behind. This method is simple to install, provides strong support, and levels easily. Use 2×2 or 1×2 cleats for wood-only builds, or welded steel brackets for heavy loads.
Concealed Rod Systems Have Limitations
Metal rods anchored into the wall insert into holes drilled in the shelf back. The shelf slides down over them. However, this will not work in enclosed corners—you cannot slide the shelf in diagonally.
Maximize Load Capacity and Durability
Even the best-looking shelf fails if it cannot hold weight.
Anchor Into Multiple Studs
Each arm of the shelf should engage at least two wall studs. More studs equal greater load distribution. A properly framed floating corner shelf supports 20 to 30 pounds; reinforced joints can handle 50 pounds or more.
Use Glue Plus Screws for Joints
Screws alone can loosen. Combine with waterproof wood glue to create permanent, rigid connections.
Avoid Sagging With Proper Spacing
For shelves over 36 inches long, place support blocks every 16 to 18 inches. This prevents the middle from drooping under books or decor.
Test stability: Press down gently on the center after installation. No movement should occur.
Achieve a Professional Finish
The final look makes all the difference.
Pre-Finish Before Installation
Stain or paint all components before assembly and mounting. This ensures even coverage and avoids brush marks on tight edges.
Skip touch-ups on walls: Use painter’s tape to protect adjacent surfaces during final painting.
Consider a Beadboard Backing
For added visual interest, install ¼-inch beadboard paneling on the wall before mounting the shelf. It hides imperfections and enhances the classic, built-in look.
Avoid These Common Mistakes
Even experienced DIYers make errors. Learn from others’ regrets.
| Mistake | How to Avoid |
|---|---|
| Shelf not level | Use a laser level and check both walls. Shim if needed. |
| Visible screws | Drive screws upward from below or downward from above into hidden brackets. |
| Cracked tile | Drill slowly, use water cooling, and apply light pressure. |
| Gaps at corner | Scribe the edge or use a precision-cut joint. |
| Weak support | Always anchor into studs—never use drywall anchors for floating shelves. |
Final check: Gently tug on the shelf after installation. It should feel solid, with no wobble or pull.
Frequently Asked Questions About Installing Floating Corner Shelves
Can I install a floating corner shelf without finding studs?
No. Floating corner shelves require secure anchoring into wall studs. Drywall anchors alone will not support the weight over time and will eventually pull out. Use a stud finder to locate studs, and plan your shelf height around them.
How much weight can a floating corner shelf hold?
A properly installed floating corner shelf anchored into wall studs typically holds 20 to 30 pounds. With reinforced joints and cross braces, capacity increases to 50 pounds or more. Always anchor into multiple studs for best load distribution.
What tools do I need to install a floating corner shelf?
You will need a stud finder, laser level or bubble level, drill, miter saw or circular saw, Kreg pocket-hole jig, clamps, sandpaper, and various drill bits. For tile or masonry walls, add a carbide-tipped masonry bit.
How do I fix gaps between the shelf and the wall?
Apply paintable caulk along the top seam where the shelf meets the wall. Run a damp finger over the bead to smooth it. For larger gaps, use spackle or wood filler first, then caulk once dry.
Can I install a floating corner shelf on tile?
Yes. Use a carbide-tipped or diamond core drill bit, drill slowly with light pressure, and keep the tile cool with a damp sponge. Insert appropriate wall anchors before screwing in your mounting hardware.
Key Takeaways for Installing Floating Corner Shelves
Installing a floating corner shelf successfully requires three critical elements. First, always anchor into wall studs—never rely on drywall anchors for structural support. Second, build a strong internal frame using wood glue and pocket-hole joinery before mounting. Third, take time with the finish work by pre-finishing all components, filling screw holes, and caulking seams.
Once installed, inspect your shelf annually for signs of stress, especially if holding heavy items. Tighten any loose screws and re-caulk if gaps appear over time.
With careful planning, solid anchoring, and attention to detail, your floating corner shelf will be both beautiful and built to last.


