

A leaning shelf adds stylish storage to any room while taking up minimal floor space. This freestanding ladder-style unit leans against the wall like a architectural element, making it perfect for living rooms, bathrooms, or home offices. You can build one yourself for under $60, saving hundreds compared to store-bought versions that often use cheap materials. This guide walks you through every step, from cutting angled legs to applying the final finish, so you can create a sturdy and beautiful leaning shelf.
Cut Angled Legs at 10° for the Perfect Lean
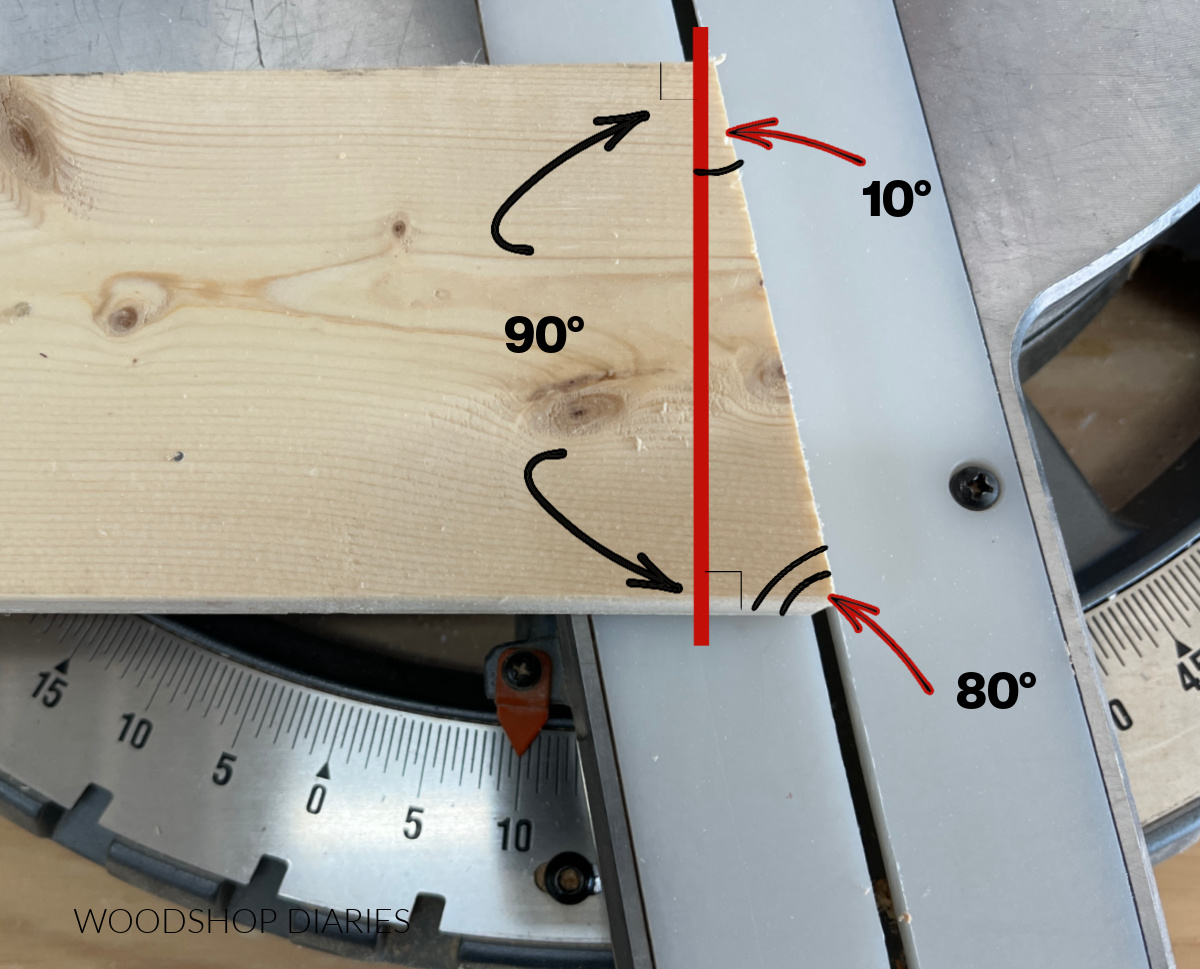
The legs determine the angle and overall stability of your leaning shelf, so precise cuts are essential.
Choose Your Lumber
Select 1×3 or 1×4 pine or poplar boards, cut to 76-1/4″ to 84″ long. Pine is budget-friendly and stains well, while poplar accepts paint smoothly for modern two-tone designs.
Mark and Cut the 10° Bevels
Set your miter saw to a 10° angle. Cut both ends of each leg with the angle facing the same direction to create the signature lean. Double-check that both legs match exactly to prevent wobbling.
Install Top Back Support for Stability
The back support connects the legs at the top and prevents them from splaying outward over time.
Cut and Attach the Support Piece
Cut a 1×3 board to 17-1/4″ long. Position it flush with the top and back edges of both legs, then clamp in place. Drill pilot holes and secure with 2″ wood screws and wood glue. This creates a rigid triangle that keeps the frame stable.
Cut Tapered Shelves from Plywood

The signature look comes from shelves that get progressively deeper from top to bottom.
Select Plywood and Cut Shelves
Use ¾” sanded plywood (birch or oak-faced). Cut five shelves to these dimensions with a 22″ width.
| Shelf Position | Depth |
|---|---|
| Top | 4.5″ |
| Second | 6.75″ |
| Third | 9″ |
| Fourth | 11.5″ |
| Bottom | 14″ |
Adjust depths to match your style preference, keeping the incremental increase of about 2–2.5″ per shelf for visual balance.
Reinforce Shelves with Back and Side Supports
Plywood shelves need backing to stay rigid and align properly on the angled legs.
Add Rear Shelf Supports
Cut 1×2 or 1×3 boards to match shelf width. Glue and nail them to the back edge of each shelf using 1-1/4″ brad nails. This creates a solid lip that attaches cleanly to the legs.
Install Angled Side Supports
Cut two 1×2 pieces per shelf. Hold each piece on the shelf and trace the 10° angle from the leg, then cut along the line. Glue and nail into place to ensure the shelf sits flush against the leaning frame.
Mark Shelf Positions on Legs
Accurate marking ensures all shelves sit level even though the legs are angled.
Divide Leg into Even Sections
For an 84″ leg with 5 shelves, divide by 6 to get 14″ spacing. Mark every 14″ from the bottom on both legs. Alternatively, set the first shelf 9.5″ from the bottom and use 11″ tall spacer blocks to position each subsequent shelf.
Draw Level Lines and Pre-Drill
Using a speed square, draw a line across each leg at the same 10° angle as the bevel. At each mark, drill two pilot holes 1″ apart, centered and set 0.5″ inward from each edge.
Attach Shelves to the Frame
This step requires precision and ideally a helper to hold shelves in place while you secure them.
Secure Shelves with Screws
Have a partner hold each shelf in position on the marked lines. Align the back edge with the leg line and confirm the shelf is level. Drive 2″ screws through the pre-drilled holes into the shelf’s back support. Check level after each shelf before proceeding.
Add Front Trim for a Clean Finish
Exposed plywood edges look unfinished, so cover them with trim.
Cut and Attach Solid Wood Trim
Cut 1×2 or ¾” molding to match shelf front width. Apply wood glue to the edge, clamp in place, and nail with 1″ brad nails every 6–8″. Fill holes with wood filler and sand smooth.
Alternative: Iron-On Edge Banding
Use adhesive-backed veneer tape cut to length. Apply with a hot iron to activate the glue, then trim excess with a utility knife and sand flush.
Sand and Finish Your Leaning Shelf
A smooth, even finish elevates your shelf from DIY project to designer furniture.
Sand the Entire Unit
Use 120-grit sandpaper, following the wood grain. Focus on edges, corners, and trim seams. Wipe down with a damp cloth, then vacuum all dust.
Stain or Paint
For stained wood, apply wood conditioner first to prevent blotching on pine. Use a foam brush to apply stain, wipe off excess after 5–15 minutes, and let dry 24 hours. For painted legs, prime poplar first, then apply satin or semi-gloss paint.
Seal with Polyurethane
Apply 2–3 coats of water-based polyurethane in satin finish. Lightly sand between coats with 220-grit and wipe clean before each new coat. Let cure fully for 48 hours before loading the shelf.
Anchor to Wall for Safety
Even a stable-feeling leaning shelf must be secured to prevent tipping.
Locate Wall Studs and Attach
Use a stud finder to identify studs behind the top of the shelf. Drive 2″ screws through the top back of the shelf into two studs, or use heavy-duty L-brackets screwed into both shelf and wall. This step is critical in homes with children or pets.
Frequently Asked Questions About Making a Leaning Shelf
What is the best angle for a leaning shelf?
The most common and effective angle is 10°. This creates a natural lean while keeping the base flat on the floor and shelves level. Some plans use 5° or 9°, but 10° provides the best balance of stability and aesthetics.
How much does it cost to build a leaning shelf yourself?
Building a leaning shelf costs approximately $60 for materials, including lumber, plywood, trim, glue, and fasteners. This saves $150–250 compared to commercial versions that cost $200–300.
How long does it take to build a leaning shelf?
The project takes 6–10 hours total. Cutting the pieces takes 1–2 hours, assembly takes 3–5 hours, and finishing (sanding, staining, sealing) takes 2–3 hours including drying time.
Can a leaning shelf hold heavy books?
Yes, when properly constructed with 2″ screws or pocket hole joinery, a leaning shelf can hold 50 pounds or more. Place heavier items on lower shelves to lower the center of gravity and increase stability.
Do I need a helper to build a leaning shelf?
Having a helper is strongly recommended during the assembly phase when attaching shelves to the legs. One person can hold the shelf in position while the other drives the screws and checks for level. Working alone can lead to misalignment and frustration.
Key Takeaways for Building Your Own Leaning Shelf
Building a leaning shelf is a rewarding DIY project that combines functionality with minimalist style. The key steps involve cutting precise 10° angles on the legs, creating progressively deeper shelves for that signature tapered look, and reinforcing all joints with screws and wood glue. Always finish by anchoring the top to wall studs for safety, especially if you plan to store heavy items. With proper planning and a helper, you can complete this project in a weekend and create a custom piece that looks like it came from a high-end furniture store. Start by gathering your materials, set up your workspace, and enjoy the satisfaction of building something beautiful with your own hands.


