Losing power steering in a modern vehicle often leads to a costly diagnosis: “Replace the entire electric rack and pinion.” But in over 60% of cases, the real issue is not a failed rack. It is a failed drive belt or degraded coupling inside the electric power steering system. With the right knowledge and tools, you can perform an electric rack and pinion repair for a fraction of the cost, restoring full steering assist without removing the rack. This guide covers every step from diagnosing the true cause to replacing belts, couplings, and sensors using OEM-level procedures.
Diagnose EPS Failure Correctly Before Replacing Parts

Accurate diagnosis is the foundation of any successful electric rack and pinion repair. Shops often recommend full rack replacement because they lack access to targeted diagnostics or repair kits. But identifying the actual failing component saves hundreds or thousands of dollars.
Read EPS-Specific Trouble Codes
Use an OBD2 scanner capable of accessing EPS or ESC modules, not just basic engine codes. Look for these key DTCs that indicate specific component failures.
C1510 and C1513 point to motor circuit faults, meaning you should check power, ground, and motor function. C2600 and C2607 indicate torque sensor errors, which commonly cause erratic steering assist. C2610 means the steering angle sensor needs calibration or has failed entirely. U0101 and U0402 signal communication loss, which points to wiring problems or module issues rather than mechanical failure.
A U-code never means the belt is bad. It means the system is not talking. Check fuses, grounds, and connectors first.
Test Motor Function Before Disassembly
With the key on, turn the steering wheel slightly. You should hear a soft whirring from the motor. No sound indicates an electrical issue. If the motor spins but there is no assist, the belt or coupling has likely failed.
Monitor Live Sensor Data Using Scan Tools
Watch these parameters on your scan tool live data display. Torque sensor output should rise with steering effort. Vehicle speed signal affects assist level and must be present. Motor current draw spikes indicate mechanical binding in the system.
If torque increases but the motor does not respond, the drive system, meaning the belt or coupling, is broken.
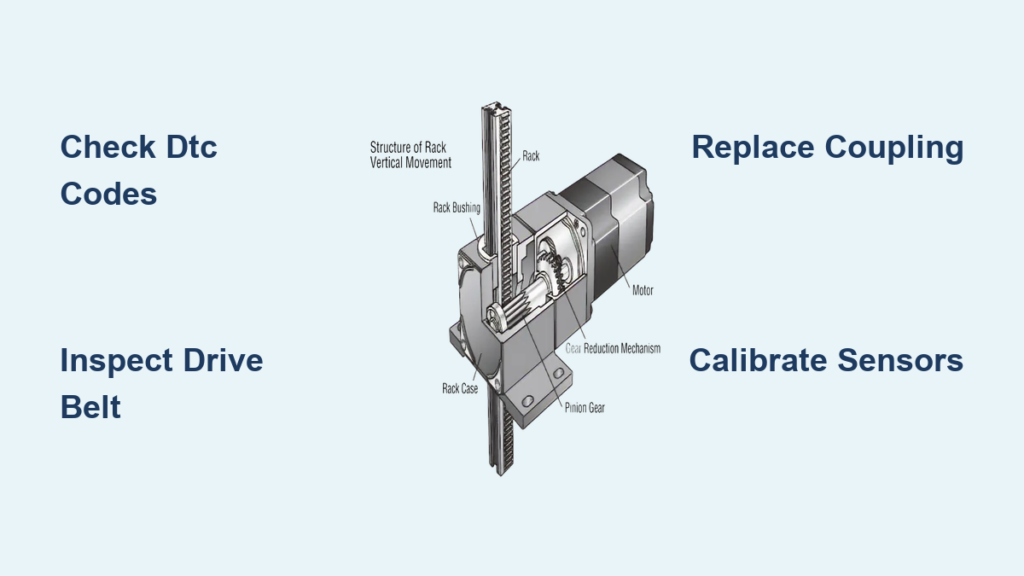
Inspect the Drive Belt System in Belt-Driven EPS

Belt-driven EPS systems are common on Ford, RAM, and GM trucks and SUVs. The belt connects the electric motor to the spiral gear that moves the rack. When it fails, assist is lost even if the motor and rack are perfectly functional.
Remove the Motor Shroud Safely
Disconnect the battery negative terminal before starting any work. Remove the Torx bolts securing the motor shroud. Carefully pull back the cover, and never force it if resistance is felt.
Pro Tip: Label every connector and take photos before disconnecting wiring harnesses.
Check for Belt Damage
Look for these specific signs of belt failure that indicate a repairable condition.
Stripped or missing teeth on the Gates timing belt are the most common failure mode. Rubber debris inside the housing indicates partial failure. Twisting, fraying, or delamination weakens the belt. Misalignment between pulleys causes premature wear.
Even minor wear causes slippage and intermittent assist that drivers often ignore until complete failure.
Confirm Spiral Gear Engagement
The large pulley attached to the spiral gear should rotate smoothly. If it is seized or gritty, internal rack damage may be present. But if it turns freely and the motor spins, the belt is your fix.
Replace the Drive Belt in Belt-Driven Systems
Swapping the belt avoids $1,500 or more in rack replacement costs and usually does not require a wheel alignment afterward.
Gather Required Tools
You need a Torx bit set including T20, T25, and T30 sizes. A socket wrench and extensions are essential. A chamfer ring removal tool specific to your vehicle model is critical. Get a new Plews-Edelmann EPS belt kit that includes the belt, gaskets, and O-rings.
Warning: Never reuse the old chamfer ring or O-rings. Contamination leads to early failure and voided warranties.
Step-by-Step Belt Replacement Process
Remove the motor assembly after disconnecting the wiring harness. Extract the chamfer ring using the correct tool for your vehicle, such as EPST-1 for Ford Explorer or EPST-4 for RAM 1500. Slide out the old belt and inspect both pulleys for scoring or damage. Install the new belt and ensure the teeth fully engage both pulleys. Replace all O-rings and gaskets from the kit. Reinstall the chamfer ring with the proper tool to avoid housing damage. Reattach the motor and shroud.
Verify Proper Belt Tension
The belt should allow 5 to 10 millimeters of deflection when pressed in the middle span. Too loose causes slippage. Too tight causes premature wear and motor bearing stress.
Repair Coupling-Driven EPS Systems

In many sedans and crossovers, a rubber coupling connects the motor to the pinion or column shaft. Over time, the rubber cracks or separates, killing steering assist completely.
Identify Coupling Type in Your Vehicle
Pinion-driven couplings have the motor mounted at the end of the rack. The coupling links the motor shaft directly to the pinion gear. This design is found in Chevrolet Equinox, Buick LaCrosse, and Chevrolet Impala.
Column-driven couplings have the motor on the steering column. The coupling joins the motor to the column shaft. This design is found in Hyundai Sonata, Toyota Avalon, and Lexus UX vehicles.
Diagnose Coupling Failure
Watch for these symptoms that indicate coupling problems. Spongy steering feel and delayed response are primary indicators. A clunking noise during turns is a common complaint. Intermittent assist that comes and goes suggests coupling damage.
Test by disconnecting the motor and manually rotating the coupling. Excessive play or visible cracks mean replacement is needed.
Replace the Rubber Coupling
This repair restores direct torque transfer without replacing the entire rack assembly.
Use OEM-Spec Coupling Kits
Plews-Edelmann coupling kits include everything needed for a complete repair. The high-durometer rubber coupling resists fatigue. Alignment marks ensure precise installation. Mounting hardware is included. Installation tools come with the kit when needed.
Kit 9700 covers pinion-driven applications like Buick LaCrosse and Chevrolet Equinox. Kit 9701 covers column-driven applications like Hyundai Sonata and Kia Optima. Kit 9702 covers column-driven applications like Toyota Avalon and Lexus models.
Installation Steps for Coupling Replacement
Disconnect the battery and motor wiring first. Unbolt the motor from the rack or column. Remove the old coupling, which may require gentle prying. Clean both shafts of rust or debris. Slide on the new coupling and align the marks per kit instructions. Reinstall the motor and torque fasteners to specification. Reconnect the harness and verify.
Critical: Misalignment causes vibration and rapid failure. Follow alignment guides exactly as shown in the kit instructions.
Replace Faulty Torque Sensors
When steering feels too light or too heavy, or the EPS light flashes, the torque sensor may be failing.
Confirm Sensor Failure Before Replacing
Scan for C2600 or C2607 DTCs that indicate torque sensor errors. Check live data to verify the torque value scales with steering effort. Rule out binding in the steering linkage first.
Install OEM-Equivalent Torque Sensor
Plews-Edelmann sensors come pre-aligned with accurate alignment marks. They include mounting hardware. U.S.-based A.S.E. certified technical support is available for installation questions.
Sensor 9704 fits 2008-2012 Ford Escape and 2008-2011 Mercury Mariner. Sensor 9705 fits 2004-2012 Chevrolet Malibu and 2005-2010 Pontiac G6.
Replacement Process
Disconnect the battery. Remove steering column covers. Unplug the old sensor and unbolt it from the shaft. Install the new unit and match alignment marks exactly. Reconnect and test.
Note: Some models require steering angle sensor calibration after replacement. Use a scan tool to perform the zero-point calibration procedure.
Avoid Costly Mistakes During EPS Repair
Even experienced technicians make errors that lead to comebacks or further damage. These tips prevent the most common problems.
Never Skip the Chamfer Ring Tool
Forcing the chamfer ring out with screwdrivers damages the bore, leading to leaks and premature failure. Use the correct tool for your vehicle. EPST-1 fits 2011-2015 Ford Explorer. EPST-2 fits 2010-2012 Ford Fusion, MKZ, and Mercury Milan. EPST-3 fits 2009-2021 Chevrolet Silverado and GMC Sierra. EPST-4 fits 2013-2016 RAM 1500.
Never Reuse Seals or O-Rings
Old seals leak and allow moisture and debris into the motor housing. All Plews-Edelmann kits include fresh seals for a reason. Using old seals voids the repair.
Do Not Assume Motor Failure
A non-spinning motor could be caused by a blown fuse, failed control module, open circuit in the harness, or bad ground. Test voltage and ground at the motor connector before replacing the motor.
When Full Rack Replacement Is Unavoidable
Some failures cannot be repaired in place and require complete rack replacement.
Replace the rack if rack teeth are pitted or worn. Replace if the pinion gear shows scoring. Replace if the recirculating ball mechanism is noisy or stiff. Replace if inner tie rods have play. Replace if the housing is cracked or leaking.
Even when replacing the rack, use OEM-spec torque sensors and couplings from aftermarket kits to avoid dealer markups on components.
Post-Repair Verification Steps
Your repair is not complete until the system is fully validated.
Clear DTCs and Calibrate the System
Use a scan tool to clear all EPS codes after repairs. Perform steering angle sensor zero-point calibration on applicable models like Toyota, Hyundai, and Ford vehicles. Some Ford models require module reinitialization following OEM procedures.
Test Drive for Performance
Drive over 10 miles and verify smooth, consistent assist at all speeds. Confirm no warning lights are illuminated. Listen for grinding, clicking, or whining noises. Verify normal effort in park and at highway speed.
Pro Tip: Test at low speed in a parking lot and at highway speed during lane changes to confirm variable assist works correctly.
Prevent Future EPS Failures
EPS repairs last longer with proper maintenance and driving habits.
Reduce Steering System Stress
Avoid holding the wheel at full lock for long periods. Do not curb check wheels during parking. Fix suspension or alignment issues promptly because binding increases load on the EPS motor.
Inspect During Routine Service
Every 30,000 miles, check inner tie rod boots for tears. Look for rubber debris near the motor shroud. Listen for unusual noises during turns.
Early detection prevents catastrophic failure and expensive repairs.
Electric Rack and Pinion Repair Cost Comparison
| Failure Type | Repair Cost | Full Rack Replacement Cost | Savings |
|---|---|---|---|
| Drive Belt | $150-$400 | $1,200-$2,500 | 70% |
| Coupling | $200-$500 | $1,000-$2,200 | 60% |
| Torque Sensor | $250-$600 | $1,300+ | 55% |
| Motor Only | $350-$800 | $1,500+ | 50% |
The bottom line is clear: over 60% of failed racks only need a $200 to $400 repair.
Frequently Asked Questions About Electric Rack and Pinion Repair
How Do I Know If My EPS Issue Is the Belt or the Rack?
Listen for a grinding noise from the rack area and check for rubber debris near the motor shroud. If the motor spins freely and the spiral gear turns smoothly, the belt is the problem. If there is binding or roughness in the rack mechanism, the rack itself may be damaged.
Can I Replace Just the Electric Motor Instead of the Whole Rack?
Yes, the electric motor is often replaceable separately from the rack. Motor failure typically costs $350 to $800 for parts and labor, compared to $1,200 or more for full rack replacement.
Do I Need a Wheel Alignment After Belt Replacement?
In most cases, no. If you do not disturb the inner tie rods during the repair, alignment is not required. However, always verify toe specification after any steering system work.
What Tools Are Required for DIY Electric Rack and Pinion Repair?
You need basic hand tools including wrenches and sockets. A Torx bit set is essential for removing the motor shroud. A vehicle-specific chamfer ring removal tool is critical for belt-driven systems. An OBD2 scanner capable of accessing EPS modules is required for diagnosis and calibration.
How Long Does an Electric Rack and Pinion Repair Take?
Belt replacement typically takes 1 to 2 hours for experienced DIYers. Coupling replacement takes 1 to 3 hours depending on vehicle accessibility. Torque sensor replacement takes 2 to 4 hours including calibration time.
Key Takeaways for Electric Rack and Pinion Repair Success
Electric rack and pinion repair does not have to mean full replacement. With the right diagnostic approach and access to OEM-spec belt kits, couplings, and sensors, you can fix the real problem fast and affordably. Always use proper tools like chamfer ring extractors to avoid damaging housing bores. Never reuse seals or O-rings because contamination causes early failure. Verify your repair by clearing codes, calibrating sensors, and test driving to confirm consistent assist at all speeds. The future of steering repair is modular, cost-effective, and precise.