A cluttered garage or workshop frustrates every homeowner who wastes precious minutes searching for tools or holiday decorations. Building a custom storage rack transforms chaotic spaces into organized havens where every tote slides out smoothly and every item has its place. This guide shows you exactly how to build a storage rack using affordable 2×4 lumber, with proven dimensions that fit standard 27-gallon Project Source and Costco totes perfectly. You’ll learn precise cutting lists, cleat spacing calculations, and assembly techniques that create a rack holding over 100 pounds per shelf—all for under $150 in materials.
Choose Your Storage Rack Type for Your Space
Selecting the right rack design depends on your room, load requirements, and how often you need to access items. Each type serves different purposes better than others.
Garage Storage: Sliding Tote Racks Work Best
Garages demand high-capacity storage that remains accessible. Sliding tote racks with 2×4 cleats let you pull totes in and out like drawers, making them ideal for seasonal items, automotive supplies, and sports gear. These freestanding units typically hold 6 to 16 totes depending on width, and locking casters allow repositioning when needed. The cleat system accommodates 27-gallon Project Source totes or Costco bins with a simple 22-inch upright spacing.
Shed Storage: Wall-Anchored Units Resist Elements
Sheds require racks that withstand moisture, wind, and potential tipping. Wall-anchored units using 2×6 vertical supports and diagonal bracing provide the stability needed for outdoor environments. Always anchor these racks directly into wall studs using 1×4 braces, and consider pressure-treated lumber if your shed experiences humidity fluctuations throughout the year.
Basement and Workshop Storage: Floor-to-Ceiling Shelving Maximizes Space
Tight basement corners and workshop areas benefit from floor-to-ceiling shelving that uses vertical height efficiently. These units typically employ ½-inch plywood shelves on 2×6 supports, with each shelf capable of holding over 100 pounds when properly reinforced. The design works exceptionally well for tools, paint supplies, and heavy materials like butcher block or tile boxes.
Select the Right Materials for a Strong Rack
Using proper lumber prevents sagging, splitting, and premature failure under heavy loads. Cheap or thin materials compromise the entire structure.
2×4 Lumber Provides the Best Value
Actual dimensions of 1.5 inches by 3.5 inches make 2×4 the workhorse for legs, cleats, rails, and supports. This lumber offers the best strength-to-cost ratio and holds screws securely without splitting when pilot holes are drilled. Avoid thinner options like 1×3 or 2×3 boards, which split easily and cannot support heavy totes.
2×6 Lumber Handles Heavy Loads
For floor-to-ceiling racks or areas requiring maximum load capacity, 2×6 lumber provides the additional strength needed. The actual 1.5-inch by 5.5-inch dimensions resist bending and racking in tall units, making them essential for supporting over 100 pounds per shelf in workshop settings.
½-Inch Plywood Creates Solid Shelves
Plywood shelf surfaces cut from 4×8-foot sheets provide durable platforms for storing tools and supplies. Home improvement stores offer free cutting services, so you can have them cut strips into 12-inch to 18-inch widths before leaving the store. For spans exceeding 32 inches, add center support rails or use ¾-inch plywood to prevent sagging.
Cut Lumber Using Precise Dimensions
Accurate cuts prevent assembly headaches and ensure totes slide smoothly. Use these tested dimensions for common tote sizes.
Cut List for 27-Gallon Project Source Totes

Building a 16-tote rack requires 22 pieces of 2×4 lumber at 8 feet plus one 2×4 at 10 feet for the back support beam. The back beam measures 108 inches long for 27-gallon totes. Cleats cut to 30 inches fit securely inside 29-inch-wide totes, and uprights spaced 22 inches center-to-center accommodate three totes across the 67.5-inch outer frame width.
Cut List for 17-Gallon Project Source Totes
The back support beam shortens to 99.25 inches when building for smaller 17-gallon totes. The same cleat logic applies, though you may adjust cleat heights if your specific totes vary from standard dimensions.
Cut List for Costco or Kirkland Totes
Costco totes measuring 18 inches deep by 24 inches wide work with the same 22-inch upright spacing. Build a three-column unit using approximately 25 pieces of 2×4 lumber, with total materials costing around $95.
Pro Tip: Label every piece after cutting using masking tape and a marker. Write “Left Leg Front,” “Cleat 2,” or similar identifiers to prevent confusion during assembly.
Install Cleats for Smooth Tote Sliding
Cleats act as horizontal runners allowing totes to slide in and out like drawers. Precise positioning ensures smooth operation without binding.
Calculate Cleat Positions Accurately
The bottom tote sits with its base 13 inches above the floor. Install the first cleat at 14.5 inches from the base to account for the 1.5-inch thickness of the 2×4 cleat. Space subsequent cleats 16 inches center-to-center, which creates a 2.5-inch gap between totes and maintains 1 inch of clearance above each tote for easy sliding. Mark 3.5 inches down from the tote top to position the next cleat, accounting for the cleat thickness.
Attach Cleats Securely to Legs
Use two 2.75-inch deck screws per joint, drilling pilot holes first to prevent splitting. Use your first completed leg as a template to ensure consistent cleat positioning across all uprights. Keep cleats level and aligned by checking with a speed square during installation.
Visual Cue: Slide an actual tote into the rack during dry-fit testing. It should glide smoothly with no resistance or binding.
Assemble the Frame Square and Strong
A wobbly frame fails under load, so building it square and secure from the start matters enormously.
Build Complete Leg Sets First
Assemble full leg units with all cleats attached before connecting them with rails. Outer legs receive cleats on only one side, while center legs need cleats on both sides for dual-sided support. Building complete leg sets first prevents measurement errors when joining the frame.
Connect Legs with Top and Bottom Rails
Use 2×4 rails spaced 21 to 22 inches apart between legs, matching your tote width. Clamp pieces or recruit a helper to hold components steady while securing with 2.5-inch deck screws. Drill pilot holes to prevent wood splitting.
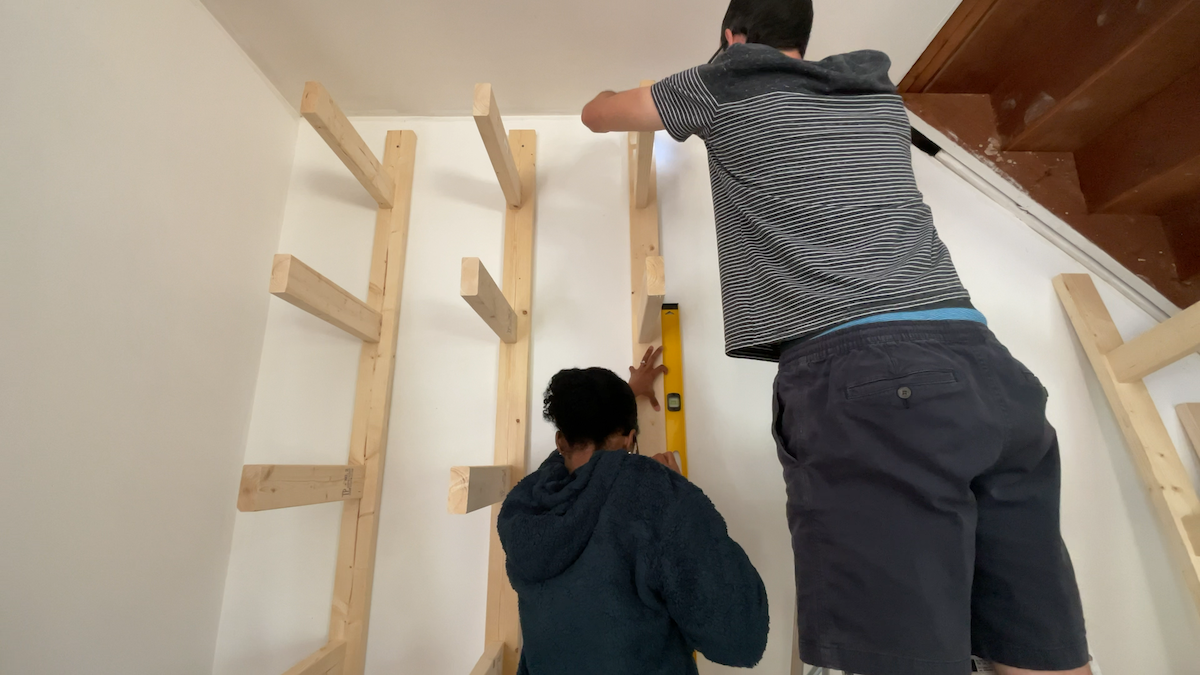
Verify the Frame is Square
Measure diagonally from corner to corner of the frame. Both diagonal measurements must be equal for a perfectly square frame. If they differ, apply gentle pressure to shift the frame until measurements match. Use a speed square to maintain 90-degree angles at all joints during assembly.
Reinforce the Rack Against Wobble and Tipping

Even sturdy frames can rack sideways or tip forward without proper reinforcement. Add these safeguards during or after initial assembly.
Add Diagonal Bracing to Prevent Sway
Cut 1×4 boards at 45-degree angles and attach them to the back of the rack. Screw through braces into vertical legs and rails to prevent side-to-side movement. Diagonal bracing transforms a wobbly frame into a rigid structure that handles heavy loads safely.
Anchor Tall Racks to Wall Studs
Any rack exceeding 5 feet in height requires wall anchoring to prevent tipping, especially in homes with children or pets. Locate wall studs using a stud finder, then drive 3-inch screws through the back brace into at least two anchor points. This non-negotiable safety step prevents catastrophic failures.
Install Locking Casters for Mobile Racks
Attach four locking swivel casters to the base of freestanding racks using structural screws rather than drywall anchors. Lock wheels when the rack is in position, and unlock only when repositioning is necessary. The locking mechanism keeps the rack stable during use while maintaining mobility for garage cleaning or reorganization.
Install Shelves or Load the Totes
With the frame complete, add the functional storage surfaces tailored to your specific needs.
Load Sliding Totes Directly
For sliding tote racks, simply slide plastic totes into position after frame assembly is complete. Test full-weight operation by filling one tote and checking that it glides smoothly. Add felt pads to cleats if friction causes sticking or difficult removal.
Attach Solid Plywood Shelves
Cut ½-inch plywood to exact shelf dimensions and secure with 1.5-inch wood screws every 8 inches along the support frame. Reinforce heavy-load shelves with cross supports underneath, and add middle vertical supports for spans exceeding 32 inches to prevent sagging.
Load Test: Place a 50-pound bag of concrete or similar weight on each shelf type. Watch for visible sagging, screw pull-out, or frame movement before loading with valuable items.
Finish the Rack for Durability and Appearance
Optional finishing protects indoor racks and improves aesthetics in visible spaces like living areas or finished garages.
Sand Before Applying Finish
Use 120 to 150 grit sandpaper to smooth rough edges and remove splinters. Wipe all surfaces with a tack cloth to remove dust before applying stain or paint.
Apply Stain and Sealant
Apply wood stain with a clean rag, wiping off excess after 5 to 10 minutes. Allow drying for 6 to 8 hours between coats. Finish with two coats of polyurethane for protection against wear and moisture. Use exterior-grade paint for shed installations where weather resistance matters more than appearance.
Organize Your Rack for Daily Use
A storage rack only works if you actually use it. Smart organization makes retrieval easy and encourages maintaining the system.
Label Totes and Group Similar Items
Use label makers or chalkboard tags on tote exteriors to identify contents at a glance. Group related items together, such as holiday decorations, sports equipment, or automotive supplies. Clear bins speed identification, while opaque bins hide clutter.
Place Items at Ergonomic Heights
Store frequently used items at eye to shoulder level for easy access. Position heavy or rarely used items on bottom shelves. Reserve top shelves for lightweight seasonal storage that you access only a few times per year. Leave at least 6 inches of front clearance for easy tote removal without bumping adjacent items.
Test and Maintain Your Rack Long-Term
Assuming your rack is safe after building invites accidents. Systematic testing catches problems before they cause damage or injury.
Conduct Fit Testing with Real Totes
Use actual storage totes during assembly to verify clearance, smooth insertion and removal, and stable positioning when loaded. Check that no binding occurs and totes fully close without hitting frame components.
Level and Load Test Gradually
Use a carpenter’s level on every shelf to ensure even positioning. Adjust legs with shims if unevenness appears. Load shelves gradually, starting with empty totes, then adding weight incrementally while watching for sagging, loose screws, or frame twist.
Establish a Maintenance Schedule
Tighten all screws every six months to account for wood settling. Re-seal outdoor or shed racks every 1 to 2 years if exposed to moisture. After moving mobile racks with casters, recheck caster locks and wall anchors to ensure security.
Why DIY Beats Pre-Made Storage Solutions
Building your own rack costs less and outperforms store-bought alternatives in several key areas.
| Feature | DIY Wooden Rack | Pre-Made Plastic Rack |
|---|---|---|
| Cost | $95–$180 | $100–$200 |
| Load Capacity | 100+ lbs per shelf | 50–100 lbs per shelf |
| Customization | Full control over dimensions | Fixed sizes only |
| Durability | High with proper maintenance | Moderate; degrades in sunlight |
| Assembly Time | 1–2 days | 1–2 hours |
DIY wooden racks provide superior strength, complete customization, and better cost efficiency for heavy-duty storage needs. Pre-made plastic racks work better for light, temporary, or modular situations where speed of assembly matters more than load capacity.
Frequently Asked Questions About Building a Storage Rack
How much does it cost to build a storage rack?
A basic sliding tote rack using 2×4 lumber costs approximately $95 to $180 depending on your location and whether you include optional features like casters or finishing. Wall-mounted shelving runs similarly, while premium floor-to-ceiling units with heavy-duty 2×6 supports may approach $280 for complete shed shelving systems.
What tools do I need to build a storage rack?
Essential tools include a miter saw or circular saw for cutting lumber, a drill with appropriate bits for driving screws, a level for ensuring horizontal and vertical alignment, and a tape measure for accurate dimensions. A pocket hole jig helps create clean joints for wall-mounted shelves, while clamps assist with holding pieces during assembly.
How much weight can a 2×4 storage rack hold?
A properly constructed 2×4 storage rack with diagonal bracing and wall anchoring supports 100 pounds or more per shelf level. The sliding cleat system for totes distributes weight across multiple support points, making each tote capable of holding 30 to 50 pounds of contents without compromising the structure.
Can I build a storage rack without anchoring it to the wall?
Freestanding racks under 5 feet tall may work without wall anchoring if they include wide bases or diagonal bracing. However, any rack over 5 feet tall should be anchored to wall studs for safety, particularly in homes with children or pets. Locking casters provide mobility but do not replace the need for wall anchoring in tall configurations.
How do I customize a storage rack for different tote sizes?
Adjust upright spacing based on your specific tote width plus 1 inch for clearance and 3 inches for the 2×4 thickness on each side. For 19.5-inch-wide totes, use 22-inch center-to-center spacing. Adjust cleat heights proportionally if your totes differ from standard 16 to 18 inch heights, maintaining the 1-inch clearance above each tote for smooth sliding.
Key Takeaways for Building Your Storage Rack
Building a storage rack transforms chaotic spaces into organized, functional areas where every item has a designated place. The project requires basic tools, affordable 2×4 lumber, and one to two days of work, with total materials costing under $150. The sliding tote system accommodates standard 27-gallon bins with smooth, drawer-like access, while wall anchoring ensures safety for tall installations. Start with a simple design matching your current tote sizes, add diagonal bracing and wall studs for stability, and expand your system as storage needs grow. With this guide’s precise dimensions and proven techniques, you’ll create a professional-grade storage solution that lasts for decades.