

If you’re tired of tripping over scattered shoes by the door, it’s time to design a shoe rack that keeps your entryway tidy and makes daily routines smoother. A well-thought-out shoe rack protects your footwear, accommodates everything from flip-flops to ski boots, and stands up to busy household traffic. Whether you’re building a DIY unit for a mudroom or optimizing space in a small apartment, the key lies in smart design: right dimensions, durable materials, and user-friendly features.
This guide walks you through every step of designing a shoe rack that works as hard as your shoes do. You’ll learn how to choose the best materials, set proper shelf spacing, build stable joints, and incorporate space-saving hacks that maximize storage without cluttering your space.
Choose the Right Materials for Your Shoe Rack

Selecting the right wood ensures your rack withstands daily use and moisture exposure. The material you choose affects both durability and final appearance, so consider your environment and aesthetic goals before purchasing supplies.
Use Plywood or Solid Pine
For most DIY shoe racks, ¾-inch plywood or rough pine boards are ideal. Plywood offers superior stability, resists warping, and accepts paint or varnish beautifully for clean, modern finishes. Rough pine gives a rustic look and handles heavy loads well, but requires extra sanding and sealing to avoid splinters. Both materials cut precisely and hold screws securely, ensuring long-term durability.
Avoid Unsealed MDF
MDF should be avoided unless fully sealed with oil-based primer on all surfaces. In damp areas like mudrooms, MDF absorbs moisture quickly, swells, and deteriorates. Even minor exposure to wet shoes or concrete floors can compromise its structure. If you must use MDF, apply multiple coats of waterproof sealant and elevate the unit off the floor.
Seal and Protect the Wood
After assembly, protect your rack with a sanding sealer, followed by varnish, polyurethane, or tung oil. These finishes guard against scratches, moisture, and daily wear. For natural pine, mineral or tung oil enhances grain and prevents drying. Always sand with 200 to 220 grit paper before finishing for a smooth, professional feel.
Set Proper Shelf Dimensions and Spacing

Getting dimensions right prevents crowded shoes and ensures every pair fits comfortably. Standard measurements work for most footwear, but adjustable spacing accommodates special items like ski boots.
Plan Total Height and Depth
A standard shoe rack should be at least 58 inches tall to accommodate bulky footwear like ski boots or tall cleats. Use side panels cut to 58¼ inches for vertical support. The overall depth should allow for angled shelves while fitting in tight spaces. A depth of 12 to 14 inches is sufficient for most adult shoes when shelves are sloped.
Space Shelves for Visibility and Access
Set 7 inches of vertical rise between shelves from front to back to create a gentle upward tilt. This slope improves visibility so you can see each shoe’s toe box at a glance. The first shelf should sit 16 inches above the base to fit oversized boots. Subsequent shelves rise 7 inches above the previous at both front and back points, maintaining a consistent incline.
Allow Room for Large Footwear
Ski boots, Sorels, and rollerblades need more clearance than average shoes. Design the bottom tier with at least 16 inches of vertical space from the floor to the underside of the first shelf. This prevents crowding and allows easy placement and removal.
Build Strong, Stable Joints
Strong joinery keeps your rack steady under weight and daily use. Weak joints lead to wobbling and premature failure, so invest time in proper connection methods.
Use Pocket Hole Joinery
For strong, hidden connections, use pocket hole joinery with a Kreg Jig or similar tool. Drill three pocket holes at each end of 55-inch shelves and secure them with 1¼-inch pocket screws into the side panels. This method provides excellent holding power and simplifies alignment during assembly.
Reinforce Corners with Brackets
Add L-shaped metal brackets at top and bottom interior corners for extra rigidity. These help resist racking forces, especially in taller or narrower units. Even small brackets significantly improve long-term stability.
Ensure Square Assembly
Use a speed square to align side panels and base at perfect 90-degree angles. Check that the first sloped shelf is level before installing the rest. If building in a garage, remember the floor may slope for drainage, so measure from a consistent reference point to avoid uneven results.
Install Angled Shelves for Better Access
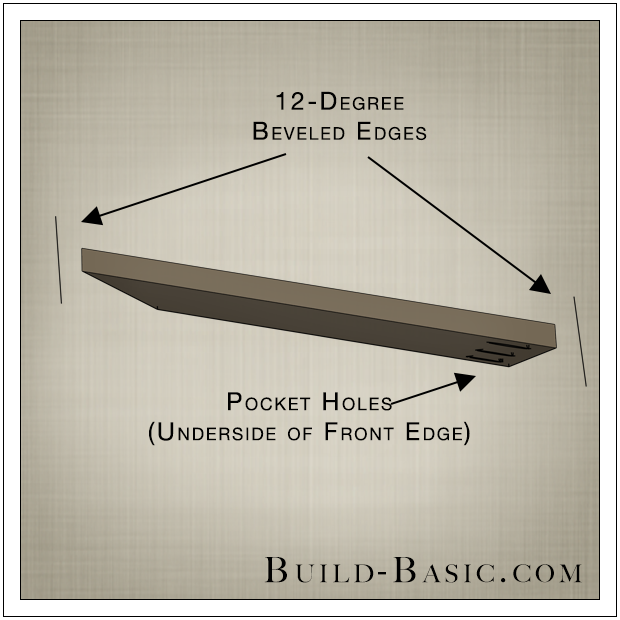
Angled shelves transform a basic rack into an organized display system. The slight incline makes shoes easier to see and grab, encouraging proper storage habits.
Why Angle Shelves Work
Angled shelves make shoes easier to see and grab. A slight incline, about 2 inches of rise from front to back, positions the toe of each shoe forward, turning your rack into a mini-display. This subtle presentation encourages users to store shoes neatly instead of tossing them on the floor.
Mark and Cut with Precision
To create the slope, mark 7 inches up from the front edge and 9 inches up from the back edge on both side panels. Draw a straight line connecting these points. This is your shelf angle. Repeat for each tier, measuring 7 inches above the prior line to maintain uniform spacing.
Prevent Slippage with a Lip
If shoes slide forward, attach a ½-inch front lip or molding strip along the edge of each shelf. This small barrier keeps footwear in place without blocking access. Rounded edges on the lip also prevent snagging.
Maximize Space with Smart Layout Hacks
Strategic arrangement squeezes more storage from every square inch. Small adjustments in how you place shoes make a big difference in overall capacity.
Alternate Shoes Heel-to-Toe
Place shoes in a heel-to-toe pattern on the same shelf. This staggered arrangement saves 2 to 4 inches per row, letting you fit more pairs without widening the rack. It also creates a neat, symmetrical look.
Dedicate Zones by User or Activity
Divide the rack into zones for kids, adults, or specific activities. Labeling or color-coding helps maintain order. For example, a ski zone at the bottom stores boots and gloves, while flip-flops go on upper tiers.
Use the Top Shelf for Accessories
Install the final shelf horizontally at 90 degrees to serve as a utility platform. It’s perfect for stacking helmets, shin guards, mittens, or drying racks. This turns your shoe rack into a full entryway command center.
Finish for Durability and Style
A proper finish protects your investment and elevates appearance. Sanding and sealing extend the life of wood while creating a polished look.
Sand Smoothly
Start with 200-grit sandpaper to remove tool marks, then switch to 220-grit for a silky finish. Pay special attention to edges and corners, especially if using a router to round them. Smooth surfaces prevent splinters and ensure even coating.
Round Edges for Safety
Use a hand router with a round-over bit to soften all sharp edges. This improves safety, especially in homes with children, and gives the rack a more refined appearance. A 1-liter paint can makes a great template for curved corners.
Apply Protective Coatings
Seal wood with sanding sealer. Lightly sand after drying. Apply 2 to 3 coats of clear varnish or polyurethane, letting each dry fully. For natural pine, use tung oil to enrich grain and condition the wood. Avoid water-based finishes in high-moisture areas and opt for oil-based products instead.
Customize for Your Space and Needs
A customized rack fits your specific situation perfectly. Modular designs and functional upgrades transform basic storage into a personalized organization hub.
Make It Modular
Build stackable or modular units that can grow with your needs. Start with a base section and add tiers later. This is ideal for families expecting more shoes over time or changing seasonal gear.
Add Functional Upgrades
Enhance your shoe rack with these popular additions:
- Coat hooks on the side for bags or jackets
- A built-in bench below for putting on shoes
- Cubbies or baskets above for small items like keys or dog leashes
These additions transform a simple rack into a multi-use entryway hub.
Adjust for Tight Spaces
In narrow hallways or closets, consider a vertical, space-saving design with slim, deep shelves. Or mount a wall-mounted version to free up floor space. Angled shelves work well here too, improving access in confined areas.
Test and Maintain for Longevity
Regular checks and basic maintenance keep your rack performing well for years. A few minutes of upkeep prevents bigger problems down the road.
Load-Test Before Final Use
Once assembled, place heavy shoes like boots or cleats on each shelf to check stability. Gently shake the unit to test for wobble. Tighten any loose screws and add brackets if needed.
Inspect and Re-Oil Annually
Dust the rack regularly and wipe with a damp cloth when dirty. For unfinished pine, re-apply mineral oil every 6 to 12 months to prevent drying and cracking. Check joints yearly and tighten screws to maintain rigidity.
Elevate Off the Floor
Place the rack on small feet or a moisture barrier to prevent water wicking from concrete floors. Even a slight lift of ¼ to ½ inch can extend the life of wood and fasteners in damp environments.
Frequently Asked Questions About Designing a Shoe Rack
What is the best material for a DIY shoe rack?
¾-inch plywood or solid pine boards offer the best combination of strength, stability, and workability. Plywood resists warping and finishes beautifully, while pine provides a rustic look at a lower cost. Avoid unsealed MDF in moisture-prone areas.
How much vertical space do I need between shoe rack shelves?
Allow 7 inches of vertical rise from front to back for standard shoes. For bulky items like ski boots or Sorels, the bottom shelf needs at least 16 inches of clearance from the floor.
Are angled shelves better than flat shelves for shoe racks?
Angled shelves improve visibility and accessibility by tilting shoes forward to show their toe boxes. They also encourage neater storage habits. Add a small front lip to prevent shoes from sliding off.
How do I prevent my shoe rack from wobbling?
Use pocket hole joinery with 1¼-inch screws for strong connections. Add L-shaped metal brackets at interior corners for extra rigidity. Always use a speed square during assembly to ensure 90-degree angles.
How often should I maintain my wooden shoe rack?
Dust regularly and wipe with a damp cloth when needed. Re-apply tung or mineral oil to unfinished pine every 6 to 12 months. Inspect and tighten screws annually to maintain structural integrity.
Key Takeaways for Designing Your Shoe Rack
Designing a shoe rack isn’t just about storage. It’s about creating a system that fits your lifestyle and stands up to real-world use. By choosing strong materials like plywood or solid pine, setting smart dimensions with proper shelf spacing, and using reliable joinery methods like pocket holes, you build furniture that lasts.
The angled shelf technique transforms everyday storage into an organized display that encourages proper shoe placement. Adding thoughtful details like lip barriers, modular expansion options, and accessory zones tailors the design to your specific needs. Whether you’re crafting a rustic pine unit for a mudroom or a sleek modern rack for an apartment, these principles ensure your design is durable, accessible, and built for long-term use.
Start by measuring your space, select quality materials, and follow the assembly sequence carefully. A well-designed shoe rack keeps your entryway clutter-free and makes finding the right pair effortless every morning.


