

If your steering feels loose, makes clunking noises, or leaks fluid, you may have a failing power steering rack. Left unattended, this can lead to dangerous driving conditions and costly damage. The good news is that with the right tools and knowledge, you can fix power steering rack issues yourself—saving hundreds in labor costs.
This guide walks you through diagnosing, rebuilding, and reinstalling a power steering rack step by step. Whether you’re restoring an older model like a Toyota MR2 Mark I or tackling a modern vehicle, you’ll learn how to restore precise, responsive steering and avoid common pitfalls.
Diagnose Power Steering Rack Failure
Your car will give you warning signs before the rack completely fails. Learning to recognize these early can save you from being stranded or facing more expensive repairs down the road.
Identify Fluid Leaks Under Your Vehicle
A puddle of reddish or amber fluid under the front of your car often signals a leaking rack. Check around the tie-rod boots and input shaft seal. Leaks typically stem from worn internal seals, especially when fluid appears near the rack ends or center. Place cardboard under your parked car overnight to catch drips and pinpoint the exact location.
Test for Excessive Steering Play
With the engine off, turn your steering wheel slightly. If it moves more than an inch before the wheels respond, there’s excessive play in the system. This points to worn bushings, tie rods, or internal gear wear. This symptom is especially common in high-mileage vehicles over 100,000 miles.
Listen for Clunking and Knocking Sounds
Clunks during turns often come from loose tie-rod ends or damaged rack bushings. Jack up the front end and shake the tires side to side. Any movement at the hub indicates worn components that need attention. Don’t ignore these noises— they’ll only get worse over time.
Check for Stiff or Uneven Steering
If turning feels jerky or requires more effort on one side, check your power steering fluid level first. If the fluid is full and clean, the issue may be internal rack or pinion wear, or a clogged steering line. Stiff steering at low speeds is particularly dangerous in parking situations.
Watch for Recurring Alignment Problems
If your car pulls to one side or tires wear unevenly shortly after an alignment, the rack itself may be misaligned or damaged. A bent housing or worn internal components can throw off geometry permanently. Get the rack inspected before spending money on another alignment.
Choose Between Rebuilding and Replacing
Once you’ve diagnosed the problem, you need to decide whether to rebuild your existing rack or install a replacement unit. This choice affects your budget, timeline, and long-term results.
Rebuild When the Housing Is Intact
Rebuilding makes sense if the rack casing is structurally sound with no cracks or corrosion. It’s ideal when only seals, boots, or bushings are worn. This approach is cost-effective and perfect for vintage or rare models where OEM parts are hard to find. A DIY rebuild on vehicles like the Toyota MR2 Mark I can save significant money while preserving originality.
Replace for Severe Internal Damage
If you see cracks, severe corrosion, or multiple leak points, replacement is the safer choice. Remanufactured racks come pre-tested with warranties, making them smart when time matters or past seal repairs failed. The added cost includes peace of mind and predictable longevity.
Consider Expected Lifespan
A rebuilt rack can last 50,000 miles or more with quality parts and proper installation. But if internal gears are worn or the torsion bar is damaged, even new seals won’t fix the core problem. Choose replacement in these cases—you’ll save money in the long run.
Gather Tools and Parts for the Job
Having the right tools and parts ready before you start prevents frustrating mid-job trips to the auto parts store. Here’s what you’ll need for a smooth repair.
Essential Hand Tools
• Socket and wrench set in metric sizes (common for most imports)
• Torque wrench (critical for mounting bolts and tie rods)
• Locking pliers and needle-nose pliers
• Screwdrivers and a hammer
• Impact gun with penetrating oil for rusted bolts
Specialized Tools You Cannot Skip
A crowfoot wrench with ratchet reaches tight power steering line fittings without slipping. A tie-rod separator or pickle fork breaks the taper lock between tie rod and steering knuckle. You’ll need a ball joint press if your tie rods integrate into suspension arms. These tools are worth renting or buying if you don’t own them.
Replacement Parts Checklist
• New tie rods (inner and outer)
• Steering rack bushings (polyurethane for durability, OEM rubber for comfort)
• Rubber boots and clamps
• New pinch bolt and mounting hardware (never reuse)
• Power steering fluid (OEM-specified type)
• High-temp primer and black paint for cleaned racks
• Multi-purpose grease for threads and boots
Remove the Steering Rack Safely
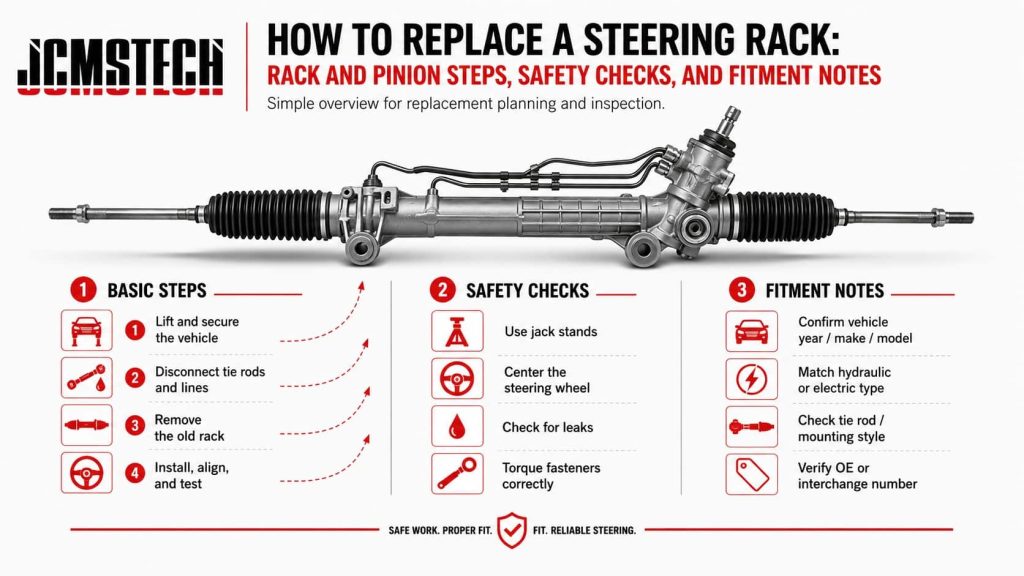
Proper removal prevents damage to surrounding components and makes reinstallation much easier. Take your time with this section—the details matter.
Disconnect Tie Rods from Steering Knuckles
Loosen the castle nuts on the outer tie rods. Use a tie-rod separator to pop them free from the steering knuckles. Support the control arms to prevent stress on ball joints. Count the exact turns as you unscrew the outer tie rods and record the number. You’ll need this later to approximate alignment.
Mark and Unhook the Intermediate Shaft
Mark the alignment between the steering column shaft and rack input pinion with paint or tape. Remove the two bolts securing the universal joint, then slide it off. This step ensures your steering wheel stays centered after reinstallation. Skip this step and you’ll be guessing during reinstallation.
Remove Mounting Bolts
Unscrew the four rack mounting bolts (two on each side). Apply penetrating oil if they’re rusted. Some vehicles require removing cross-members or under-panels for clearance—check your model-specific guide. Don’t force frozen bolts—they can break off inside the subframe.
Disconnect Power Steering Lines
Place a drain pan underneath. Use a crowfoot wrench to disconnect the high-pressure and return lines. Cap both lines immediately to prevent fluid loss and contamination. Leaving lines open lets dirt enter the system, causing future problems.
Extract the Rack Assembly
Push the boot up on the intermediate shaft and remove the pinch bolt. Gently wiggle the rack out of the frame mounts. Lower it carefully to avoid damaging lines or surrounding components. Set it on a clean work surface for inspection and rebuilding.
Rebuild the Rack Step by Step
Rebuilding your removed rack saves money and gives you control over component quality. Follow these steps for a professional result.
Clean and Prep the Housing
Scrub off all rust and grime with a wire-wheel brush. Focus on bushing seats, seal areas, and mounting brackets. Remove every trace of corrosion—this improves paint adhesion and prevents future leaks. A clean rack also reveals cracks or damage you might have missed.
Paint for Protection
Mask the bearing surfaces and input shaft area. Apply rust-inhibiting primer, then one to two coats of high-temperature black paint. Let dry fully before reassembly. This protective coating adds years to your rebuilt rack’s life.
Replace Steering Rack Bushings
Choose polyurethane (like Protein brand) for durability and improved steering response. Use OEM rubber for a softer ride, or plastic-specific parts for models like the Toyota MR2 Mark I. Press the new bushing firmly until it “pops” into place on all sides. Align the retention pins with housing holes exactly.
Install New Tie Rods
Slide a new coil washer onto the rack shaft for the inner tie rod. Thread in the inner tie rod and tighten with the two-wrench method. Stake the washer with a hammer tap to lock it—never strike the rack body directly. For outer tie rods, match your recorded turn count (for example, 15 turns) exactly. Thread onto the inner rod and secure with the lock nut.
Fit New Rubber Boots
Remove old clamps with pliers. Slide off the old boot and install the new one with the wide end on the rack and narrow end on the inner tie rod. Secure with cable ties or OEM clamps. Avoid any kinks—twisted boots fail quickly and let dirt inside.
Lubricate Moving Parts
Apply high-quality grease to inner tie-rod threads, inside of boots, and sliding interfaces. Don’t over-grease—excess pressure can burst boots. A thin, even coating is all you need.
Install the Rebuilt or New Rack
Reinstallation is essentially reverse of removal, but attention to detail matters more now than ever.
Verify Rack Compatibility First
Confirm mounting hole positions, hose connection angles, input shaft length and spline count, and tie-rod extension length all match your vehicle. Mismatched racks cause misalignment and poor steering response. If something seems off, double-check before bolting it in.
Position and Mount the Rack
Slide the rack into place and align mounting holes. Insert the four bolts hand-tight first. Don’t torque yet—allow slight movement for alignment. This prevents binding and ensures even stress distribution.
Reconnect All Components
Align the intermediate shaft using your pre-marked marks and insert the pinch bolt. Use the crowfoot wrench to reconnect both power steering lines—tighten to spec but don’t over-tighten brass fittings. Reinstall torsion bar if removed, then thread outer tie rods using your recorded turn count. Secure with new castle nuts and cotter pins.
Perform Final Checks and Test the System
Your work isn’t done until you’ve verified everything works correctly. These final steps ensure safety and proper function.
Refill and Bleed Power Steering Fluid
Use OEM-recommended fluid (like ATF+4, Mercon, or specific PSF). Fill to the MAX cold line. Start the engine and turn the wheel lock-to-lock 10 to 15 times to bleed air. Top off as needed. Air in the system causes spongy steering and noise.
Inspect for Leaks
Run the engine and check hose connections, rack seals, and tie-rod boots. Even minor seepage must be fixed before driving. Tighten fittings or replace components as needed.
Test Steering Function
Turn smoothly from lock to lock. Listen for whining, grinding, or stiffness. Confirm the steering wheel is centered when driving straight. Any issues now mean something isn’t right—don’t ignore warning signs.
Get a Professional Alignment
A front-end alignment is mandatory after rack work. Toe is most affected—incorrect toe causes rapid tire wear. Camber may shift slightly. Caster usually stays unchanged. Even with matched turn counts, factory specs must be verified by a professional.
Extend Rack Life with Regular Maintenance
Your rebuilt or new rack lasts longest with consistent care. These habits prevent premature failure.
Inspect Boots at Every Oil Change
Cracked or torn boots let dirt and water into the rack. Replace them immediately when damaged. This takes seconds and saves expensive repairs later.
Monitor and Replace Fluid Regularly
Dark, burnt-smelling fluid means contamination. Flush and replace every 50,000 miles or per OEM schedule. Clean fluid keeps internal seals lubricated and cool.
Avoid Stressing the System
Limit time at full lock during parking. Don’t hold the wheel against the stop—that increases pressure and heat. Let the steering center naturally rather than forcing it.
Torque Everything to Specification
Use a torque wrench on mounting bolts, tie-rod nuts, and the pinch bolt. Loose hardware causes premature wear and failure. This is one step no one should skip.
Avoid Critical Mistakes During Repair
These errors can turn a manageable job into a disaster. Learn what not to do before you start.
Never Drive With a Leaking Rack
Loss of power assist increases steering effort dramatically, especially at low speeds. The risk of losing control is very real. Fix leaks before driving.
Never Reuse Critical Fasteners
Tie-rod bolts, pinch bolts, and mounting hardware are one-time-use items. Reusing them risks failure under stress. Buy new hardware—it’s cheap insurance.
Don’t Strike the Rack Housing
Hammer blows can damage internal gears or seals. Use proper tools for separation. Even a seemingly gentle tap can cause hidden damage.
Work on Level Ground
Install the rack with wheels straight and on a flat surface. This helps maintain alignment and prevents binding during reinstallation.
Expected Results After Repair
When done correctly, a fixed power steering rack delivers crisp, responsive steering with no play or clunking. You’ll enjoy smooth operation at all speeds and improved safety and handling. With quality parts and proper maintenance, your repair can last 50,000 miles or more, especially with polyurethane bushings and regular fluid changes.
Frequently Asked Questions About Fixing Power Steering Rack
How do I know if my power steering rack is bad?
Watch for fluid leaks under the front of your vehicle, excessive steering play (more than an inch of wheel movement), clunking noises during turns, stiff or uneven steering effort, and recurring alignment issues after adjustment. Any combination of these symptoms points to rack problems.
Can I replace just the seals on my power steering rack?
You can replace seals, but it’s rarely worth the effort. Seals are cheap, but accessing them requires complete rack removal and disassembly. Most DIYers find it more practical to rebuild with new tie rods, bushings, and boots included.
How long does it take to fix a power steering rack?
Removal and installation takes experienced DIYers about 4 to 6 hours. Rebuilding adds another 2 to 3 hours. First-timers should budget a full weekend. Professional shops complete the job in one to two days.
What’s the difference between rebuilding and replacing the rack?
Rebuilding involves restoring your existing rack with new seals, bushings, and tie rods. Replacing means installing a remanufactured or new unit. Rebuilding costs less but requires more labor. Replacement is faster but more expensive upfront.
Do I need a professional alignment after rack work?
Yes. A professional front-end alignment is mandatory after any rack work. Even with perfect turn-count replication, factory specifications must be verified. Incorrect toe causes rapid tire wear and affects handling safety.
How much does it cost to fix a power steering rack?
DIY parts cost $150 to $400 depending on your vehicle. Professional replacement runs $500 to $1,500 including labor. Rebuilding yourself saves the most money but requires mechanical experience and specialized tools.
Key Takeaways for Fixing Your Power Steering Rack
Fixing a power steering rack is a major job, but entirely doable with patience and the right tools. Whether you rebuild or replace, the process requires attention to detail at every step—from careful removal with marked alignment points to precise reinstallation with new hardware. The most critical success factors are using quality replacement parts (especially polyurethane bushings for longevity), torquing all fasteners to specification, and getting a professional alignment afterward. Never reuse fasteners, and never skip bleeding air from the system—these mistakes cause premature failure. Your steering system is critical to vehicle control, so don’t cut corners. Now that your rack is fixed, enjoy the confidence of precise, quiet, and smooth steering once again.


