

If you’ve ever struggled to store or transport your bike securely, you are not alone. Learning how to hang bike on bike rack properly makes all the difference whether you are saving garage space, protecting your frame during transit, or securing your ride outdoors.
A poorly mounted bike can sway, scratch your vehicle, or even fall off mid-drive. This guide walks you through every step for wall, ceiling, hitch, roof, and truck-mounted racks so you can confidently secure your bike regardless of frame type, weight, or location.
Choose the Right Rack Type for Your Needs
Before hanging your bike, ensure you are using a rack designed for your specific needs. Different racks require different mounting techniques and offer varying levels of security, compatibility, and convenience.
Rack Types and Their Best Uses
Wall-mounted racks save floor space and work best in garages or apartments. Ceiling hangers free up wall space and are ideal for tight storage areas. Hitch racks attach to your vehicle’s trailer receiver and are perfect for transport. Platform hitch racks support full weight via the wheels, making them great for e-bikes or step-through frames. Trunk racks are budget-friendly but less stable at high speeds. Roof racks require lifting but keep bikes off the rear bumper. Truck bed racks offer maximum stability by securing the front fork.
E-bikes weighing 50 to 80 pounds need heavy-duty racks rated for 60 or more pounds per bike. Platform-style hitch or bed-mounted systems are your best choice for heavier electric bikes.
Install Wall or Ceiling Hangers Correctly

Proper installation ensures your bike stays secure and does not damage walls or ceilings. Taking time to mount hangers correctly prevents headaches later.
Mounting Height and Spacing
Standard mounting height is 68 inches from the floor for rear wheel hooks. For alternating front and rear wheel setups, space hangers 16 inches apart. For high-density storage in a W pattern, alternate heights between 68 and 80 inches with 12-inch spacing. Minimum corridor clearance should be 3 feet, though 5 feet is recommended. Allow 6 to 8 feet of swing space for corner access.
Secure to Studs or Masonry
Mounting into wood studs or beams requires locating two wall studs, marking holes for the hanger, drilling one-quarter-inch holes 1 and three-quarters to 2 inches deep, inserting three-eighths by 2-inch hex head lag screws with washers, and tightening both screws fully.
For concrete or masonry surfaces, mark hole locations, drill holes for three-eighths lag expansion shields, insert the shields, and use the same screws and washers, tightening securely.
Warning: Never mount into drywall alone. It cannot support bike weight over time and will eventually fail.
Hang the Bike on a Wall or Ceiling Rack
Once installed, loading your bike should be simple and repeatable. Follow these steps for safe, secure mounting.
Step-by-Step Loading
Position the bike so the rear wheel aligns with the hook. Stabilize the frame with your left hand on the top tube or down tube. Lift from under the seat post with your right hand. Pivot the rear wheel upward and hook it onto the bracket. Let the bike settle vertically and ensure it does not swing freely.
Pro tip: People as short as 5 feet 4 inches can do this safely using the seat post lift method described above.
Unloading Safely
Reverse the loading motion. Support the down tube, pivot the rear wheel down, and lower the bike gently to the ground.
Secure Against Theft
Use the cable loop on the hanger. Thread a security cable through the front wheel, frame, rear wheel, and back to itself. Lock everything with a padlock or combination lock for added security.
Adapt for Step-Through Frames
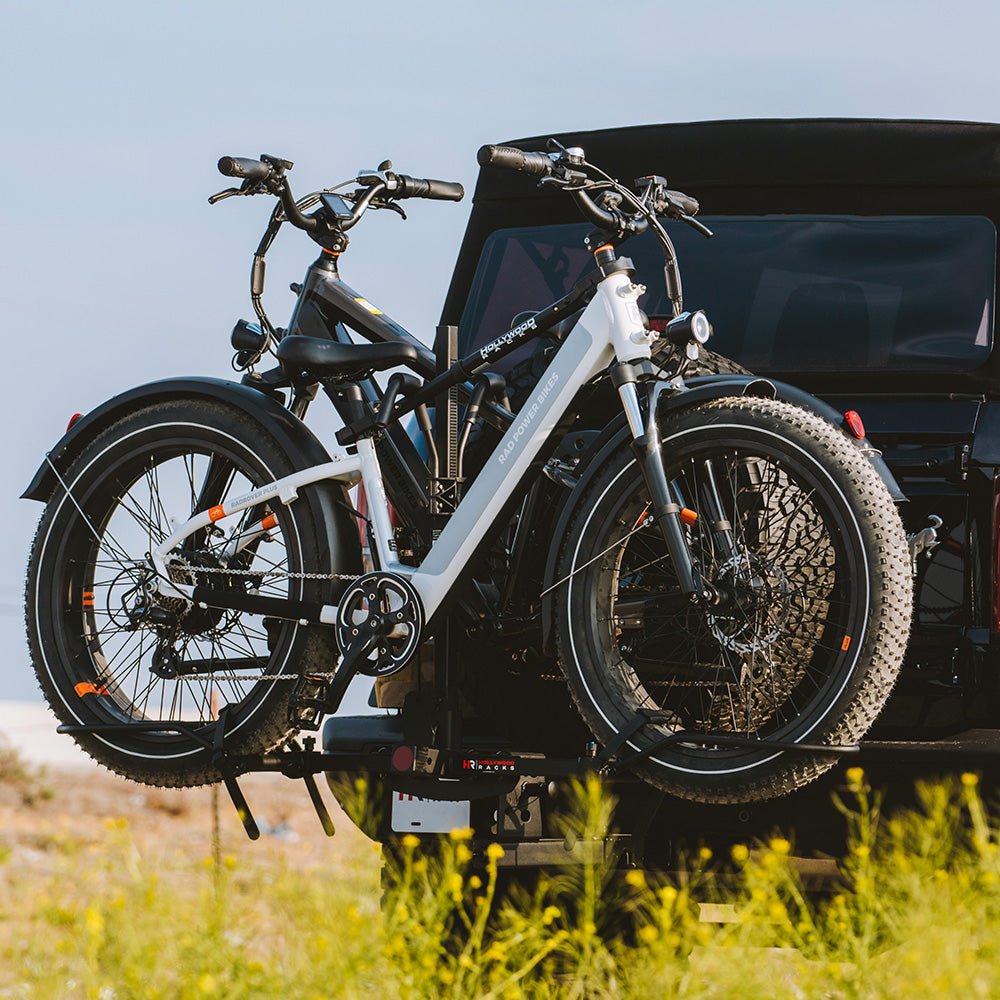
Diamond frames fit standard hangers easily, but step-through, women’s, comfort, and e-bikes often lack a top tube, requiring special handling.
Solutions for Frame Gaps
Use a frame adapter bar that installs between the seat post and handlebar stem to create a surrogate top tube. Dual-point suspension hooks cradle both the seat tube and down tube. Horizontal bar mounts hang the bike by a crossbar attached to the frame.
Never force a frame into a cradle. It can bend or crack carbon or aluminum tubing, causing expensive damage.
Load a Hitch-Mounted Hanging Rack
Hitch-mounted hanging racks suspend bikes by the frame and are compact and easy to use. Proper installation comes first.
Install the Rack First
Confirm your hitch size: 1.25-inch or 2-inch receiver. Pull the locking lever to clear the pin hole. Slide the rack fully into the hitch. Release the lever to engage. Turn the anti-theft knob clockwise and lock with your key.
Note: Class II hitches with 3,500 pounds gross trailer weight are most common and support 2 to 4 bikes.
Hang the Bike by the Frame
Lift the bike and slide it over the rack arms. Rest the top tube in the cradle closest to the vehicle. If available, engage a second cradle around the seat tube. Tighten the locking strap or clip. For multiple bikes, load the innermost first. This improves balance and reduces sway during transit.
Prevent Sway During Transit
Loose bikes can damage paint, frames, or other bicycles. Several simple solutions prevent this common problem.
Sway Reduction Methods
Pool noodles cut lengthwise and zip-tied to upright posts act as soft bumpers. Bungee cords attach from the top tube to the vertical post, adding tension. Old inner tubes cut into loops stretch between the frame and rack, providing durability and silence. Industrial Velcro straps offer heavy-duty hook-and-loop ties with no sharp parts.
Expert tip: Placing bikes in inner slots reduces the swing arc and keeps them closer to the central support post, significantly improving stability.
Use a Platform Hitch Rack for Heavier Bikes
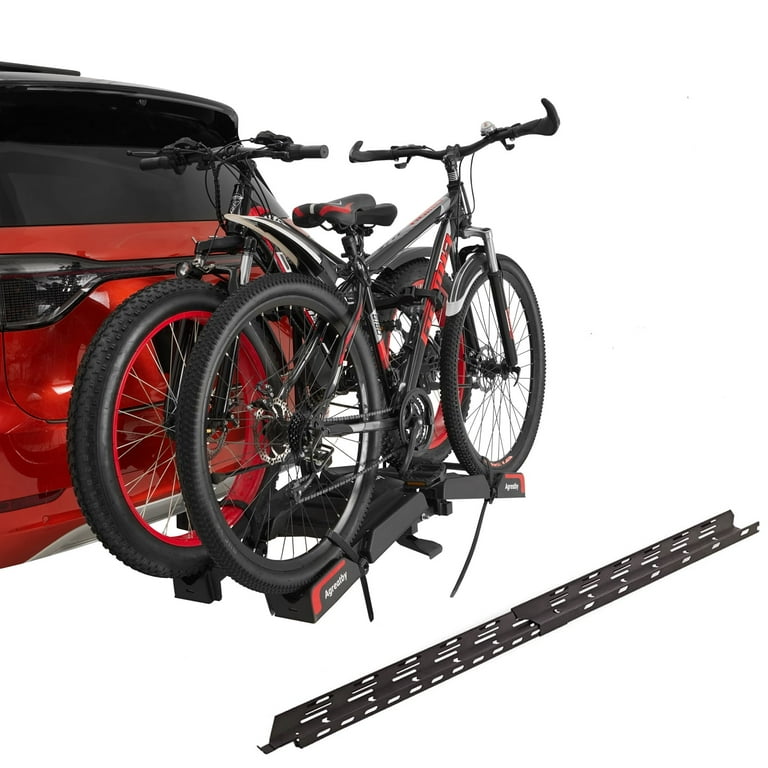
Platform hitch racks are ideal for e-bikes, fat-tire bikes, or full-suspension bikes because they require no frame contact.
Wheel-Based Mounting
Place the bike on the platform with the rear wheel near the vehicle. Drop the wheels into molded cradles. Lift the retention arm and clamp it over the front tire, close to the fork. Secure the rear wheel with a strap threaded through the spokes. Lock the retention arm if equipped.
This method causes no frame stress, making it perfect for carbon or delicate frames.
Frame Plus Wheel Mounting
Position the bike on the platform. Offset wheel cradles to prevent bike-to-bike contact. Strap both wheels down. Engage the frame clamp on the seat tube or top tube. Ensure the clamp is snug so the bike does not rock.
Mount on a Trunk Rack
Trunk racks are affordable and easy to install but require extra care during loading and transport.
Setup Steps
Park on level ground and open the trunk. Inspect the rack for damaged straps or hooks. Align the rack with the trunk lid. Secure the hooks over the edges and tighten support straps. Lift the bike onto the rack arms. Nest the top tube into padded cradles. Strap the frame and wheels securely, tight but not over-torqued.
Adapt for Step-Through Frames
Use a rigid frame adapter bar that spans the open frame. Ensure it fits within the cradle width for secure mounting.
Safety Check
Confirm brake lights, turn signals, and license plate are visible. Use an extendable license plate mount if needed.
Warning: Trunk racks are not recommended for highway use unless reinforced. Straps can loosen over bumps, creating safety hazards.
Secure to a Roof Rack
Roof racks require lifting strength or assistance but work well for occasional use.
Loading Procedure
Use a step stool or roof rail for safe access. Lift the bike overhead and center it on the roof rack. Secure using fork-mount by removing the front wheel, inserting the fork into the mount, and locking it. For tray-style mounts, clamp each wheel and strap the frame tightly. Double-check all connections by tugging straps and verifying quick-releases are fully closed.
Drive Smart
Check your total vehicle height to avoid garages or tunnels. Reduce speed because roof racks increase wind resistance and raise the center of gravity. Avoid sudden stops and sharp turns.
Use a Truck Bed Rack
Truck bed racks provide the most secure option with zero sway, ideal for muddy or off-road bikes.
Install and Load
Remove the front wheel using quick-release or thru-axle. Lift the bike into the bed. Insert the fork dropout into the rack clamp. Tighten the knob or lever until there is no play in the fork. Optionally strap the rear wheel to bed anchor points.
Note: The fork must be compatible with quick-release 9mm or thru-axle 12 to 15mm systems.
Watch for Obstructions
Spare tires, tonneau covers, or bed accessories may block placement. Check your bed configuration before loading.
Prepare the Bike Before Mounting
A few prep steps prevent damage and make loading easier.
Remove Accessories First
Take off water bottles, saddle bags, panniers, lights, GPS units, and phone mounts before mounting.
Check Tires and Drivetrain
Inflate tires to recommended pressure to reduce rim stress. Ensure the chain is seated and secure to prevent shifting during transit.
Special Steps for E-Bikes
Remove the battery to prevent vibration damage, reduce weight, and avoid electrical issues. Use a loading ramp or get help because lifting 70 or more pounds alone poses injury risk.
Perform Safety Checks Before Driving
Never skip this step. Loose bikes are dangerous.
Pre-Drive Checklist
Tug every strap, clamp, and connection to ensure no slack exists. Push the bike gently to verify it does not wobble. Check that lights and license plate are visible. Use extension mounts if lights or plate are blocked. Confirm the hitch lock is engaged.
Rule: Re-check all fastenings every 50 to 100 miles on long trips.
Drive with Caution
Your vehicle handles differently with bikes on board.
Adjust Your Driving
Avoid sudden braking or acceleration. Slow down on bumps and potholes. Take wide turns because bikes extend your width. Reduce speed in wind because roof and hitch racks catch gusts.
Tip: Roof racks can increase fuel consumption by up to 15 percent due to drag.
Follow Legal and Safety Regulations
Some states have specific rules for bike transport.
Common Legal Requirements
License plate must be readable. Brake and tail lights must function and remain visible. Overhanging loads may require a flag or marker. Secondary safety cables are required in some areas.
Always check state-specific laws before a long trip.
Maintain Your Rack for Longevity
Regular care extends your rack’s life.
Routine Maintenance
Inspect for rust, cracked plastic, and frayed straps. Clean after salt, mud, or rain exposure. Lubricate moving parts like hinges and levers. Store indoors when not in use because UV rays degrade plastic and rubber.
Warranty Tips
Metal parts often have lifetime warranty. Straps, locks, and plastic typically have 1 to 5 years. Register your product with the manufacturer to activate warranty coverage.
Key Takeaways for Hanging Your Bike
Hanging a bike properly takes just a few minutes but protects your investment every time. Whether storing in the garage or taking it cross-country, the key is matching the rack to your bike type, preparing the bike correctly, and double-checking all security points.
Pay special attention to step-through frames, e-bikes, and high-speed driving conditions. Use frame adapters for bikes without top tubes. Choose heavy-duty racks rated for 60 or more pounds when transporting e-bikes. Re-check all straps and connections every 50 to 100 miles on long trips.
With the right setup, you will ride with confidence knowing your bike is safe, secure, and ready for your next adventure.
Frequently Asked Questions About Hanging a Bike on a Bike Rack
What is the easiest way to hang a bike on a wall rack?
Position the bike with the rear wheel aligned to the hook. Stabilize the frame with one hand on the top tube. Use your other hand to lift from under the seat post, pivot the rear wheel upward, and hook it onto the bracket. Let the bike settle vertically to ensure stability.
Can you hang a step-through bike on a standard rack?
Standard racks work best with diamond frames that have a top tube. For step-through frames, use a frame adapter bar that creates a surrogate top tube, or use dual-point suspension hooks that cradle the seat tube and down tube instead.
How do I prevent my bike from swaying on a hitch rack?
Use pool noodles cut lengthwise and zip-tied to upright posts as soft bumpers. Bungee cords or old inner tube loops add tension from the frame to the rack. Position bikes in inner slots to reduce swing arc and keep them closer to the central support.
What rack is best for an e-bike?
Platform hitch racks or truck bed racks are best for e-bikes. These systems support 60 or more pounds per bike, distribute weight through the wheels rather than the frame, and eliminate frame stress on carbon or delicate frames.
How often should I check my bike rack while driving?
Re-check all straps, clamps, and connections every 50 to 100 miles on long trips. Vibrations from driving can loosen fasteners over time. Regular inspection prevents accidents and damage.
Is it safe to use a trunk rack for highway driving?
Trunk racks are not recommended for highway use unless reinforced. They are less stable than hitch or platform racks, and straps can loosen over bumps. For highway travel, choose a hitch-mounted or platform rack for better security and stability.


