

Nothing ruins a tidy entryway faster than shoes piled by the door. Installing a shoe rack solves this common problem, saving space, reducing clutter, and keeping your footwear organized. Whether you are mounting a sleek wall unit, assembling a freestanding tower, or building a custom wooden rack, this guide covers every installation method. You will learn how to install a shoe rack properly, avoid common mistakes, and ensure long-term stability.
From tool-free modular units to DIY wooden builds, this guide breaks down installation into clear, actionable steps. You will discover how to anchor wall racks securely, align freestanding tiers perfectly, and customize spacing for boots or heels. By the end, you will have everything needed to clear your floors and organize your shoes.
Choose the Right Shoe Rack Type
Before installation, identify which shoe rack suits your space and needs. Each type has unique setup requirements that affect both assembly time and stability.
Wall-Mounted Racks for Space Saving
Wall-mounted racks like the ClosetMaid SuperSlide system maximize vertical space and are ideal for closets, hallways, or small apartments. These require drilling into wall studs or using heavy-duty drywall anchors. They are perfect when floor space is limited and offer strong support when installed correctly.
Freestanding Modular Racks
Modular racks like the Knight 7-Tier assemble without tools, making them great for renters or dorm rooms. No drilling is needed—poles snap into plastic connectors. While easy to set up, these racks require careful alignment to prevent wobbling.
DIY Wooden Shoe Racks
For permanent, stylish storage, custom-built wooden racks offer full design control. You can match your home decor and adjust depth, height, and layout. These require basic carpentry tools and may be anchored to walls or floors for safety.
Pre-Assembled Cabinet-Style Racks
Rattan or fabric-covered shoe cabinets often come fully built. Simply unpack and place them. Best for low-traffic areas, these need only a flat surface and occasional dusting.
Install a Wall-Mounted Shoe Rack

Wall-mounted racks provide strong, space-efficient storage. Follow these steps to install them securely.
Mark and Level Wall Clip Positions
Start by choosing the height for your first shelf. Use a tape measure and pencil to mark horizontal positions for wall clips. Always use a laser level or long spirit level to ensure perfect alignment. Install one clip at each end and add another every 25 to 30 centimeters for support.
If mounting in drywall, locate studs with a stud finder. Anchor clips into studs whenever possible. If studs are not available, use heavy-duty drywall anchors rated for shelf loads.
Cut Shelf to Size and Seal Edges
Measure the space and cut the SuperSlide shelving to fit using a fine-tooth saw or miter saw. After cutting, press plastic end caps onto both ends to prevent snagging and protect the wire grid.
Attach Support Brackets to Shelf
Place shoe shelf support brackets at each end and one in the center. Rotate them so the mounting tabs slide between the deck wires. Then, slide each bracket backward until the rear clip locks onto the back wire of the shelf.
Snap Shelf Into Wall Clips
Align the front edge of the shelf with the installed wall clips. Lower it straight down, applying firm pressure until it snaps securely into place. Test stability by pressing lightly on the center. If it wobbles, recheck clip alignment and bracket seating.
Stack Multiple Shelves Correctly
For maximum storage, stack shelves vertically with proper spacing between each tier.
Set Standard or Custom Spacing
Standard spacing of 20 to 25 centimeters fits most shoes. For boots or heels, increase spacing to 30 centimeters or more. Use a level to mark each new row. Repeat the installation process for each additional shelf.
When installing multiple tiers, check vertical alignment after each shelf. A misaligned lower shelf will throw off the entire system.
Ensure Uniform Load Distribution
Avoid placing heavy boots on every shelf on one side. Distribute weight evenly to prevent sagging or bracket failure. Never exceed the manufacturer load rating per shelf.
Assemble a Freestanding Modular Rack
The Knight 7-Tier rack assembles quickly without tools, but precision matters for stability.
Orient Plastic Holders Correctly
Take two plastic holders and position them so the pipe slots face opposite directions. This ensures the frame aligns properly. Insert four long poles between them. The bottom holder should face downward during initial setup.
Mixing orientations causes misalignment. Double-check all holders match on both sides.
Build the First Tier
Slide the second plastic holder onto the poles from above. It may fit tightly—this is normal. Gently bend it slightly and press down. If it does not seat fully, tap the top edge with a rubber mallet or the back of a screwdriver.
Never use a metal hammer, as it can crack the plastic. Once seated, lift the frame and tap lightly along the sides to ensure even contact.
Add Upper Tiers Step by Step
For each new tier, insert four short poles into the next plastic holder. Construct the tier separately, then angle it into the existing structure. Press down firmly to lock it in place.
After the second or third tier, feet will form at the base, improving stability. Repeat for all seven tiers, or skip rows to customize height for bulky shoes.
Compress the Frame for Stability
After full assembly, perform a corner-to-corner compression. Tap one corner lightly with a mallet, then move to the opposite corner and repeat. Continue around all four corners. This forces all joints to fully engage and eliminates wobble.
Install the Top Section
The final piece gives the rack a finished look and adds extra rigidity.
Attach Elbow Connectors and Poles
Insert short poles into the topmost plastic holders. Snap elbow connectors onto the ends. Then, twist longer poles into the elbows using a slight rotational motion to lock them in place.
Secure the Top Frame
Place the completed top section onto the final tier. Ensure all poles align and press down evenly. Turn the rack on its side and tap around all joints to confirm everything is seated.
Gently shake the rack after assembly. If any part clicks or moves, reseat the loose connection with a light tap.
Build a DIY Wooden Shoe Rack
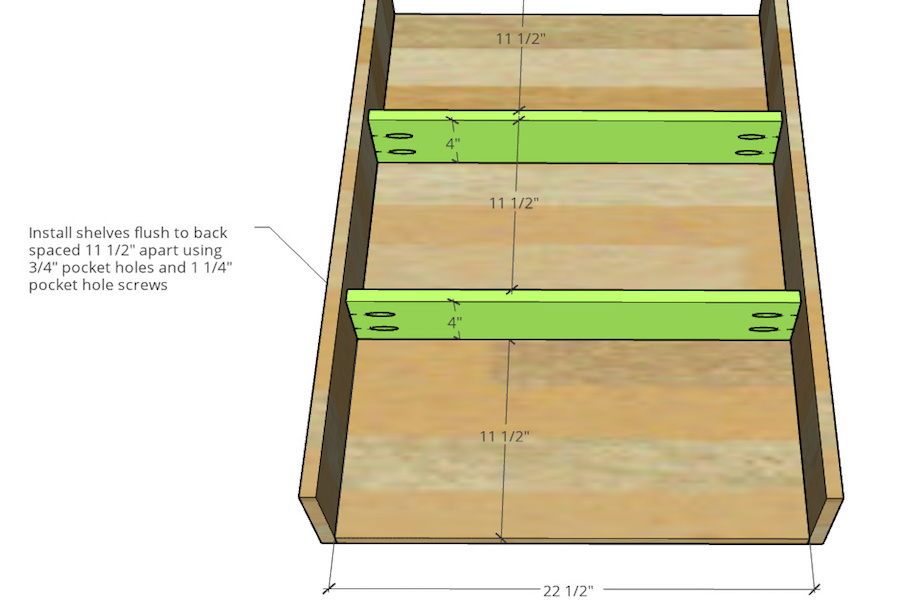
For a permanent, custom look, build your own wooden rack using a Kreg Jig or similar pocket-hole system.
Select a Design and Materials
Choose from popular plans like the Simple Shoe Storage Rack, Mudroom Bench with Shoe Storage, or Rustic Ladder Shoe Shelf. Use pine for affordability or hardwood for durability. Plywood works well for shelf bases.
Cut Wood to Size
Follow a cut list based on your space. Typical dimensions include depth of 30 to 35 centimeters, width of 60 to 90 centimeters, and height of 100 to 150 centimeters. Use a circular saw or miter saw for straight cuts.
Join Pieces with Pocket Holes
A Kreg Jig creates strong, invisible pocket-hole screws. Drill holes in side frames, then attach shelves with 1.5-inch wood screws. Clamp pieces together before driving screws for a tight fit.
Pre-drill pilot holes to prevent splitting, especially near wood ends.
Sand, Finish, and Install
Sand all surfaces with 120-grit then 220-grit paper. Apply stain, paint, or sealant and let dry completely. If wall-mounting, attach L-brackets to the back and secure into wall studs. For freestanding models, add felt pads to protect flooring.
Position Free-Standing Cabinet Racks
Rattan or fabric shoe cabinets need no assembly, only smart placement.
Choose a Flat, Level Surface
Place on hard flooring like tile, wood, or laminate. Avoid thick carpet, which can cause tipping. Use anti-slip pads under the feet if the floor is slippery.
Allow Access and Airflow
Leave at least 60 centimeters of clearance in front for easy access. Position near a light source. Rattan racks breathe naturally, making them ideal for reducing odors in enclosed spaces.
Dust weekly with a microfiber cloth and vacuum inside every month.
Follow Universal Installation Best Practices
No matter the rack type, these rules apply to all installations.
Plan Your Location Carefully
Pick a dry, low-humidity area. Bathrooms or damp basements can warp wood and rust metal. Ensure the spot is convenient, near the door or closet.
Anchor Heavy Racks to the Wall
Even freestanding units over 120 centimeters tall should be anchored to the wall using anti-tip brackets. This prevents tipping, especially in homes with children or pets.
Distribute Weight Evenly
Place heavier shoes like boots and work shoes across different shelves. Never overload one tier. Check manufacturer limits, as most modular racks support 10 to 15 kilograms per shelf.
Inspect and Maintain Regularly
Check connections on modular racks monthly and reseat loose poles. Tighten wall anchors or screws every six months. Reapply wood finish to DIY racks yearly in high-traffic areas.
Avoid Common Installation Mistakes
Even simple setups can go wrong. Here is how to dodge the most frequent errors.
Skipping the Level Check
An unlevel rack looks bad and can sag over time. Always use a spirit level when marking wall clips or assembling tiers.
Forcing Connections Too Hard
Tight joints are normal in modular racks, but never force them with excessive force. Tap gently with a rubber mallet. Over-pushing can deform plastic connectors.
Mounting into Drywall Without Anchors
Wall-mounted racks must be secured into studs or heavy-duty anchors. Standard drywall cannot support loaded shelves.
Ignoring Shoe Height When Spacing
Installing shelves too close together crams in shoes but makes them hard to remove. Measure your tallest footwear like knee-high boots and adjust spacing accordingly.
Customize for Your Needs
Make your shoe rack work better with simple tweaks.
Adjust Tier Height for Tall Shoes
On modular racks, skip a row of poles between tiers to create extra vertical space. On wall-mounted systems, increase clip spacing to 30 centimeters or more.
Reduce Rack Height for Low Ceilings
Cut down a 7-tier rack to 4 or 5 tiers by omitting upper sections. This saves space and reduces top-heaviness.
Match Rack to Room Decor
Paint or stain a DIY wooden rack to match your entryway. Add baskets or fabric bins to modular racks for a cleaner look.
Key Takeaways for Installing Your Shoe Rack Successfully

A well-installed shoe rack lasts for years and keeps your home tidy. Whether you are snapping together a tool-free tower or building a custom wooden unit, precision and patience pay off. Choose the right rack type for your space, follow the specific installation steps for that model, and always prioritize stability through proper anchoring and weight distribution. Regular maintenance and inspections ensure your rack stays secure over time. Follow these steps, prioritize safety, and enjoy a clutter-free entryway.
Frequently Asked Questions About Installing a Shoe Rack
Do I need to find wall studs for a wall-mounted shoe rack?
Yes, you should anchor wall-mounted racks into wall studs whenever possible for maximum support. If studs are not aligned with your desired placement, use heavy-duty drywall anchors rated for shelf loads.
How long does it take to install a shoe rack?
Wall-mounted racks take 15 to 30 minutes per shelf. Freestanding modular racks assemble in 20 to 40 minutes. DIY wooden racks require 3 to 8 hours depending on design complexity.
Can I install a shoe rack in a rental apartment?
Yes, freestanding modular racks require no drilling and are ideal for rentals. Wall-mounted racks are not recommended unless you have landlord approval, as they require drilling into walls.
How do I prevent a freestanding shoe rack from wobbling?
Perform corner-to-corner compression after assembly by tapping each corner with a rubber mallet. This ensures all joints fully engage. Also consider anchoring tall units to the wall.
What is the best spacing between shoe rack shelves?
Standard spacing of 20 to 25 centimeters fits most shoes. For boots or high heels, increase spacing to 30 centimeters or more to accommodate taller footwear.


