

Is your desk buried under a mountain of pens, sticky notes, and random paper clips? You can solve this clutter problem in less than an hour with materials you probably already have at home. Learning how to make a cardboard desk organizer gives you a custom storage solution that fits your exact needs, matches your workspace style, and costs almost nothing to build. This guide walks you through every step, from selecting the right materials to adding those final decorative touches that make your organizer truly one-of-a-kind.
By the end of this article, you will know exactly which supplies to gather, how to plan your compartment layout, and the best techniques for building a sturdy structure that lasts. Whether you need a simple three-section divider or an elaborate multi-tier system, the principles remain the same.
Select the Right Cardboard Box
The foundation of any good cardboard desk organizer starts with choosing the proper base material. Not all boxes are created equal when it comes to DIY projects.
Find a Sturdy Box
Look for thick, undamaged cardboard from shipping boxes used for books, electronics, or small appliances. Double-wall or triple-wall cardboard provides the best structural integrity for daily use. Avoid boxes that are crushed, water-stained, or showing signs of wear, as these will compromise the stability of your finished organizer.
Avoid Problematic Materials
Steer clear of wax-coated boxes like cereal or food packaging. These materials are too thin to hold their shape and often reject glue or paint. Similarly, heavily printed boxes can bleed through decorative coatings. Instead, opt for plain kraft brown boxes where you can clearly see the corrugation between cardboard layers.
Gather Essential Tools and Supplies
Before starting construction, collect everything you need to avoid interruptions mid-project.
Basic Tools Required
You will need a box cutter or utility knife for clean cuts, a ruler or measuring tape for accuracy, a pencil for marking lines, a metal straightedge to guide your blade, and scissors for trimming smaller pieces. Working on a protected surface like a cutting mat or old newspaper protects your work area.
Adhesives and Fasteners
White craft glue or wood glue creates strong, lasting bonds. Packing tape or duct tape reinforces joints quickly during assembly. Keep clamps or heavy books nearby to hold glued pieces in place while they dry. These clamping tools make the difference between wobbly dividers and solid construction.
Decorative Supplies
Optional items include acrylic paint in your preferred colors, washi tape for decorative borders, wrapping paper or contact paper for covering surfaces, and stickers or fabric for personalization. Gather these based on the aesthetic you want to achieve.
Plan Your Organizer Layout
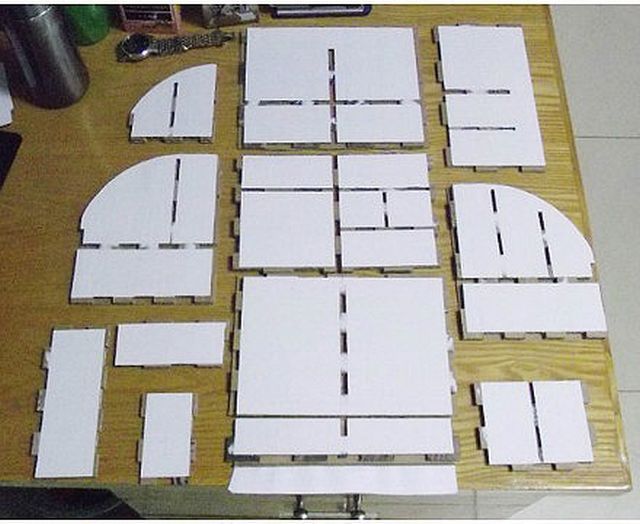
Skipping the planning phase leads to wasted materials and disappointing results. Take a few minutes to map out your design.
Determine What You Need to Store
List every item that currently clutters your desk. Common categories include pens, pencils, and markers, sticky notes and notepads, scissors and rulers, paper clips and USB drives. This list directly influences compartment sizes and quantities.
Choose Your Divider Style
A two-section split works best for separating writing tools from general supplies. Three compartments create one wide middle section for notepads with two narrower side slots for pens. Grid layouts provide maximum organization for multiple small items. You can also create custom mixes with a deep slot for scissors or a round opening for a cup of markers.
Measure and Sketch Your Design
Draw a top-down view of your base using real measurements. The ideal minimum base size is 6 by 8 inches, with a height of 4 to 6 inches for stability and visibility. Mark where each divider will go, adding 1/8 inch to divider lengths to account for cardboard thickness and ensure snug fits.
Build the Base Structure
With your plan ready, it’s time to start cutting and assembling.
Cut to Desired Height
Remove the top flaps from your box. Measure and mark a uniform height around all four sides, such as 5 inches. Use your ruler and box cutter to slice along the line, going slowly to maintain straight edges. Score the cardboard first, then deepen the cut in multiple passes to avoid tearing through the material.
Reinforce the Bottom
Glue a second layer of cardboard to the base for strength. Trace the bottom onto scrap cardboard, cut it out, and glue it flush with the original base. Weight it down with books for at least 20 minutes until the glue sets completely. This extra layer prevents sagging when you load the organizer with supplies.
Create Internal Dividers
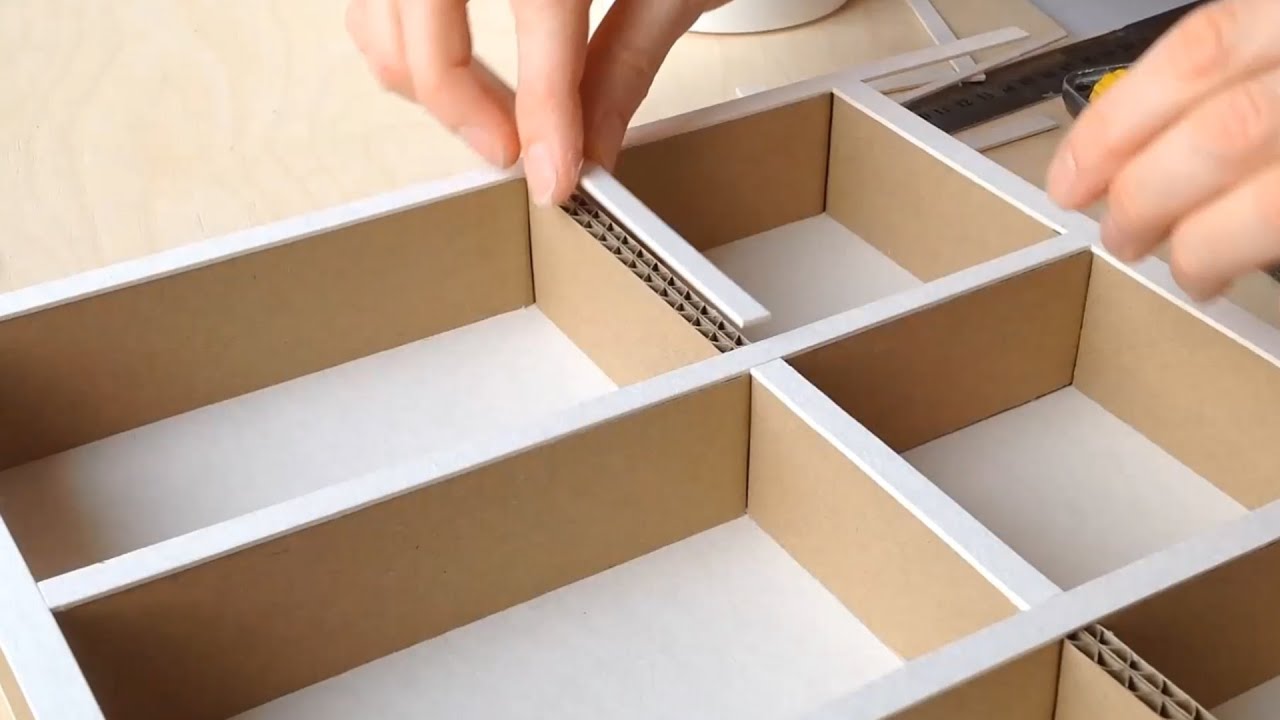
The dividers transform a simple box into a functional organizer with dedicated compartments for each supply type.
Use Pre-Cut Divider Strips
Cut vertical strips from leftover cardboard with widths matching your organizer height and lengths matching the interior dimensions. Apply glue along one edge and press into place inside the box at a 90-degree angle. Hold or clamp until dry, which typically takes 15 to 30 minutes. For grid designs, install one set of dividers first, let them dry completely, then add the perpendicular set over top.
Try Integrated Folded Dividers
This method uses the box walls themselves to create dividers. On opposite sides, mark evenly spaced parallel lines every 2 inches. Cut halfway through the cardboard along these lines, then fold the resulting tabs inward to create standing dividers. Glue or tape the folds to stabilize them in place. This approach saves space but offers less flexibility than removable dividers.
Strengthen the Overall Structure
A weak organizer falls apart quickly. Proper reinforcement extends its lifespan significantly.
Seal All Seams and Corners
Run packing tape along every inside corner where walls meet the base. Add L-shaped tape patches where dividers meet the walls. These simple steps prevent the most common failure points in cardboard construction.
Add Rim Reinforcement
Line the top rim with a strip of cardboard glued around the inner edge. This addition adds rigidity and prevents fraying from frequent item insertion and removal. It also creates a more finished, professional appearance.
Test for Stability
Gently press on each divider after assembly. If any section wobbles, add triangular cardboard glue tabs at the base of the divider for additional support. You can also reinforce joints with small pieces of tape acting like brackets across the connection points.
Decorate and Personalize Your Organizer
Now comes the fun part—making your organizer look amazing.
Paint for a Clean Finish
Acrylic paint provides vibrant, durable color coverage. Apply the first coat with a brush or sponge, let it dry completely for at least 30 minutes, then apply a second coat for full coverage. Painting before final assembly gives you easier access to all surfaces.
Cover with Decorative Paper
Cut wrapping paper or contact paper to size and adhere with a glue stick or Mod Podge. Smooth out air bubbles using a credit card as a squeegee. Fold edges neatly over the rim and seal with clear tape for a seamless look.
Add Washi Tape Accents
Washi tape works beautifully for borders around each compartment opening. You can also crisscross it across the bottom for a patterned effect or wrap the entire organizer like a present for full coverage. The tape comes in countless colors and patterns, making customization endless.
Optimize for Daily Use
A beautiful organizer only works if it fits how you actually use your desk.
Organize by Frequency
Place your most-used items like pens and notebooks in front and center compartments where they are easiest to grab. Store backup supplies like extra erasers and batteries in rear compartments where they are out of the way but still accessible.
Maximize Small Spaces
Use shallow trays for push pins or thumbtacks that might otherwise roll away. Dedicate a narrow vertical slot for charging cables to keep them contained. Consider adding a mini shelf made from a glued cardboard piece for two-tier storage of items like sticky notes stacked on top of paper clips.
Match Your Desk Style
Minimalist designs feature white paint with no labels and clean lines. Cute or kawaii themes use pastel washi tape and fun stickers. Rustic looks achieve warmth with brown kraft paper wrap and twine accents around edges. Modern aesthetics favor black paint with geometric masking tape patterns.
Extend the Lifespan
Proper care keeps your organizer functional for months or even years.
Seal Against Wear
Brush on Mod Podge or clear acrylic sealer to protect the surface from dust and moisture. Apply 2 to 3 coats, allowing each to dry completely before adding the next. This coating also covers edges and prevents fraying.
Avoid Moisture Damage
Never place your organizer near windows, sinks, or humidifiers. Cardboard weakens dramatically when damp, and once structural integrity is compromised, repairs are difficult. Store in a dry, shaded area to prevent warping or fading.
Perform Basic Repairs
If a divider loosens over time, reapply glue and clamp for 20 minutes before use. Reinforce the joint with tape for added security. When the base begins to sag despite reinforcement, corners come apart repeatedly, or the surface becomes stained and peeling, it is time to build a replacement.
Frequently Asked Questions About Making a Cardboard Desk Organizer
How long does it take to make a cardboard desk organizer?
Most people complete their first organizer in 30 to 60 minutes. Simple three-compartment designs take closer to 20 to 30 minutes, while more elaborate grid layouts with multiple tiers can take 90 minutes or longer. The second time you build one, you will be significantly faster.
What type of glue works best for cardboard organizers?
White craft glue or wood glue provides the strongest long-term bond for cardboard projects. Packing tape works well for quick reinforcement but does not create as clean a finish. Avoid hot glue for structural joints, as it can melt through thin cardboard and does not bond as strongly to paper fibers.
Can I make a cardboard desk organizer waterproof?
You cannot make cardboard truly waterproof, but you can make it water-resistant by applying multiple coats of Mod Podge, clear acrylic sealer, or spray varnish. These coatings protect against light moisture and spills but will still fail if the organizer is submerged or exposed to heavy water contact.
How durable is a cardboard desk organizer?
With proper construction including corner reinforcement and a double-layered base, a cardboard desk organizer lasts 6 to 12 months with normal daily use. The key is reinforcing all seams with tape and keeping the organizer away from moisture. Heavy items like staplers should not be placed on top.
What can I store in a cardboard desk organizer?
These organizers work perfectly for pens, pencils, markers, sticky notes, notepads, scissors, rulers, tape dispensers, paper clips, USB drives, earbuds, and other small office supplies. Avoid placing heavy objects inside or on top, as the cardboard can only support light to moderate weight.
Key Takeaways for Building Your Cardboard Desk Organizer
Building a cardboard desk organizer is one of the most practical DIY projects you can tackle. The process requires only basic tools, recycled materials you likely already have, and about an hour of your time. The result is a custom storage solution perfectly sized for your specific needs and decorated to match your personal style.
The most critical steps are choosing thick, undamaged cardboard, planning your compartment layout before cutting, reinforcing all seams with tape, and sealing the finished product to protect against wear. Skipping the reinforcement step is the most common mistake that leads to wobbly, short-lived organizers.
Beyond the practical benefits, you are making an eco-friendly choice. Every organizer diverts cardboard from landfills, reduces demand for plastic alternatives, and gives an old box a useful second life. Whether you create a simple three-section divider or an elaborate multi-tier system, your finished organizer will prove that sustainable design can be both functional and beautiful.
Now that you understand the process, find an old box in your recycling bin and start building. Your organized, clutter-free desk is just one project away.


