
Creating a drum rack is one of the most powerful ways to shape your sound, whether you’re building a virtual instrument in Ableton Live or assembling a sleek physical setup on stage. The term “drum rack” spans both digital and hardware worlds, and mastering both opens new doors for creativity, performance, and studio efficiency. In this guide, we’ll show you how to build a drum rack from the ground up in Ableton Live, covering sample loading, macro mapping, round robin playback, and advanced signal routing. Then, we’ll walk you through assembling a Gibraltar Stealth Side Mount hardware rack for acoustic kits.
Load Samples into Your Drum Rack
Start by loading a Drum Rack from Ableton Browser. Go to Drums, find Drum Rack, and drag it onto a MIDI track. The rack appears empty with no samples assigned. Navigate to your samples (WAV, AIFF, etc.) in the Browser and drag one directly onto a pad like C1. Once loaded, the pad displays the sample name and becomes playable via MIDI.
Drag and Drop Individual Samples
To load a single sample, simply drag it from the Browser onto any pad. The pad shows the sample name once loaded. Enable Auto Select in the top toolbar so triggering a pad automatically selects its sample in the device view, which is ideal for quick editing. To remove a sample, select the slot and press Delete.
Auto-Load Entire Folders
Speed up your workflow by dragging entire folders into the Drum Rack. Ableton automatically fills consecutive pads starting from the selected cell. This is perfect for importing full drum kits or percussion libraries in one move. Hold Shift while clicking to select a range of pads and distribute samples evenly across them.
Navigate and Organize the Drum Rack Grid
Use arrow keys to jump between pads. Press Ctrl (Win) or Cmd (Mac) plus arrows to move one row at a time. Scroll vertically with the mouse wheel or up and down keys.
To select multiple pads, click one pad, hold Shift, then click another to highlight the range. Drag samples across selected cells to batch-load them. Organize by mapping similar sounds together, keeping kicks on bottom rows, snares in the middle, and hi-hats above. Use chromatic octaves so MIDI controllers play intuitively.
Adjust Sample Parameters for Each Pad
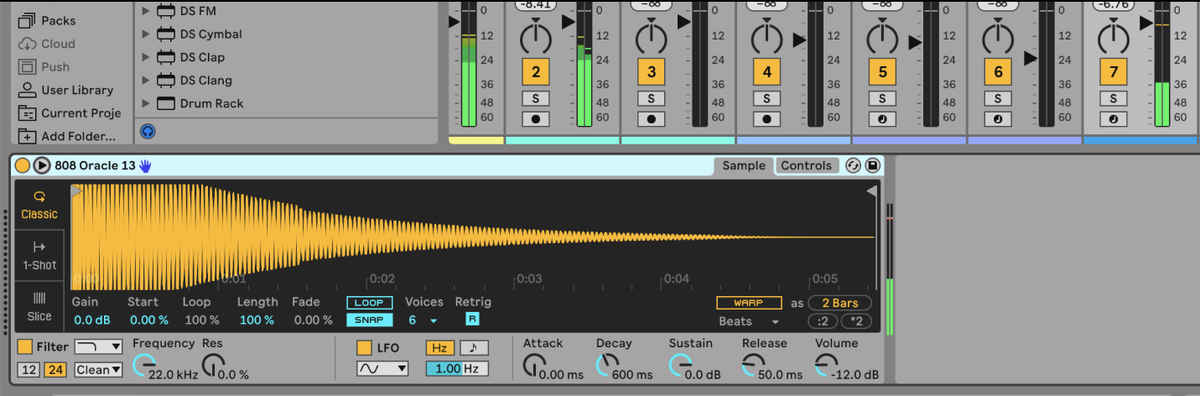
Each pad in the Drum Rack acts as an independent instrument chain. Click a loaded pad to reveal its Simpler device with editable parameters. You can adjust Start and End to trim sample length, Fade In and Out to smooth out clicks, Pitch to transpose in semitones or cents, and Pan to position in the stereo field.
For loops, set Voice Count to 1 to prevent overlapping playback. For one-shots like kicks and snares, voice count matters less. For layered hits, increase voice count cautiously to avoid CPU overload.
Enable Warp Mode for Tempo Sync
When loading rhythmic loops like shuffles or breaks, enable Warp mode on the Simpler. This stretches the sample to match your project BPM. Choose a warp mode like Beats for percussive material or Re-Repitch for lo-fi character. Disable Warp to play samples at their original speed, which is useful for vinyl crackles or ambient textures.
Pro tip: If your loop has a clear transient structure, set a Warp Marker at the first beat and adjust grid density manually for tight timing.
Build Layered Drum Kits with Multiple Sounds
Create richer, more complex hits by layering multiple samples on a single pad. For example, combine an 808 kick with a short acoustic kick for attack, or blend two snares for body and snap.
To layer sounds, load a sample onto a pad, then right-click the Simpler and select Group to create a Rack inside the pad. Open the group and click the plus Chain button to add a second chain. Load another sample into the new chain. Both trigger when the pad is hit. Adjust volume balance and pan each layer independently for stereo depth.
Apply Effects to Individual Pads

Each pad supports full audio effect chains. Click the plus symbol under a pad to open its device chain and insert effects like Reverb for short decay, Delay at 1/8 or 1/16 for rhythm, Saturation for warmth, or EQ Eight to cut low end on hats.
Use Chain Stacking to create parallel processing. Duplicate a chain, apply distortion to one, leave the other dry, and blend using chain volume. Map wet/dry mix to a Macro for real-time control during performance.
Use Return Chains for Shared Effects
Drum Racks support up to 6 return chains, functioning like internal aux sends. These let you apply shared effects across multiple pads without duplicating devices.
Click the Returns button in the Drum Rack and add a return chain. Insert a reverb or Spectral Time effect. On any pad, raise the Send A knob to route signal to the return. This method saves CPU and creates cohesive ambience. Use multiple returns for delay throws, modulation like chorus or phaser, and experimental FX like Corpus or Grain Delay.
Map Macros for Real-Time Control
Macros let you control multiple parameters with one knob, perfect for live tweaking or automation. Click Map in the Drum Rack, turn a parameter like reverb send or pitch, and assign it to a Macro knob. Set min and max values in the Map menu for precise response.
For example, map Macro 1 to reverb send from 0% to 80%, pitch from -12 to +12 semitones, and pan spread from 0% to 100%. Now one twist adds space, detunes, and widens the sound. Exit Map mode and automate Macros in Arrangement View or assign to MIDI controller knobs.
Set Up Choke Groups to Prevent Overlap
Choke Groups silence certain pads when others trigger, just like acoustic drums. This is most commonly used for open hi-hat cutting off when closed hi-hat hits, ride cymbal stopping when crash is played, and preventing multiple kick layers from stacking.
Select a pad like open hi-hat and in the Chain list, set Choke Group to 1. Assign the closed hi-hat to the same group. Now playing the closed hi-hat instantly cuts off the open one. You can create up to 16 choke groups, ideal for complex kits with overlapping elements.
Balance Panning and Stereo Image
Keep core elements centered, positioning kick and snare at 0% pan. Pan hi-hats, rides, and percussion slightly left or right at 10% to 30%. For dramatic movement, use Autopanner on a hi-hat pad, set LFO to triangle wave, and sync rate to 1/8 or 1/16 notes.
Try LCR panning by hard panning all elements left, center, or right to create a bold, modern mix with clear separation. To design unusual stereo behavior, use a return chain with Utility set to Mid/Side and widen selectively.
Create Round Robin Sample Playback
Round robin cycles through multiple versions of the same hit, preventing robotic repetition. Build it with a nested Drum Rack.
On a pad, load a Drum Rack instead of a sample. Inside, add 3 to 4 Simpler instances, each with a different snare sample. Insert a Random MIDI effect before the Simplers. Set Chance to 100%, Choices to 4 (matching your sample count), Mode to Alt for sequential cycling, Sign to Add, and Scale to 1. Add a Pitch MIDI effect set to -24 semitones before Random to transpose incoming notes to C1.
Now each hit triggers the next sample in sequence, perfect for organic drum feel. Use this for multi-sampled kits or random FX triggers.
Host Synths and Non-Drum Sounds
Drum Racks are not just for drums. You can load VST synths like Wavetable, Serum, or Operator onto any pad. Drag a synth onto a pad and the entire instrument loads into that chain. Trigger notes via MIDI for chords, basslines, or full progressions.
Add MIDI effects before the synth like Arpeggiator for automatic patterns, Chord to play harmonies with one key, or Random for pitch variation. This turns your Drum Rack into a performance instrument ideal for live sets.
Apply MIDI Effects Across the Kit
Enhance playability with global MIDI effects. Insert Arpeggiator, Scale, or Note Echo above the Drum Rack or on individual chains.
Assign the same hi-hat sample to three pads, each with a different Arpeggiator rate. Pad 1 plays 1/8 notes, Pad 2 plays triplets at 1/12, and Pad 3 plays 1/16 notes. Hold one pad to generate instant rhythmic complexity. Use Scale MIDI to force all notes into a key like C minor, avoiding wrong notes during improvisation.
Balance Volume and Apply Glue Processing
Before using the kit, balance levels across all pads. Mute all chains, then solo one pad at a time. Adjust volume fader until perceived loudness matches others. Aim for consistency so no single hit jumps out unnaturally.
Apply glue processing at the rack output. Insert a Compressor with Glue Compressor preset using moderate ratio of 2:1 to 4:1, slow attack, and medium release. Add a Limiter to catch peaks. This creates cohesion so your kit feels like a unified instrument.
Add Saturation for Character and Warmth
Saturation introduces harmonic richness, great for vintage or aggressive textures. Options include Saturator X with Analog, Tape, or Soft Clip modes, Klanghelm SDRR for tube-style drive, or Decapitator for colored distortion.
Apply subtly on individual pads like snare and clap, or globally on the rack output. For contrast, keep the kick clean while saturating snare and hats slightly. Blend dry and saturated chains using parallel routing. Avoid overdriving low-end since distorted kicks can muddy the mix.
Optimize Your Workflow
Speed up creation with studio-tested tips. Enable Hot Swap in the top-right icon, then use arrow keys in the Browser to preview samples without closing the device. Hear changes instantly with no tab switching.
Learn key shortcuts like Tab to switch between mixer and devices, Ctrl/Cmd R to rename, Ctrl/Cmd Shift L to create return track, and Ctrl/Cmd G to group devices. Adopt smart naming with descriptive names like Trap_808_Kick_v2 or Jazz_Hats_RR. Avoid generic names like Drum Rack 1.
Rearrange layouts creatively by trying non-standard mappings. Assign 88 keys randomly to pads or place kicks on high notes and hats on low. This forces new patterns and breaks muscle memory. Modify stock racks by opening Ableton factory Drum Racks and studying how chains, macros, and effects are routed.
Assemble a Physical Drum Rack

Shift from software to hardware by building a space-efficient, legless acoustic drum rack using the Gibraltar Stealth VMS. This system mounts directly to the bass drum, freeing floor space and improving pedal access.
Install Side Mounts and Connect Rack Tube
Attach two GSSMS Stealth Side Mounting Systems to each bass drum hoop. These serve as anchor points for the entire rack. Ensure clamps are tight and aligned to prevent instability.
Slide the SC-GPRSBAR 30-inch rack tube into the side mounts. Secure both ends with SC-GCRMC multi clamps. This horizontal bar becomes your main mounting spine.
Mount Toms and Add Cymbal Arms
Use SC-DP double platform for high and low toms, and SC-SPCM single platform for mid-tom. Attach platforms via SC-LBM 10.5mm or SC-LBL 12.7mm L-rods with ball joints for fine angle adjustment. Position toms at playing height and tilt, then tighten ball joints firmly to prevent slippage.
Attach boom arms to the rack tube using SC-GCRMC clamps. Use SC-USCB, SC-SBBT, or SC-LBBT for crashes and rides, SC-4425D-1 for straight cymbal stand, and SC-CLRA for splash cymbal. Use gearless brake tilers for smooth, secure angle adjustment.
Mount Snare and Finalize Setup
For a legless snare option, use 9706NL No-Leg Snare Stand and clamp to rack tube with SC-GCRA right angle and SC-GCSMC super multi clamp. Alternatively, install GSMTL Mini T-Leg on rack tube and attach GUASB Ultra-Adjust Snare Basket.
Add SC-EA100 Extension Arm for extra mounting points and SC-DSH Deluxe Stick Holder on the rack tube. Double-check all clamps and tighten with a drum key. The result is a sleek, stable, professional-grade rack with minimalist aesthetic and maximum functionality.
Frequently Asked Questions About Making a Drum Rack
How do I load samples into a Drum Rack in Ableton Live?
Navigate to the Browser, find Drums, and select Drum Rack. Drag it onto a MIDI track. Then drag samples from the Browser directly onto pads to load them. You can load individual samples or drag entire folders to auto-populate multiple pads at once.
What are choke groups and why should I use them?
Choke groups prevent overlapping playback by silencing certain pads when others trigger. This mimics acoustic drums where hitting a closed hi-hat cuts off an open hi-hat. Assign pads to the same Choke Group number to enable this behavior.
How do I create round robin playback in a Drum Rack?
Build a nested Drum Rack by loading a Drum Rack onto a pad instead of a sample. Add multiple Simpler instances inside, each with a different sample version. Insert a Random MIDI effect set to Alt mode so each hit cycles through samples sequentially.
Can I use synths and non-drum sounds in a Drum Rack?
Yes. Drag any VST synth or Ableton instrument like Wavetable or Operator directly onto a pad. The entire instrument loads into that chain and triggers via MIDI. This turns your Drum Rack into a hybrid instrument for melodic sounds.
What is macro mapping and why is it useful?
Macro mapping lets you control multiple parameters with a single knob. Click Map, adjust a parameter like reverb send or pitch, and assign it to a Macro. One knob turn now affects all mapped parameters simultaneously, perfect for live performance.
How do I build a physical drum rack for acoustic drums?
Use the Gibraltar Stealth Side Mount system. Attach side mounts to bass drum hoops, connect a rack tube between them, and use clamps to mount toms, cymbals, and snare. This creates a legless, space-saving setup ideal for small stages.
Key Takeaways for Building Your Own Drum Rack
Whether you’re crafting beats in Ableton or building a stage-ready acoustic rig, knowing how to make a drum rack gives you total control over your sound. Start with sample loading and grid organization, then progressively add layering, effects, and macro mapping to build complexity. The Drum Rack is a modular container limited only by your creativity, so experiment with synths, field recordings, and unconventional layouts. Save your custom racks in the User Library for reuse across projects, and don’t be afraid to share and learn from others in the community. Now go build something powerful.