

You’ve seen them in farmhouse kitchens, cozy living rooms, and boutique coffee bars. Rustic shelves carry decades of character in their chipped edges, weathered grain, and subtle imperfections. They’re not perfectly smooth or factory-fresh. They’re full of story. The good news? You don’t need reclaimed barn wood or a carpenter’s workshop to achieve this look. With the right techniques, even a plain pine board can transform into a rustic statement piece that adds warmth to any room.
This guide walks you through every step to make a shelf look rustic: choosing the right wood, mastering distressing techniques, applying aged finishes, mounting options, and styling tips designed to help you craft a shelf that feels like it’s been in your family for generations.
Choose Character-Rich Wood for Your Shelf
The foundation of any rustic shelf is the wood itself. Forget flawless, smooth boards. Your best choices feature knots, cracks, dents, and grain variations that read as features rather than flaws.
Pick the Right Wood Type
• Reclaimed wood is the gold standard. Old barn boards, factory floors, or salvaged beams come pre-aged with nail holes, saw marks, and natural discoloration. They’re dense, durable, and tell a story.
• White pine is a budget-friendly alternative. It’s soft, easy to cut, and takes distressing well. Look for boards with visible knots and grain swirls.
• Common pine (1×12 or 2×10) is widely available at hardware stores. While it starts clean, it’s perfect for DIY aging with sanding and tool marks.
• Scrap wood from old furniture, pallets, or construction sites can be free and full of character if properly cleaned and prepped.
Pro Tip: Don’t sand out dents or fill cracks. These imperfections are what give your shelf authenticity.
Cut and Prep Your Shelf to Custom Size
A mass-produced shelf screams “new.” A rustic one fits its space like it was made for it.
Standard Sizes for Custom Fit
• Length: 36 to 72 inches works for most walls. Common sizes include 46, 48, or 60 inches.
• Width: 8 to 12 inches is ideal. Wider shelves suit kitchens while narrower ones fit tight spaces.
• Thickness: 1.5 inches (like a 2×10) or 2 inches adds visual weight and structural sturdiness.
Cutting Tips
Use a circular saw or table saw with a guide for straight cuts. If you don’t own tools, most hardware stores will cut boards for free. Always measure twice because custom fit beats off-the-shelf every time.
Design Note: Slight warping or uneven ends can enhance rustic charm when structurally sound.
Sand and Prepare the Wood Surface
Prep work sets the stage for aging. You’re not smoothing the wood. You’re revealing its soul.
Sanding Grit Guide
• 80–100 grit: Strip old paint, remove splinters, level rough spots
• 150 grit: Smooth without losing texture
• 220 grit: Final prep for stain or finish
Key Prep Steps
-
Strip paint if using reclaimed wood using a belt sander with 80-grit. Wear a mask and test for lead if the wood predates 1978.
-
Clean the surface thoroughly with a brush or vacuum to remove all dust.
-
Round edges and corners using a flap sander or electric grinder to soften sharp factory edges. Focus on front and sides since these areas wear fastest over time.
Why it matters: Rounded edges mimic decades of handling and prevent that “new build” look.
Distress the Wood for Authentic Age
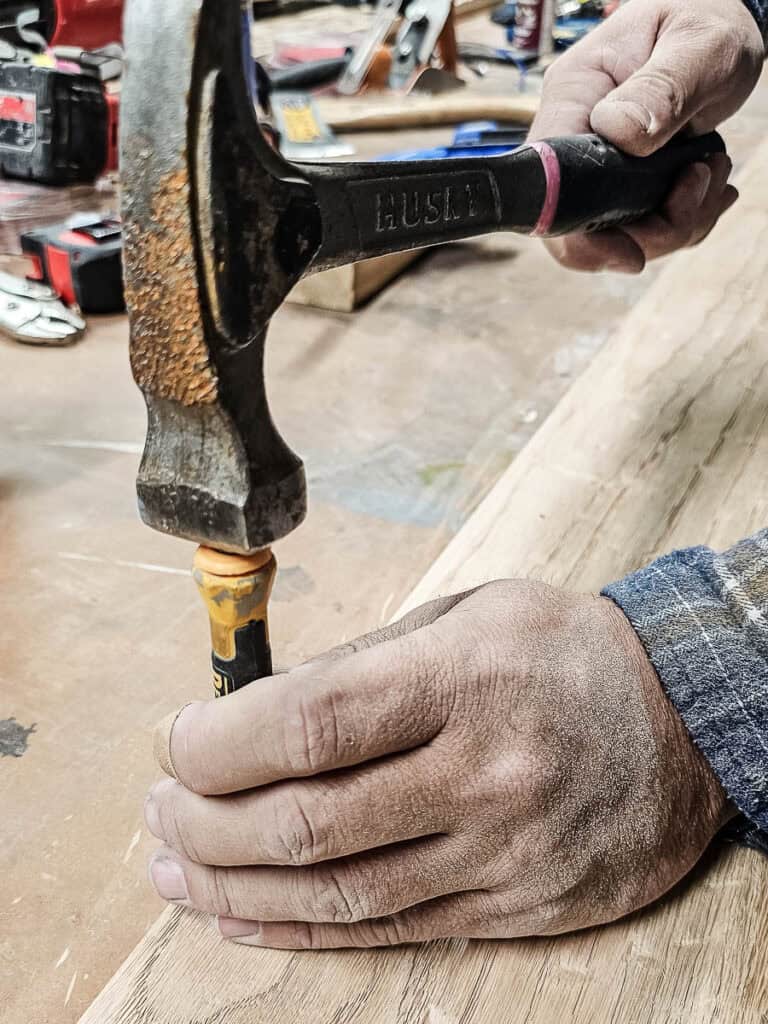
This is where your shelf starts looking like it’s been around the block. Use tools to simulate natural wear.
Distressing Techniques
• Edge gouging: Use a chisel or hatchet to create deep cuts that resemble hand tool work
• Random dents: Press a nail, hammer, or awl into the surface for scattered pitting
• Crack carving: Use a Dremel with a narrow blade for fine, irregular splits
• Grain texturing: Attach a wire wheel to your drill to strip soft wood and highlight grain
• Tool marks: Use a broad ax or hammer to create tear-outs and surface roughness
• Nail holes: Press old square nails into the wood for authentic imperfections
• Wear simulation: Use a flap grinder to smooth areas that would naturally get touched over time
Pro Tip: Combine at least three techniques for layered realism. Focus on front edges, corners, and areas that would naturally see handling.
Apply a Weathered Finish
A great finish doesn’t hide the wood. It enhances its history.
Stain Options for Aged Look
• Varathane Aged Wood Accelerator: Creates a warm, sun-bleached brown tone
• Minwax Vintage Oak: Gives a soft gray appearance that darkens crevices
Application Method
Apply stain with a clean rag using circular motions. Work it deeply into cracks, knots, and dents. Wipe off excess immediately and let dry fully before sealing.
Test First: Always try stain on scrap wood to preview the final color.
Wax for Antiquing
Wax adds depth and mimics years of handling, especially in corners and high-touch areas.
Apply clear wax first to seal the wood and enhance grain. Then apply dark antiquing wax to edges, corners, and knots, wiping off quickly for control. Apply after mounting to avoid finishing unseen surfaces and build layers gradually for best results.
User Favorite: Tung oil is often preferred for a natural, warm look, but wax excels at creating an aged appearance.
Paint Techniques for Farmhouse Look
Want a whitewashed or painted rustic shelf? Use matte latex paint in antique white, cream, or gray.
• Dry brushing: Use a nearly dry brush to apply light paint on edges only
• Sponge dabbing: Use a sponge for subtle color variation
• Damp cloth wiping: Remove paint from high points while wet for a worn look
Avoid: Over-painting. Let wood grain show through in spots for authenticity.
Seal and Protect Your Rustic Shelf
Even rustic shelves need protection, especially in kitchens or bathrooms.
Best Sealers
• Oil-based polyurethane: Best for durability and rich color, though it yellows slightly over time
• Water-based poly: Best for clarity and fast drying with less yellowing
• Tung oil: Best for natural look and easy reapplication, though it needs refreshing every 6 to 12 months
Application Tips
Use a brush or rag to apply thin coats. Lightly sand between coats with 220-grit paper. Reapply sealant annually in high-use areas.
Mount with Rustic Brackets
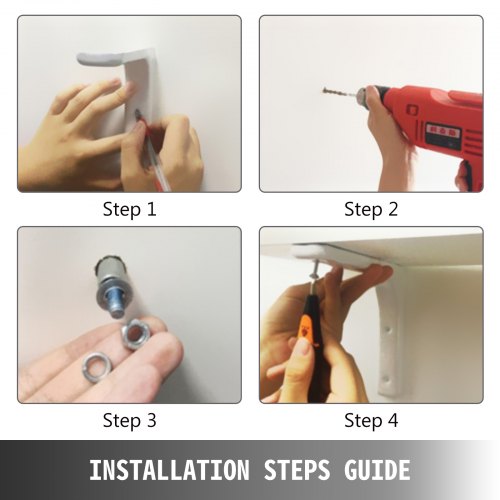
Hardware should complement the look, not clash with it.
Bracket Options
• Industrial black iron L-brackets: Classic, sturdy, and widely available
• Reclaimed wood brackets: Built from old 2×2s for a unified look
• French cleat system: Creates floating shelves with hidden, strong support
Mounting Tips
Find wall studs with a stud finder and pre-drill holes to prevent splitting. Use a level throughout because even a slight tilt ruins the look. Space brackets 6.25 inches in from each end for a 46-inch shelf or 8 inches in for a 36-inch shelf. Use three brackets for heavy loads or spans over 48 inches.
No studs? Use heavy-duty wall anchors like toggle bolts.
Align Multiple Shelves Perfectly
Want a clean, professional look with multiple shelves? Use spacer blocks.
Cut a block to your desired gap. Place one block at each end of the lower shelf. Align the next bracket with the top of the block, then mark and mount. Using two blocks ensures perfect vertical alignment with no guessing.
Style Your Rustic Shelf
A rustic shelf is only as good as what’s on it. Keep it simple, functional, and seasonal.
What to Display
• Vases with faux tulips add height and softness
• Mugs, bowls, and ceramic jars are both functional and decorative
• Vintage books or wooden signs add character
• Woven baskets provide texture and storage
• Potted plants or dried flowers bring life
Styling Rules
Group items in odd numbers like 3s or 5s for best visual balance. Keep the display uncluttered because negative space is part of the design. Rotate seasonally to refresh the look with holiday decor or fresh greenery.
Design Mantra: “It’s your home. Make the space work for your needs.”
Apply by Room Type
Rustic shelves adapt beautifully to any space.
Kitchen
Use open shelving for dishes, spices, and cookbooks. Style with mugs, jars, and woven baskets. Seal the finish well since kitchen moisture demands durability.
Living Room
Replace gallery walls with shelves. Display books, photos, and cozy textiles. The benefit is added storage without visual noise.
Bathroom
Hold towels, candles, and toiletries. Ensure the finish is sealed since humidity is the enemy. Add S-hooks for extra utility.
Laundry Room
Mount narrow shelves to hold baskets, labeled jars, and cleaning supplies. Add an under-shelf rail for hanging drying tools.
Avoid Common Mistakes
Even small errors can ruin the rustic illusion.
| Mistake | Fix |
|---|---|
| Too much symmetry | Add random distressing |
| Over-sanding | Stop when texture shows |
| Perfectly straight boards | Choose warped or knotty wood |
| Fresh-looking paint | Use distressing wax or dry brush |
| Leveling too late | Check with shelf in place |
| Mounting without studs | Use heavy-duty anchors |
Golden Rule: You can always add more distressing. Start subtle and build up gradually.
Frequently Asked Questions About Making a Shelf Look Rustic
What type of wood is best for a rustic shelf?
Reclaimed wood like barn boards or old factory flooring is the gold standard because it comes pre-aged with natural character. White pine and common pine work well for budget projects and take distressing easily. The key is choosing boards with knots, grain variation, and minor imperfections rather than flawless pieces.
Can I make a new shelf look rustic?
Absolutely. New pine boards from hardware stores can be transformed using distressing techniques like gouging, denting, and wire wheel texturing. Combined with stain, wax, or paint finishes, you can create an aged appearance that rivals reclaimed wood. Start with 80-grit sanding and layer multiple aging techniques for realism.
How do I distress wood without special tools?
Use items you already have around the house. Press nails or screws into the surface to create dents. Use a hammer and chisel for gouges. Run a wire brush or steel wool across the grain to highlight texture. Even dragging a chain across the wood creates convincing wear marks. Focus on edges and corners since those areas naturally show the most age.
Should I seal a rustic shelf?
Yes, sealing protects your work, especially in kitchens and bathrooms where moisture is present. Tung oil provides a natural look while allowing the wood to age gracefully. Polyurethane offers harder protection. Apply sealant after distressing and staining but consider leaving some areas unwaxed if you want the wood to develop natural patina over time.
How much does it cost to make a rustic shelf?
A basic two-shelf unit costs under $50 using pine boards and standard finishes. A reclaimed wood board runs $10 to $20, brackets cost $15 to $30, and stain or wax runs $10 to $20. You can spend even less using scrap wood or salvaged materials. The tools needed are common household items or available for rent.
Key Takeaways for Making Your Shelf Look Rustic
Creating a rustic shelf comes down to embracing imperfection as a design feature. Choose wood with character like knots, grain variation, and minor damage rather than seeking flawless boards. The aging process matters most: combine multiple distressing techniques including edge gouging, random dents, wire wheel texturing, and tool marks to create layered realism that mimics decades of natural wear.
The finish transforms new wood into something that appears ancient. Stain works deeply into grain and crevices while dark antiquing wax builds age in corners and high-touch areas. Paint techniques like dry brushing leave color only on edges and details. Always seal your work in moisture-prone rooms like kitchens and bathrooms, but reapply protective finishes annually.
Start simple with an affordable pine board, add some deliberate dents, apply a weathered stain, mount with industrial brackets, and style with items you love. The most beautiful rustic shelves aren’t flawless. They’re full of stories.


