

If you’re preserving fruits, pickles, or jams at home, knowing how to use a canning rack is essential for safe and successful water bath canning. Without a rack, glass jars sit directly on the hot pot bottom, risking thermal shock that can crack or shatter them mid-process. A canning rack lifts jars off the metal surface, allowing boiling water to circulate evenly underneath and around each jar. This ensures consistent heating, prevents seal failure, and protects both your food and equipment. Whether you’re using a dedicated canner or a stock pot, the rack is non-negotiable for reliable results. In this guide, you’ll learn how to choose the right rack, set it up properly, load jars safely, and avoid common mistakes that lead to breakage or spoilage.
Choose the Right Canning Rack
Not all racks are created equal, and your choice impacts safety, stovetop compatibility, and longevity. Matching your rack to your pot and cooktop ensures optimal performance and protects your investment in both jars and preserved food.
Pick a Rack for Your Stovetop
Your stovetop type determines which racks and pots work best. Using the wrong combination can damage glass or ceramic cooktops or cause uneven heating.
- Gas, propane, or electric coil stoves are compatible with most metal racks, including chrome-plated, stainless steel, or ribbed-bottom pots.
- Smooth-top electric or glass stovetops require flat-bottomed pots only. Avoid textured or warped racks that can scratch or crack the surface.
- The best options for smooth tops are silicone trivets or stainless steel steamer racks with smooth bases.
Compare Rack Materials

Each material offers trade-offs in durability, cost, and maintenance. Understanding these differences helps you make an informed purchase.
| Material | Best For | Key Considerations |
|---|---|---|
| Chrome-plated steel | Budget-friendly setups | May rust if not dried; inspect regularly |
| Stainless steel | Long-term use | Resists rust; heavier but very durable |
| Silicone | Smooth-top stoves | Never rusts; ensure it’s perforated to prevent floating |
| DIY alternatives | Temporary fixes | Use only when tested and stable |
Avoid the Folded Towel Trap
While some suggest using a folded kitchen towel as a jar base, experts strongly advise against this practice. Towels shift, compress, or float during boiling, creating uneven support that increases tipping and breakage risk. They can also trap debris or burn on contact with the hot pot. Stick with a rigid, purpose-built rack for safety.
Prepare the Pot and Rack
Proper setup prevents thermal shock and ensures even processing from the start. Taking time to prepare correctly pays off during the actual canning process.
Place Rack Before Adding Water
Always insert the rack into the pot before pouring in water. This avoids scratching the pot and ensures stability during loading. Center the rack so jars will not touch the sides, and confirm that feet or supports keep the rack elevated off the bottom.
Preheat Water to Prevent Shock
Fill the pot one-third to half full with water, then heat until hot but not boiling. For raw-packed foods like raw peaches in jars, target 140°F. For hot-packed items like simmered jam, aim for 180°F. Preheating reduces temperature stress when hot jars enter the pot.
Load Jars Safely and Correctly
How you place jars on the rack affects seal success and breakage risk. Proper loading technique is one of the most important skills in water bath canning.
Use a Jar Lifter for Control
Never lower jars by hand. Use a jar lifter to grip jars securely around the neck, lower them upright into the rack, and prevent splashing or tipping.
Space Jars Properly
Arrange jars so they do not touch each other or the pot walls. Leave 1 to 2 inches of space between jars for water flow, and ensure the total number fits within the rack capacity, typically 7 to 9 pint jars. Overcrowding restricts circulation and increases siphoning.
Maintain Correct Water Level
After loading, ensure 1 to 3 inches of boiling water covers the jar lids. Add boiling water from a kettle if needed, as cold water can cause sudden cooling and jar breakage.
Process Jars with Precision
Accurate timing and consistent boiling are critical for shelf-stable results. The processing stage is where food safety is determined.
Start Timer at Full Rolling Boil
Only begin the processing countdown once the water reaches a full rolling boil, not a simmer. Cover the pot with its lid to maintain heat, and keep the boil steady throughout the entire process.
Adjust for Altitude
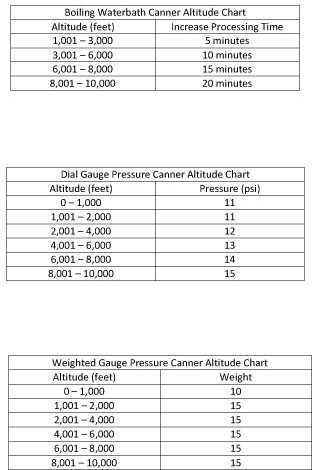
Boiling point drops at higher elevations, requiring increased processing time. Add 5 minutes for elevations between 1,001 and 3,000 feet. Add 10 minutes for 3,001 to 6,000 feet. Add 15 minutes for 6,001 to 8,000 feet. Add 20 minutes for elevations above 8,000 feet.
Monitor Water During Processing
Check the water level halfway through processing. If it drops below the top of the jars, carefully add boiling water to maintain coverage. Use a kettle to avoid burns or temperature drops.
Cool and Remove Jars Properly
Rushing this step can break seals or crack jars. Proper cooling is just as important as proper processing.
Let Jars Rest in the Canner
After processing, turn off the heat and remove the lid. Let jars sit in the water for 5 to 10 minutes. This gradual cooling reduces internal pressure and prevents siphoning.
Lift Jars Upright
Using the jar lifter, remove one jar at a time, or lift the entire rack if it has handles. Keep jars upright, as tilting can force liquid out. Place jars on a towel or wire cooling rack, spaced 1 to 2 inches apart.
Cool Undisturbed
Allow jars to cool for 12 to 24 hours without touching. Do not retighten bands, as this can interfere with seal formation. Listen for the ping sound as lids seal.
Check Seals and Store Safely
Final inspection ensures your food will keep for months. Proper storage extends the shelf life of your preserved goods.
Test Each Lid
After cooling, press the center of each lid. A sealed lid stays down and does not flex. An unsealed lid pops up and down when pressed.
Handle Failed Seals
For unsealed jars, reprocess within 24 hours using a new lid and full processing time. Alternatively, refrigerate and use within 2 to 3 weeks, or freeze contents in a freezer-safe container.
Label and Store for Longevity
Before storage, remove screw bands to prevent rust and corrosion. Wash jar exteriors to remove residue. Label with contents and date. Store in a cool, dark, dry place, and use within 1 year for best quality.
Prevent Common Mistakes
Even experienced canners make errors. Understanding these pitfalls helps you avoid them.
Stop Jar Breakage
The cause is thermal shock from cold jars or direct pot contact. The fix is to always use a rack and preheat both jars and water before processing.
Avoid Seal Failures
Common causes include dirty rims, over-tightened bands, and trapped air bubbles. Wipe rims with a clean, damp cloth. Tighten bands to finger-tight only. Remove air bubbles with a non-metallic utensil.
Reduce Siphoning
Siphoning is caused by rapid temperature changes or overfilling. Keep jars warm before processing, and leave the correct head space, typically ¼ inch to ½ inch depending on the food.
Prevent Rust and Noise
If your rack is rusty, switch to stainless steel or silicone. If you hear noisy bubbling, replace solid silicone trivets with perforated or flower-shaped ones.
Use Safe Alternatives When Needed
No rack? Try these tested substitutes that provide similar functionality.
Try a Silicone Trivet
The Ball Preserving Starter Kit trivet is a popular, dishwasher-safe option. It is heat-resistant and rust-proof, designed to sit flat and allow full water circulation, and ideal for smooth-top stoves. Ensure it is vented or flower-shaped, as solid versions may lift and rattle during boiling.
Repurpose a Steamer Rack
A Chinese dumpling steamer rack works well as a substitute. Made of stainless steel with legs, it elevates jars and allows full water flow. It is inexpensive and durable. Invert it if needed for more clearance.
Build a DIY Base from Screw Bands
Link metal canning screw bands with twine or twist ties. Use wide-mouth bands for quarts and standard bands for pints. Tie tightly in a circle to form a stable base, and inspect for rust before each use. This hack is budget-friendly but less durable than metal racks.
Maintain Your Canning Rack
Long-term success depends on care after every use. Regular maintenance extends the life of your equipment.
Clean and Dry Thoroughly
Wash with mild soap and water. Dry completely, especially chrome-plated racks, to prevent rust. Store in a dry place.
Inspect Before Each Use
Check for rust, warping, or broken handles. Look for chipped enamel on coated racks and cracks in silicone. Replace damaged racks immediately.
Know What Foods Require a Rack
A canning rack is mandatory for all high-acid foods processed in a boiling water bath. Using a rack is not optional, it is essential for safety.
Safe to Can with a Rack
These high-acid foods are safe for water bath canning with a rack. Fruits including peaches, apples, and berries. Jams, jellies, and marmalades. Pickles, relishes, and chutneys. Acidified tomatoes with lemon juice or citric acid. Salsas formulated for water bath canning.
Never Use a Rack for Low-Acid Foods
Do not can meats, vegetables, soups, or beans in a water bath, even with a rack. These require pressure canning to destroy Clostridium botulinum. Water bath canning is unsafe for low-acid foods with pH above 4.6.
Optimize Your Canning Workflow
Work smarter, not harder, with these pro tips that improve efficiency and results.
Preheat the Pot
While prepping food, heat the canner with the rack inside. This saves time and stabilizes temperature before jars are added.
Use Soft Water
Hard water leaves mineral deposits. Use distilled or soft water to reduce scaling on jars and racks.
Process in Batches
Do not exceed rack capacity. Overloading leads to poor circulation and seal failures.
Inspect Jars Before Use
Check for chips or cracks in glass, uneven rims that prevent sealing, and dents in lids. Discard any damaged pieces.
Follow Trusted Recipes
Only use tested methods from the National Center for Home Food Preservation, Ball Blue Book, or USDA or university extension guides. Never improvise processing times or ingredients.
Frequently Asked Questions About Using a Canning Rack
Can I use a stock pot instead of a dedicated canner?
Yes, any deep pot that allows 1 to 3 inches of water above jar lids works. Just ensure it is large enough for your jar size and add a proper rack inside.
What happens if I skip the canning rack?
Skipping the rack causes jars to sit directly on the hot pot bottom. This creates thermal shock that cracks or shatters jars, ruins your food, and creates a dangerous mess.
Can I use a silicone trivet on a gas stove?
Yes, silicone trivets work on gas stoves. However, ensure the trivet is perforated to allow water circulation and prevent it from floating or shifting during boiling.
How do I know if my rack is compatible with a smooth-top stove?
Use only flat-bottomed pots and silicone or smooth stainless steel racks. Avoid textured metal racks or ribbed bottoms that can scratch or crack glass cooktops.
Why do my jars keep breaking even with a rack?
Breakage may still occur if jars are cold when added, if water is not properly preheated, or if the rack is warped or damaged. Always warm jars and water before processing.
Final Thoughts on Mastering Canning Rack Use
Using a canning rack correctly is the foundation of safe home canning. It protects jars from thermal shock, ensures even heat distribution, and supports proper sealing. Whether you use a commercial rack, silicone trivet, or DIY alternative, always prioritize stability, full water submersion, and circulation. By following these steps, preheating properly, loading carefully, timing precisely, and cooling undisturbed, you will preserve food safely and enjoy harvest flavors year-round. Start with quality equipment, follow tested recipes, and your canning projects will succeed consistently.


