You’ve picked the perfect floating shelf for your living room, bathroom, or kitchen. It looks sleek, modern, and effortlessly stylish until it sags, wobbles, or worse, crashes down. The secret to a flawless installation isn’t luck, it’s precision. How to attach floating shelf correctly depends on more than just drilling holes. It requires understanding wall types, load limits, alignment, and hidden support systems.
In this guide, you’ll learn exactly how to install floating shelves the right way every time. From locating studs and choosing correct hardware to using laser levels and concealing fasteners, we’ll walk through each step with professional-grade clarity. You’ll discover how to avoid common errors, maximize strength, and achieve that seamless floating look.
Locate Wall Studs for Secure Mounting

Before any drilling begins, you must know what’s behind the drywall. Floating shelves rely on strong anchor points, and studs are your best bet for long-term stability.
Use a Stud Finder with AC Detection
Grab a stud finder that detects both wood and live electrical wiring. Scan horizontally across the wall where you plan to mount the shelf. Mark the edges of each stud, then find the center where you’ll drill.
Key points to remember:
- Studs are typically spaced 16 or 24 inches apart
- Knock lightly: a solid sound means a stud, hollow means empty space
- Always test for AC voltage near outlets or switches to avoid drilling into live wires
Pro Tip: Verify your stud finder reading by drilling a small pilot hole in an inconspicuous spot if you’re uncertain.
Expose Studs for Heavy Loads
For shelves holding books, appliances, or items used frequently:
- Cut drywall around the stud using a multi-tool
- Mount bracket directly to the exposed wood
- Patch or refinish after installation
This method eliminates reliance on drywall anchors and prevents sagging over time.
Choose the Right Bracket System for Your Shelf
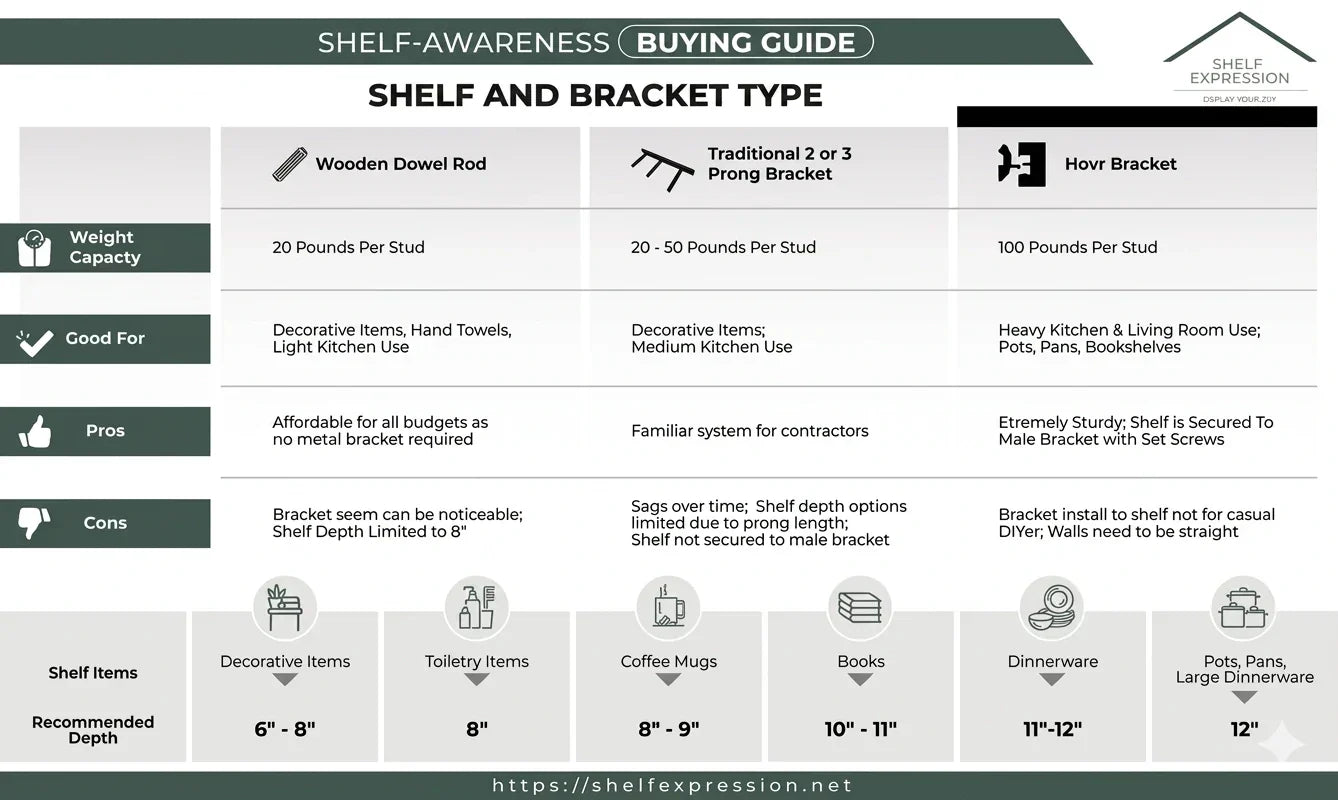
The bracket is the hidden backbone of your floating shelf. Pick one that matches your load needs and wall type.
Bracket Types by Use Case
| Bracket Type | Ideal For | Load Capacity |
|---|---|---|
| Steel Bracket with Wall Plate | Heavy shelves, kitchens | 75 to 100+ lbs per bracket |
| Threaded Rod System | Minimalist look | Moderate to heavy |
| Backplate with Set Screws | Easy alignment, rentals | 30 to 60 lbs |
| Cleat System | DIY builds, woodworkers | 50+ lbs if mounted to studs |
Expert Advice: For shelves over 36 inches, use three brackets, one on each end and one in the center, for even weight distribution.
Mark and Transfer Shelf Height Accurately
Getting the height right ensures both function and visual balance. Use these standard placement guidelines to start.
Standard Placement Guidelines
- Above countertops: 18 to 19 inches from surface for easy reach
- From floor: 44 inches to bottom of shelf for eye-level display
- Between shelves: minimum 14 inches, ideal 9.75 inches from top of lower to bottom of upper shelf
Transfer Template with FrogTape
This technique ensures perfect hole alignment without wall damage:
- Apply FrogTape along the back top edge of the shelf
- Poke through the tape at each bracket hole location
- Stick the tape on the wall at your desired height
- Align marks with a cross-line laser level
Why This Works: FrogTape removes cleanly and allows repositioning with no wall damage during adjustments.
Drill Pilot Holes Without Slippage
Precision drilling prevents wall damage and ensures secure mounting. The key is preventing bit wander.
Match Drill Bit to Wall Type
| Wall Material | Drill Bit Needed | Anchor Type |
|---|---|---|
| Drywall | Self-drilling bit or pilot hole | Toggle bolt or snap toggle |
| Wood Stud | 1/8 inch bit for #8 screw | #8 or #10 wood screw (1.5 to 3 inches) |
| Concrete/Brick | Hammer drill plus carbide bit | Wedge or sleeve anchor |
| Tile | Carbide bit, low speed | Masonry anchor plus silicone sealant |
Prevent Bit Slippage with Punch Tool
After marking hole locations:
- Use a nail set or center punch to create a small dimple
- This keeps the drill bit from wandering
- Drill straight at 90 degrees to the wall to avoid angled screws
Warning: Angled screws won’t align with shelf brackets, making installation impossible.
Install Wall Anchors or Mount to Studs

Now secure the support system to the wall. This step determines long-term stability.
For Stud Mounting
- Pre-drill pilot holes to prevent wood splitting
- Drive #8 or #10 wood screws into studs, leaving 1/4 inch protruding for bracket attachment
- Ensure screws are driven square to the wall, not at an angle
For Drywall Without Studs
- Insert toggle bolts or snap toggles into holes
- Tighten until snug but do not overtighten and crush drywall
- Ensure anchors are flush and secure
Critical: Never use plastic anchors for shelves over 25 lbs. Upgrade to metal toggles for safety.
Attach the Bracket to the Wall
Now mount the support hardware to the wall before handling the shelf itself.
- Align bracket with pilot holes
- Slide onto protruding screws or anchor studs
- Tighten fully while checking with a spirit level
- If uneven, insert a metal washer as a shim between bracket and wall
Do not overtighten. This can strip anchors or split wood.
Prepare and Drill the Shelf
Now modify the shelf to fit the bracket system. Proper preparation ensures smooth installation.
Drill Alignment Holes in Shelf
Use a self-centering doweling jig for accuracy:
- Mark bracket arm positions on shelf underside
- Drill holes to match bracket depth (mark drill bit with tape)
- Slightly wiggle the bit left and right to enlarge the hole for easier sliding
- Clear all sawdust before installation
Build Strong Joints for Corner Shelves
If installing a corner shelf:
- Use a half-lap joint
- Cut depth equal to half the board thickness
- Use a 3/4-inch rabbeting bit with router
- Clean with chisel for tight fit
This allows one shelf to fold over another seamlessly.
Slide Shelf Onto Bracket and Secure
Time to create the floating illusion. This step requires patience and gentle pressure.
- Lift shelf and align holes with bracket arms
- Slide down firmly, may require pressure
- If resistance occurs, check for bent metal arms and gently bend back with pliers
- Tap evenly into place using a rubber mallet or 2×4 block
Avoid hammering directly on the shelf. This can crack wood or damage finish.
Close Gaps Behind Shelf
If shelf doesn’t sit flush:
- Apply wood glue along the back edge
- Insert wood shims between wall and shelf to push it forward
- Remove shims after glue dries, 30 to 60 minutes
Secure with Hidden Fasteners
Finalize the installation with concealed reinforcement:
- Lower shelves: screw upward from below, invisible when loaded
- Upper shelves: screw downward through top, hidden by objects
- For backplate systems: align set-screw holes and drive hex screws through shelf into tubes
Final Touch: Cover any visible screw heads with wood plugs, filler, or matching stickers for a seamless finish.
Check Weight Limits and Load Capacity
Even a perfectly installed shelf fails if overloaded. Know your limits before loading items.
Maximum Weight by Mounting Method
| Method | Capacity per Bracket | Safe Use |
|---|---|---|
| Into Studs (Wood Screw) | 75 to 100+ lbs | Books, kitchenware, electronics |
| Toggle Bolt (Drywall) | 30 to 50 lbs | Decor, light storage |
| Plastic Anchor | 10 to 25 lbs | Small photos, trinkets |
| Masonry Anchor | 50 to 100+ lbs | Brick or concrete walls |
Rule: Use at least two brackets per shelf. For shelves over 36 inches, use three.
Distribute Weight Wisely
- Place heavier items near bracket locations
- Avoid loading the front edge, this increases risk of tipping
- Balance weight across the full length
Avoid Common Installation Mistakes
Even skilled DIYers make preventable errors. Learn from these common mistakes.
Top Mistakes and Fixes
| Mistake | Fix |
|---|---|
| Crooked shelf | Always use laser level and double-check alignment |
| Drill bit slips | Use punch tool or drill through FrogTape |
| Sagging over time | Mount into studs, not just drywall anchors |
| Overtightened screws | Strip anchors, use drill clutch or hand tighten |
| Uneven spacing | Measure from floor, ceiling, and adjacent furniture |
Pro Insight: Installers using FrogTape plus laser level report zero alignment errors across multiple jobs.
Final Adjustments and Finishing Touches
Last steps ensure durability and aesthetics. Take time to perfect the installation.
- Recheck shelf with level, even slight tilt is noticeable
- Tighten all set screws and fasteners
- Sand rough edges or corners
- Apply final stain, paint, or sealant if not pre-finished
- Remove protective films from hardware
Maintenance Tip: Inspect shelves every 6 to 12 months. Retighten screws and check for sag.
Achieve a Seamless Floating Look
The goal isn’t just strength, it’s invisibility. Here’s how to make your shelf look effortless.
- Use shelves with factory-installed brackets for cleaner lines
- Add a rear lip or trim to hide hardware
- Match shelf color to wall or furniture for visual flow
- Stagger shelves asymmetrically for modern appeal
Design Hack: Center shelves over sofas or align with window frames for balanced composition.
Frequently Asked Questions About Attaching Floating Shelves
What is the best way to attach floating shelves?
The best method is to secure the bracket directly into wall studs using wood screws. This provides maximum support and long-term stability. Stud mounting prevents sagging and handles heavier loads than anchor systems.
Can you install floating shelves in drywall?
Yes, if studs are not available, use high-quality wall anchors rated for the shelf and expected load. Toggle bolts or snap toggles are recommended for heavier shelves. Plastic anchors work only for light loads under 25 lbs.
How much weight can a floating shelf hold?
Drywall with anchors holds 25 to 50 lbs depending on anchor type. Stud-mounted shelves hold 75 to 100+ lbs per bracket. Always check manufacturer specifications and derate for safety margin.
Do floating shelves need to be in a stud?
For heavy or frequently used shelves, yes, mounting into studs is strongly recommended. Light decorative shelves may use anchors but with strict weight limits. Studs provide the strongest and most reliable support.
How do you hide the mounting hardware?
Use hidden brackets, set screws, and concealed fasteners. Screw from top or bottom depending on shelf position. Cover visible screw heads with matching stickers, wood plugs, or filler for a seamless appearance.
What tools do I need to attach a floating shelf?
Essential tools include a stud finder with AC detection, laser level or spirit level, power drill with correct bits, tape measure, punch tool, and hammer. Optional but recommended tools are a self-centering doweling jig and rubber mallet.
Key Takeaways for Attaching Floating Shelves Successfully
A floating shelf should look effortless, but its strength comes from careful planning. By following these steps, you’ll achieve a secure, level, and visually stunning result that lasts for years.
The most critical factors are mounting into wall studs whenever possible, using the correct bracket system for your load requirements, and taking time to align everything precisely with a laser level. Never skip the stud-finding step or rely on plastic anchors for heavy loads. The FrogTape transfer method eliminates crooked installations and wall damage during adjustments.
Whether you’re upgrading your home office or adding bathroom storage, now you know exactly how to attach floating shelf like a pro. Take your time with measurements, use proper anchors, and check weight limits before loading your shelves.