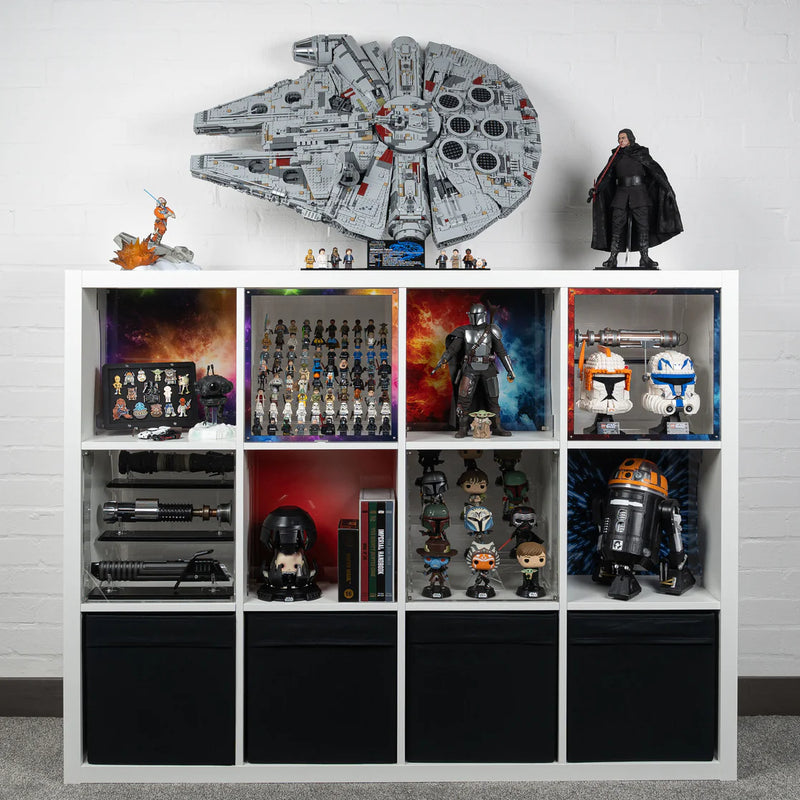
Building a LEGO shelf isn’t just about storage. It’s a way to showcase your favorite builds, reduce clutter, and turn your collection into wall art. Whether you’re displaying a prized UCS Millennium Falcon or organizing loose bricks for your kids, how to build a LEGO shelf comes down to three main methods: fully LEGO, wood-LEGO hybrid, or acrylic-LEGO wall mount. Each offers different benefits in strength, style, and simplicity. This guide walks you through step-by-step instructions for all three types, plus materials, tools, reinforcement tips, and customization options.
Choose Your LEGO Shelf Build Method
Before buying materials or bricks, decide which construction method fits your needs. The three main types vary significantly in durability, load capacity, and installation requirements.
Fully LEGO Shelves: Modular and Freestanding
Built entirely from LEGO bricks, these shelves are perfect for kids’ rooms or creative play areas. You can reconfigure the design anytime, and they double as interactive storage. However, they have limited weight capacity of only 2 to 5 pounds per shelf, and they cannot be wall-mounted. These work best for lightweight displays like minifigures or small sets.
Acrylic-LEGO Hybrid Shelves: Strong and Sleek
These shelves use L-shaped acrylic supports mounted to the wall, with LEGO base plates adhered on top. They support 5 to 10 pounds per shelf, making them ideal for displaying valuable completed sets. The clear or colored acrylic creates a floating effect, and the LEGO studs securely hold your models. Once assembled, they’re permanent but offer maximum stability and a clean, modern look.
Wooden LEGO-Themed Shelves: Sturdy and Customizable
These shelves mimic LEGO aesthetics using real wood. Built from 1×6 or 1×8 boards and painted in classic LEGO colors with wooden “studs” on top, they support 15 to 20 pounds per shelf when anchored into wall studs. This method blends DIY craftsmanship with playful design, perfect for home offices or collector displays.
Plan Your LEGO Shelf Layout
Measure Your Wall Space and LEGO Sets
Start by measuring the wall area where you want your shelf. Clear the space and use a stud finder to locate wall studs, since your mounting points depend on their position. Mark stud locations with a pencil.
Next, measure the LEGO sets you plan to display. A standard UCS set like the Millennium Falcon can be over 30 inches long, so ensure your shelf width accommodates it. For modular builds, allow 1 to 2 inches of clearance on each side.
Set Optimal Shelf Dimensions
Standard dimensions work well for most displays:
• Width: 24 inches is standard, but adjust based on your wall space
• Depth: 6 to 8 inches for most floating shelves, or 12 inches if storing larger builds
• Height between shelves: 10 to 12 bricks high (about 3.8 to 4.6 inches) for minifigure clearance on fully LEGO shelves, or 11 to 18 inches for wall-mounted shelves depending on set height
Use a laser level to mark horizontal lines on the wall so your shelves stay perfectly aligned.
Sketch Your Design
Draw a simple sketch showing the number of shelves, spacing between them, placement of studs or supports, and color layout if using multiple colors. For complex builds, use BrickLink Studio or LEGO Digital Designer to simulate your design before building.
Gather Materials and Tools
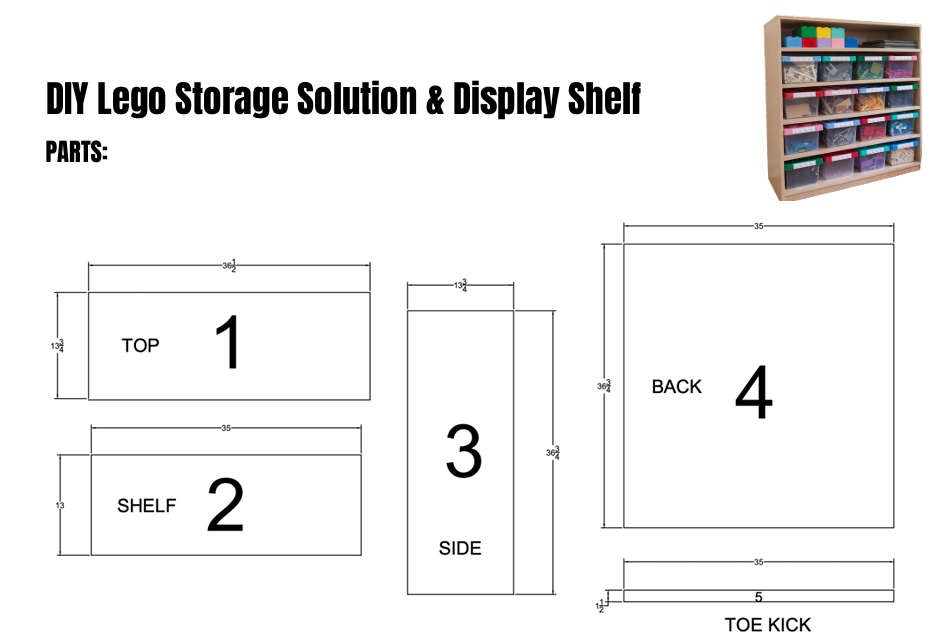
Materials for Wooden LEGO-Themed Shelves
You will need the following materials:
• 1×6 or 1×8 pine board for the shelf surface
• 1×8 or 1×10 board for the back panel
• 2×4 lumber cut into 1×1 strips for wall braces
• 1.5-inch wooden circles for LEGO studs
• Wood glue
• 1.25-inch screws for frame assembly
• 2-inch screws for wall mounting
• Wood filler
• Sandpaper in 120 to 220 grit
• High-gloss spray paint in your chosen LEGO colors
• Clear enamel topcoat for extra durability
Materials for Acrylic-LEGO Hybrid Shelves
Gather these items:
• L-shaped acrylic shelves (9-inch or 4-inch options)
• 32×32 LEGO base plates or custom-cut sizes
• Foam adhesive backing (usually pre-applied on base plates)
• Utility knife with fresh blades
• Ruler and fine-tip marker
• Thick cardboard for a work surface
Materials for Fully LEGO Shelves
Collect these LEGO components:
• 2×4 and 2×2 bricks in your chosen colors
• Plates and tiles for smooth surfaces
• L-brackets or Technic pins for reinforcement
• Baseplates for the foundation
Essential Tools
Every builder needs these tools:
• Dremel Multi Drill with built-in stud finder and laser level
• Portable saw station or circular saw
• Orbital sander or sandpaper
• Clamps
• Carpenter’s square
• Level
• Tape measure and pencil
You can build without power tools, but precision and speed improve significantly with them.
Build a Wooden LEGO-Themed Shelf
Cut and Sand the Boards
Cut your 1×6 and 1×8 boards to your desired length, such as 24 inches. Use clamps and a saw with a laser guide for straight cuts. Sand all pieces first with 120-grit sandpaper, then finish with 220-grit for a smooth surface. Remove dust with a tack cloth before painting.
Assemble the L-Frame
Lay the 1×8 board vertically as your back panel. Attach the 1×6 board to its bottom edge to form an L-shape. Apply wood glue to the joint, then secure with 1.25-inch screws. Pre-drill holes to prevent splitting. Use a carpenter’s square to ensure a perfect 90-degree angle. Let the glue dry completely before moving on.
Add LEGO-Style Studs
Glue 1.5-inch wooden circles along the top edge of the back panel. Use a spacer jig (like a marked paint stick) to keep them evenly spaced about 1 inch apart. Glue 4 to 6 studs depending on your shelf width. Let dry, then sand any rough spots. Paint the studs separately before attaching for full coverage, especially in grooves.
Paint for Authentic LEGO Shine
Follow these painting steps:
- Apply primer if using MDF or patched areas
- Spray high-gloss paint in even coats using a foam roller to avoid brush marks
- Let dry, then apply a second coat
- Touch up edges and studs
- Optional: Seal with clear enamel for extra durability
Paint hack: Tape off the wall and paint behind the shelf area after installation for a crisp, framed look.
Assemble a Fully LEGO Shelf
Start With a Strong Base
Begin on a flat surface or baseplate. Use 2×4 and 2×2 bricks to create a wide, stable foundation. For a 24-inch shelf, aim for a base at least 16 studs wide. Reinforce corners with L-brackets or layered plates to prevent wobbling.
Build Vertical Supports
Construct four vertical columns, one at each corner, using stacked bricks. Make them 10 to 12 bricks high (about 4 inches) for standard spacing. For added strength, insert Technic pins or rods inside the columns.
Create Shelf Platforms
Build horizontal platforms using plate layers (1 to 3 plates thick) for light display, or brick layers (2 to 4 bricks thick) for heavier storage. Attach platforms to vertical columns, ensuring full stud contact. Overhang should not exceed 2 to 3 studs to avoid breakage.
Add Aesthetic Details
Use sloped bricks for decorative edges. Cover top surfaces with tiles for a smooth finish. Add a tile mosaic nameplate for personalization. Incorporate color blocks to match your room decor. Avoid glue unless you want a permanent build, since most LEGO enthusiasts prefer modularity.
Install Acrylic-LEGO Hybrid Shelves
Prepare and Cut Base Plates
Place thick cardboard on your work surface to protect it. Lay the acrylic shelf flat. Position the LEGO base plate on the horizontal arm, with edges flush or slightly overhanging 2 to 5mm. Use a fine-tip marker to trace the acrylic’s edge onto the base plate.
Score along the line with a utility knife and ruler, making multiple light passes. Deepen the cut until the plastic folds cleanly. Fold the excess section over to confirm the cut is complete. Then slice through the foam adhesive backing underneath.
Safety tip: Use a fresh blade and cut away from your body. Replace blades often to avoid slipping.
Attach Base Plate to Acrylic
Peel off the protective backing from the foam adhesive. Align the base plate with the bottom edge of the acrylic’s horizontal arm. Press slowly from bottom to top to avoid air bubbles. Flip the assembly upside down and press firmly across the surface for 10 to 15 seconds to secure the bond.
Mount to Wall
Follow the acrylic shelf manufacturer instructions. Typically, you will mark drill points on the wall, drill pilot holes, insert anchors if not hitting studs, and screw the vertical arm of the L-shelf into wall studs using 1.5 to 2-inch screws. Use a laser level to ensure shelves are perfectly horizontal. Do not exceed 5 to 10 pounds per shelf, since large UCS sets may require two brackets.
Mount and Reinforce Your Shelf
Anchor Into Wall Studs
Never mount heavy shelves into drywall alone. Use a stud finder to locate studs and mark them. For wooden shelves, build wall braces from 2×4 strips. Screw braces into studs with 2-inch screws. Attach the shelf frame to the braces using angled screws for lateral support.
Reinforce for Safety
Double-check all screws are tight and level. For long shelves, add a center vertical brace. In kids’ rooms, ensure shelves are out of jumping or climbing range. Fully LEGO shelves should be placed in low-traffic areas to avoid accidental kicks.
Customize Your LEGO Shelf
Add LED Lighting
Stick adhesive LED strips under the front edge of shelves for a floating glow. Choose color-changing or music-sync models for fun effects. Battery-powered or USB options make installation easy with no wiring needed.
Personalize With Labels
Use vinyl wall decals below each shelf, such as “Max’s Spaceship Zone.” These are available on Etsy or Amazon in LEGO-style fonts. For fully LEGO shelves, build tile mosaics with nameplates or logos.
Mix Colors and Heights
Paint wooden shelves in classic LEGO colors: red, blue, yellow, green. Alternate colors for visual pop. Combine 11-inch and 18-inch tall sections to fit different sets. Taller shelves highlight large builds while shorter ones keep the look balanced.
Maintain and Display Your LEGO
Style With Purpose
Organize sets by color, theme (Star Wars, City, Technic), or size. Leave breathing room and don’t overcrowd. Rotate displays monthly to keep the space fresh.
Clean and Protect
For wooden shelves, dust with a microfiber cloth and touch up paint if chipped. For acrylic shelves, clean with isopropyl alcohol (70%) and a soft cloth. Avoid ammonia-based cleaners. For fully LEGO shelves, use compressed air or a soft brush to remove dust. Store away from direct sunlight to prevent fading. Inspect adhesive bonds annually and reattach base plates if peeling.
Frequently Asked Questions About Building LEGO Shelves
What is the strongest type of LEGO shelf?
Wooden LEGO-themed shelves anchored into wall studs are the strongest, supporting 15 to 20 pounds per shelf. Acrylic-LEGO hybrid shelves support 5 to 10 pounds, while fully LEGO freestanding shelves support only 2 to 5 pounds.
Can I mount a LEGO shelf to drywall?
Never mount heavy shelves into drywall alone. You must anchor into wall studs for safety. Use a stud finder to locate studs, and always screw directly into them rather than relying on drywall anchors for heavy loads.
How long does it take to build a LEGO shelf?
Building a LEGO shelf takes 3 to 6 hours depending on complexity. Simple acrylic hybrid shelves can be completed faster, while custom wooden shelves with decorative studs and painting take longer.
Do I need power tools to build a LEGO shelf?
You can build without power tools, but the process takes longer and precision suffers. A Dremel Multi Drill with built-in stud finder and laser level significantly improves accuracy and speeds up the project.
Can children help build a LEGO shelf?
Fully LEGO shelves are safe for children to help assemble since there are no sharp edges. Acrylic shelves have potentially sharp edges and should be handled by adults. Wooden shelves require adult supervision for cutting and mounting.
Key Takeaways for Building Your LEGO Shelf
Building a LEGO shelf transforms your collection from stored boxes into eye-catching wall art. Choose your method based on weight needs: wooden shelves for heavy displays, acrylic-LEGO hybrids for sleek wall mounting, or fully LEGO for kids’ rooms. Measure twice, cut once, and always anchor into wall studs for safety. Add LED lighting and custom colors to make your display unique. With basic tools and 3 to 6 hours, you can create a functional, creative showcase that celebrates your LEGO passion for years to come.