You’ve seen them in lofts, cafes, and modern homes: sleek, sturdy industrial shelves made from steel pipes and wood. They combine raw, urban charm with serious functionality, and the best part is that you can build one yourself for a fraction of the retail price. Whether you’re adding storage in your living room, kitchen, or bathroom, learning how to build an industrial shelf opens the door to a customizable, budget-friendly solution that looks professionally crafted.
This guide walks you through every step, from choosing between galvanized and black steel pipes to securing your final shelf with pipe straps for safety and stability. With basic tools, a trip to your local hardware store, and a weekend of work, you can create a durable, eye-catching shelf that holds books, decor, or even heavy kitchenware.
Choose the Right Pipe Type and Finish
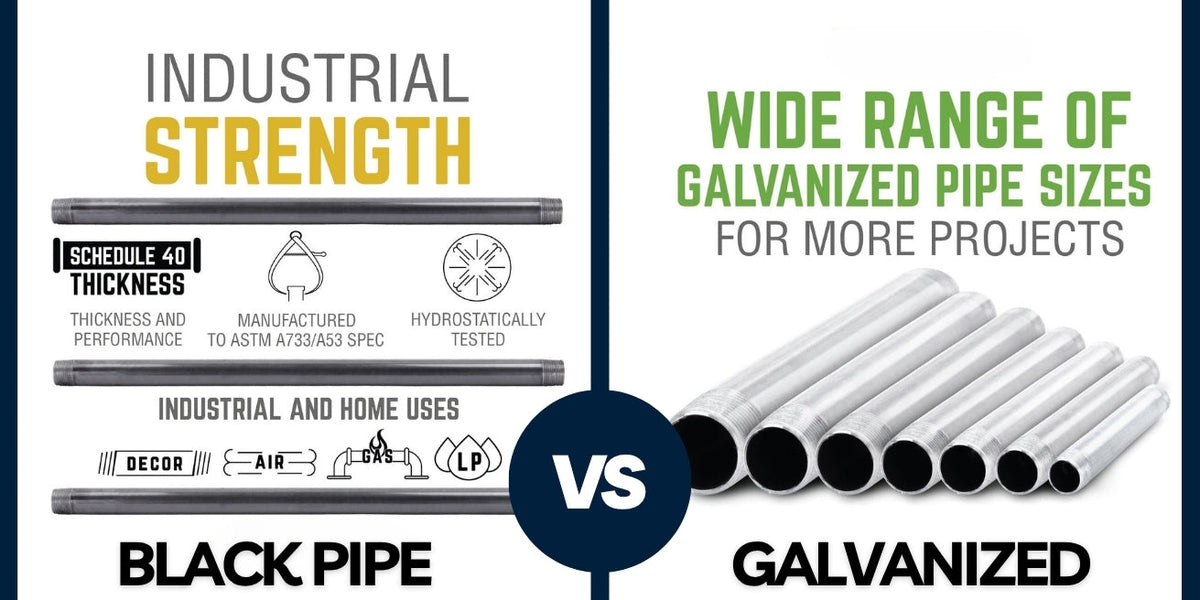
Galvanized vs Black Steel Pipes
Galvanized and black steel pipes are the two most common choices for industrial shelves. Galvanized pipes have a shiny silver finish due to a protective zinc coating that resists rust. They are ideal if you want a clean, modern look and do not plan to paint. However, the coating can make spray paint adhesion difficult, so test first if you intend to customize the color.
Black steel pipes, often used in gas lines, come pre-coated in a dark, oil-based finish. They are more affordable and deliver an authentic industrial aesthetic right out of the box. However, they require cleaning before use, as the oil can stain walls and transfer to hands. Wash them with dish soap, acetone, or paint thinner, then dry thoroughly.
Pro Tip: Black iron pipe eliminates the need for painting and gives an instant vintage look, perfect for urban farmhouse styles.
Gather All Essential Hardware
Key Pipe Fittings and Fasteners
Every industrial shelf relies on a few core components. You will need floor flanges to attach to the wall and hold vertical pipes. Pipe nipples are short straight pipes that form vertical or horizontal supports. Caps cover open pipe ends for a clean, safe finish. Elbows and tees add stability or allow multi-directional framing. Wall anchors are required when mounting into drywall without studs, and coarse-thread screws secure flanges.
Match all fittings to your pipe diameter. Most DIYers use ½”, ¾”, or 1″ pipes. Buy extras because mismatched or missing pieces are a common headache.
Warning: Kids might mix up fittings at the store. Double-check shapes and sizes before leaving because pipes and connectors are not always labeled correctly.
Select and Prepare Your Wood Shelves
Choose the Right Board Thickness
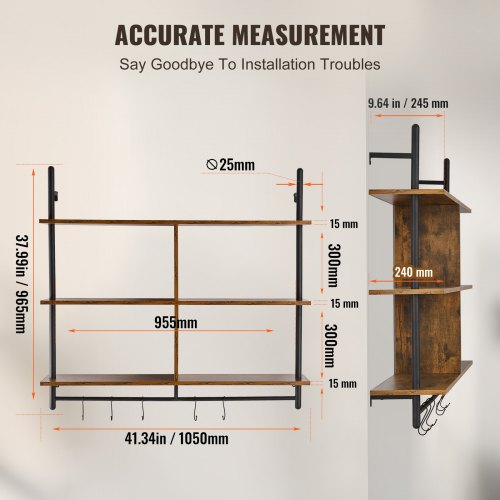
Use 1×10 or 1×12 pine, poplar, or reclaimed lumber for the shelves. Standard boards are about 9¼” deep, but you can go wider with custom cuts. For light-duty use like displaying decor, 1″ thick pine is sufficient. For heavier loads like books, appliances, or kitchen items, upgrade to 1½” thick pine to prevent sagging.
Cut boards to your desired width. Common sizes are 24″ or 36″. A miter saw ensures clean, square edges. If you do not own one, most hardware stores offer free cutting services.
Expert Note: One builder upgraded from 1″ to 1½” boards after realizing cheaper lumber would bow under weight. The extra cost was worth it.
Drill and Finish the Wood
Stain Before Assembly
Sand boards with 150-grit paper or an orbital sander until smooth. Round sharp edges slightly for a refined look. Then apply your chosen stain. Popular options include Espresso or Dark Walnut for deep, rich tones. Provincial offers medium brown, warm and versatile. Early American provides lighter, vintage appeal.
Use a brush or rag for even coverage. Let dry overnight. For high-moisture areas like bathrooms, seal with polyurethane.
Time-Saving Tip: Drill holes and stain all boards before assembling pipes because finishing is much harder once the shelf is built.
Cut and Clean the Pipes
Prepare for Installation
Have your hardware store cut long pipes into equal lengths, usually 10″ to 12″ for wall-mounted shelves. If doing it yourself, use a pipe cutter or hacksaw for clean cuts.
Clean black steel pipes with soapy water or acetone to remove factory oil. Galvanized pipes may need light sanding if you plan to paint because the zinc coating repels adhesion.
Let all pipes dry completely before handling or painting.
Safety Note: Avoid inhaling metal dust. Wear a mask when sanding or cutting.
Assemble the Pipe Brackets
Build Simple or Reinforced Supports
For a basic shelf, assemble each bracket with a floor flange screwed to one end of a pipe nipple and a cap on the other end. This creates a simple vertical support.
For extra stability especially on wide shelves, use elbows or tees to create L-shaped or multi-point supports. Pre-assemble all brackets and label them to avoid confusion during wall mounting.
Pro Tip: Use pipe straps, which are galvanized U-clips, under shelves to lock them in place and prevent lateral movement.
Mount Brackets to the Wall
Secure to Studs or Use Anchors
Mount Into Studs
This is the strongest mounting method. Use a stud finder to locate 16″ on-center studs. Hold the bracket against the wall at your desired height. Level it and mark screw holes. Drill pilot holes and secure the flange with two screws per flange. Repeat for all brackets, ensuring perfect alignment.
Alternative: Drywall With Anchors
If studs do not align with your design, mark bracket positions using a level. Drill ¼” pilot holes. Insert drywall anchors, which can be toggle or plastic types. Screw flanges into anchors using coarse-thread screws.
Warning: Use four anchors per flange for heavy loads. Avoid this method in high-traffic areas or for shelves above cribs.
Install Pipes and Shelves
Final Assembly Sequence
Screw vertical pipes into the wall-mounted flanges. Slide pre-drilled wood shelves onto the pipes. Top each pipe with a cap to secure the shelf in place.
Ensure the fit is snug. If boards wobble, adjust pipe length or recheck hole alignment.
Visual Cue: The shelf should sit flat and level, with no tilting or rocking.
Secure Shelves with Pipe Straps

Prevent Movement and Increase Safety
Even with caps, shelves can shift if bumped. To lock them in place, position galvanized pipe straps halfway down each vertical pipe. Screw the straps into the underside of the shelf using dark nuts and washers.
This adds rigidity and prevents dislodging, which is especially important in homes with children.
Builder Insight: Without straps, the shelf moved easily. Once added, it was extremely secure.
Childproof Your Industrial Shelf
Keep It Out of Reach
If installing in a nursery or child’s room, mount the shelf above 4.5 feet, which is out of reach even when a crib mattress is at its highest setting. Avoid placing near furniture kids can climb. Use pipe straps as a safety backup.
Real Talk: By the time the baby is over 4½ feet tall, those shelves will probably be gone anyway, but better safe than sorry.
Customize Design and Style
Match Your Home Aesthetic
Industrial shelves are highly customizable. You can choose shelf count from 2, 3, 5, or 7 tiers. Width options include 24″, 36″, or custom sizes. Finish options are galvanized (silver), black steel, or painted black. Wood stain options include espresso, provincial, or natural. Bracket style can be simple (flange plus pipe plus cap) or complex (with elbows and tees).
Use symmetry for balance, especially in media centers or living rooms.
Design Tip: Pair with Edison bulbs, exposed brick, or concrete walls for full industrial effect.
Troubleshoot Common Issues
Fix Problems Before They Worsen
Sagging Boards? Use thicker wood (1½”) or add a third bracket for shelves over 36″.
Wobbly Shelf? Recheck alignment because all brackets must be level and securely fastened.
Pipes Won’t Fit? Verify diameter (½”, ¾”) and thread type because not all “½-inch” pipes are the same.
Paint Chips Off? Let spray paint cure fully, which takes 48+ hours. Do not stack pipes during transport.
Anchors Fail? Replace with toggle bolts or use multiple anchors per flange.
Pro Move: Use painter’s tape to mark level lines on the wall before drilling, which is easy to adjust and removes cleanly.
Maintain Long-Term Durability
Keep It Looking New
Rust prevention involves sealing black pipes with polyurethane spray or hand-rubbed wax. Wood care means reapplying sealant every 1 to 2 years, especially in humid areas. Stability check involves annually inspecting screws, anchors, and pipe connections. Cleaning requires wiping pipes with a damp cloth and avoiding abrasives that scratch the finish.
Longevity Note: One builder’s shelf has held up great after several years of daily use.
Source Materials Efficiently
Where to Buy Components
In-Store Options: Home Depot carries all fittings in the plumbing aisle and offers free pipe cutting services.
Online Options: Amazon sells pre-packaged pipe shelf kits that include flanges, pipes, and caps for 2 shelves. You can also buy bulk pre-painted parts.
Time-Saver: Order online for in-store pickup to guarantee you get the right pieces without multiple trips.
Estimate Cost and Time
Budget-Friendly Weekend Project
A budget build for a 2-shelf unit costs approximately $50 and uses 4 pipes, 4 flanges, 4 caps, and 2 boards. A premium build for a 5-shelf unit costs approximately $350 and uses 33 pipes, 18 flanges, 12 tees, 6 elbows, 5 thick pine boards, plus stain and hardware.
Most builds take 1 to 2 days, which is longer if you are sourcing parts or perfecting the finish.
Reality Check: One builder spent extra time shopping multiple times. Plan ahead to avoid delays.
Finalize with Professional Touches
Achieve a Polished Look
Use dark screws, nuts, and washers to blend with black pipes. Ensure consistent spacing between shelves, with 12″ to 18″ being standard. Center shelves between brackets for symmetry. Wipe down pipes after installation to remove fingerprints or residue.
Builder Pride: I enjoy decorating them and changing them up every season. They are a decor entity all to themselves.
Frequently Asked Questions About Building Industrial Shelves
What type of pipe is best for industrial shelves?
Black steel pipe is generally preferred because it comes pre-finished with an authentic industrial look and costs less than galvanized options. Galvanized pipes work better if you want a clean, modern silver finish and do not plan to paint.
How much weight can an industrial pipe shelf hold?
Load capacity depends on your mounting method and number of brackets. Mounting into studs provides the strongest support. Using three brackets instead of two and upgrading to 1½” thick wood significantly increases weight capacity. A properly installed shelf can hold books, kitchen appliances, and heavy decor.
Do I need to find studs to mount an industrial shelf?
Mounting into studs is strongly recommended for maximum strength and safety. If studs do not align with your design, you can use drywall anchors, but this method is less secure. Use four anchors per flange and avoid this method for heavy loads or in high-traffic areas.
Can I paint the pipes on an industrial shelf?
Yes, but preparation matters. Black steel pipes must be cleaned thoroughly to remove oil before painting. Galvanized pipes resist paint adhesion due to their zinc coating, so lightly sand before applying primer. Allow paint to cure fully for 48+ hours before handling.
How do I prevent the shelf from wobbling?
Wobbling usually comes from misaligned brackets. Use a level during installation and double-check that all flanges are secured at the same height. Make sure all screws are tight and that you are mounted into studs or properly rated anchors. Adding pipe straps also increases rigidity.
Key Takeaways for Building Your Industrial Shelf
Building an industrial shelf is a beginner-friendly project with high visual payoff. Choose sturdy materials like 1½” thick pine boards to prevent sagging under weight. Mount into wall studs whenever possible for maximum stability, and use four drywall anchors per flange only when studs are not available. Secure shelves with pipe straps to prevent lateral movement and increase safety, especially in homes with children. Clean black steel pipes thoroughly before installation to prevent oil stains, and seal all components if using in humid environments like bathrooms. Whether you are crafting a minimalist bathroom rack or a bold living room statement, this guide gives you the tools to build with confidence, and no professional skills are required.