

Tired of cluttered closets and mismatched wire shelves? Building a custom closet organizer gives you complete control over storage layout, materials, and design without the high cost of professional installation. Whether you are organizing clothes, shoes, or accessories, a DIY closet system maximizes space, improves accessibility, and transforms even a small closet into a functional wardrobe room. This guide walks you through every step from measuring your space and choosing materials to assembling drawers, installing rods, and adding smart custom features like shoe cubbies and top storage.
Plan Your Closet Layout First
Before cutting any wood, take time to plan your layout carefully. A well-designed closet starts with understanding exactly what you need to store and how you access those items daily.
Assess Your Storage Needs
Determine what you need to store before purchasing materials. Ask yourself:
- Do you wear more dresses or folded clothes?
- How many pairs of shoes do you own?
- Do you need space for handbags, hats, or seasonal items?
Prioritize frequently used items at eye level. Reserve lower sections for heavy storage like boots, and use upper shelves for off-season clothing or luggage. If you love accessories, include cubbies or dedicated drawers. One builder added a custom underwear drawer and boot storage under hanging rods, small touches that make a big difference in daily use.
Measure Your Space Accurately
Grab your tape measure and record these key dimensions:
- Width from wall to wall
- Depth from back wall to door swing
- Height floor to ceiling
Do not forget baseboard thickness, wall irregularities, or obstructions like outlets. If your ceiling is 96 inches, consider building units 81¾ inches tall to leave room above for bins or suitcases. This vertical space is perfect for storing carry-ons or holiday decorations, turning a limitation into an asset.
Design With Purpose
Use graph paper or free design tools like Homestylr or SketchUp to sketch your layout. Common configurations include double hanging rods for short garments below and long items above, stacked drawers with shallow options for underwear and deep options for jeans, and open cubbies for baskets or handbags.
Set rods 10½ inches from the back wall and 2 inches below shelves for clearance. Standard rod heights place the lower rod at 40 inches from the floor for shirts and pants, and the upper rod at 81 inches from the floor for dresses and coats. Shelves spaced 12 inches apart work well for folded clothes, but adjust based on your specific wardrobe.
Create a Detailed Cut List
A detailed cut list prevents costly mistakes. List every piece including side panels at ¾ inch plywood, shelves, drawer fronts, toe kicks, and back panels at ¼ inch plywood. Optimize sheet usage since most plywood comes in 4×8 sheets. Plan your cuts to minimize waste and reference free plans online for proven dimensions and diagrams.
Choose Your Finish Early
Decide on paint or stain before building begins. Paint works well with MDF or paint-grade plywood like radiata pine. Stain requires higher-quality wood like maple, birch, or oak. Pre-condition maple to avoid blotchiness and apply 2 to 3 coats of water-based satin top coat for durability. Sand lightly between coats and never finish surfaces that will be glued, as adhesive will not bond properly.
Select Materials and Hardware
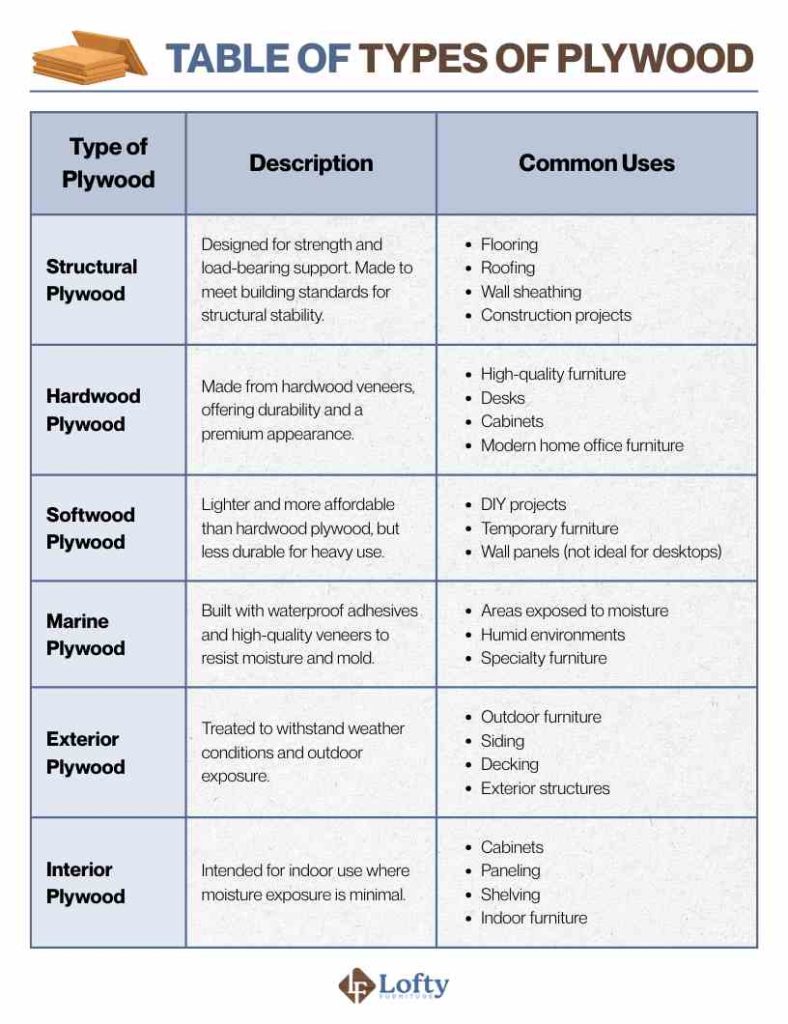
Choosing the right materials directly impacts both the cost and final appearance of your closet organizer. Use this guide to make informed decisions.
Choose the Right Plywood
| Material | Best For | Cost per 4×8 Sheet |
|---|---|---|
| Maple Plywood ¾ inch | Stained cabinets, shelves | $39 to $56 |
| Radiata Pine ¾ inch | Paint-grade builds | $27 to $29 |
| MDF ¾ inch | Painted shelves, supports | $30 to $40 |
| ¼ inch Plywood | Drawer bottoms, backs | $26 |
Total material cost typically ranges from $560 to $850 depending on finish and region. Use paint-grade materials to save money since imperfections will not show when painting.
Stock Up on Hardware
You will need pocket hole screws at 1¼ inches for strong hidden joints, drawer slides at side-mount style with ½ inch clearance, closet rods in metal or wood cut 1/8 inch shorter than bracket span, rod brackets secured into studs not drywall, drawer pulls installed after fronts are mounted, and wall screws at 2½ inches for securing cabinets to studs. Use shims to level uneven units and trim flush after installation.
Do Not Skip Edge Banding
Exposed plywood edges look unfinished. Apply iron-on edge banding to fronts and sides using a hot iron. Peel off excess with a chisel or utility knife and sand smooth for a clean professional look.
Gather Essential Tools
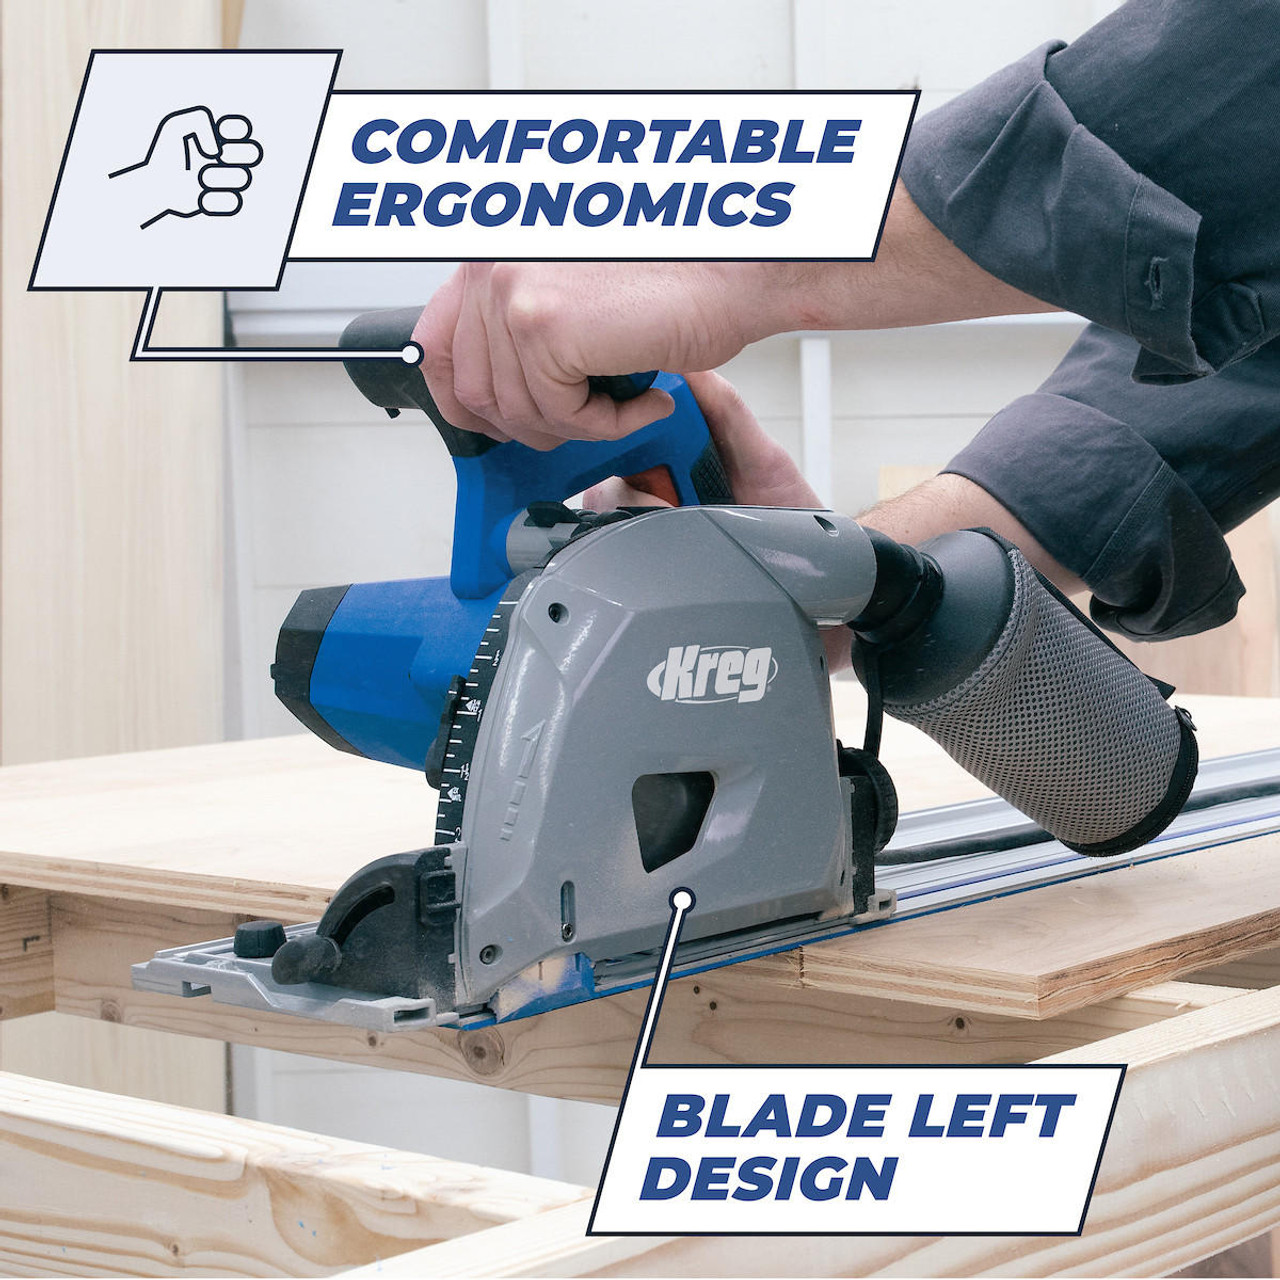
Having the right tools makes the difference between frustration and success. Here is what you need for this project.
Must-Have Tools for Success
- Circular saw with straight edge guide for precise sheet cutting
- Track saw or table saw for long clean rips
- Pocket hole jig like Kreg K4 or K5 for invisible joints
- Brad nailer with 1 inch nails for fast fastening without marring
- Drill and driver with countersink bit for clean screw holes
- Router for dados, grooves, and rounded edges
- Jigsaw for cutting toe kick notches around baseboards
- Sander with 180 to 220 grit for smoothing surfaces before finishing
Measuring and Safety Gear
Gather tape measure, level, combination square, stud finder to locate 16 inch on-center studs, safety glasses, dust mask, hearing protection, and work gloves. Keep a notepad handy to log measurements and adjustments throughout the build.
Build the Cabinet Base
The cabinet base forms the foundation of your entire organizer. Take time to build it square and sturdy.
Cut Panels to Size
Break down plywood sheets using a track saw or circular saw with guide. Support large panels with an outfeed table or foam insulation board to prevent sagging. Cut all side, top, and bottom pieces from your cut list.
Notch for Baseboards
Instead of removing baseboards, cut a toe kick notch in the back panel using a jigsaw. This lets the cabinet sit flush against the wall. Use a thin blade for tight curves around corners.
Assemble With Pocket Holes
Follow these steps for strong joints:
- Drill pocket holes in the bottom panel at edges that attach to sides
- Attach sides using wood glue and 1¼ inch pocket screws
- Install back supports and drive screws through top and bottom to prevent bowing
- Clamp and check for square by measuring diagonals, equal measurements mean the box is square
Flip the box upright and reinforce all joints. An upgraded K5 jig speeds up drilling with front lever action.
Construct Drawers
Drawers add valuable storage and keep items organized and hidden from view.
Build Strong Drawer Boxes
For an 18 inch deep by 30 inch wide drawer, follow these steps:
- Cut front, back, and sides from ¾ inch plywood
- Cut a ¼ inch groove ¼ inch up from the bottom edge using router or table saw
- Insert ¼ inch plywood bottom into grooves
- Drill pocket holes in front and back on the side opposite the groove
- Attach front between sides, then back
- Slide in the bottom and nail it to the back with 5/8 inch brad nails
Round Over Edges
Use a round-over bit on the router to soften drawer edges. For a modern look, chamfer the bottom edge at 45 degrees to create a floating effect.
Install Slides Correctly
Use spacer blocks made from off-cuts of drawer material to maintain consistent gap between cabinet and drawer. Attach slides to both cabinet and drawer, then test movement. Smooth operation means you did it right.
Mount Drawer Fronts
Drawer fronts complete the look and must be aligned perfectly for a professional appearance.
Align With Consistent Gaps
Use ⅛ inch spacers on top of the drawer box to maintain proper reveal. Temporarily attach the front with pocket screws through the box interior. Check alignment on all sides before permanent mounting.
Secure Permanently
Once aligned, drill through the drawer box into the front and drive screws. Remove temporary screws and apply edge banding to front edges before mounting for a seamless look.
Build Upper Units or Hutch
The upper unit or hutch provides hanging space and additional shelving above the base cabinets.
Cut and Assemble Panels
Rip long side panels with a track saw and trim to length on a table saw. Assemble with pocket holes, keeping back supports hidden from view.
Add a Face Frame
Use 1½ inch poplar trim to create a clean face frame. Overhang top trim slightly for shadow line and space side trims evenly using a combination square. Attach with glue and brad nails and fill nail holes with wood putty before painting. Paint panels before assembly to avoid missed spots and place wax paper between clamps and painted surfaces to prevent sticking.
Install the Organizer
Proper installation ensures your organizer is level, secure, and functional for years to come.
Prepare the Wall
Patch and repaint walls if needed before installation. Decide whether to remove baseboards for a seamless fit. Locate studs with a stud finder and mark centers with an X.
Mount Supports and Cabinets
Follow these installation steps:
- Install horizontal cleats into wall studs using 2½ inch cabinet screws
- Shim behind cleats if the wall is not flat
- Lift cabinet sections into place, getting help for large heavy units
- Clamp adjacent units together, flush at front and top
- Screw through adjacent cabinets with 1¼ inch pan head screws
- Check for plumb and use shims under toe kicks if needed, then trim flush
For wall humps, trace the gap with a compass, sand the cabinet to fit in the shop, and install.
Add Hanging Rods and Shelves
Hanging rods and shelves complete your organizer and make daily use easy.
Mount Rods Correctly
Cut metal rod 1/8 inch shorter than bracket span for easy insertion. Position brackets 10½ inches from back wall and 2 inches below shelf. Secure into studs or heavy-duty anchors and slide rod into brackets.
For double rods, place the lower rod at 40 inches from floor and the upper rod at 81 inches from floor.
Add Adjustable or Fixed Shelves
For adjustable shelves, use a shelf pin jig to drill holes in side panels. Cut shelves to fit and add edge banding to front. For fixed shelves, install into dados or brackets and secure with glue and screws. Leave top shelf flush with hutch for continuous storage and remove lower shelves later if you want shoe bins.
Include Smart Custom Features
Custom features make your organizer work for your specific lifestyle and storage needs.
Build a Toe Kick Shoe Cubby
Raise the toe kick 3 to 4 inches off the floor and make it full depth. Add a stop board at the back to keep shoes from sliding in. Now you can kick off shoes quickly with no bending required.
Use Vertical Boot Storage
Leave open space under hanging rods for tall boots. No extra work is needed. If unused, add a scrap plywood shelf later for additional storage.
Add Drawer Dividers
Cut dividers from ¼ inch plywood or MDF and glue or nail into drawers to organize socks, underwear, belts, scarves, and jewelry. This prevents clutter and makes items easy to find.
Finish and Seal Your Work
Proper finishing protects your investment and creates a polished look.
Fill and Sand
Fill pocket holes with wood filler or maple plugs. Sand all surfaces with 220-grit paper and wipe away dust before finishing.
Caulk for Seamless Look
Apply painter’s caulk along wall joints and over visible screws. Smooth with a damp finger and once dry, paint over to hide seams.
Apply Final Finish
Apply 2 to 3 coats of top coat, sanding lightly between each coat. Let cure fully before loading the closet with your belongings.
Final Tips for Success
Customize every detail to your wardrobe and habits. Invest in key tools like a pocket hole jig and brad nailer to make assembly faster and stronger. Paint before installing to avoid missed spots and prevent mess on walls. Secure everything to studs and never rely on drywall anchors alone. Prioritize function and design for daily use rather than just looks.
The satisfaction of a hand-crafted solution makes the effort worthwhile. With proper planning and execution, your DIY closet organizer will look and perform like a professional installation while saving hundreds of dollars and delivering exactly what you need. Start measuring, cut smart, and build once. Your dream closet is just a few tools away.
Frequently Asked Questions About Building a Closet Organizer
How much does it cost to build a custom closet organizer yourself?
Total material cost typically ranges from $560 to $850 depending on wood quality and region. This saves over 50% compared to professional installation costs of $2,000 to $5,000 or more.
What tools do I need to build a closet organizer?
Essential tools include a circular saw or track saw, pocket hole jig like Kreg K4 or K5, brad nailer, drill and driver, router, jigsaw, and sander. You will also need measuring tools like a tape measure, level, and stud finder.
How long does it take to build a closet organizer?
Total build time is approximately 5 days working a few hours per day. With full-time effort, you can complete it in approximately 2 days. The planning and layout phase typically takes the most time.
Can I use MDF for a closet organizer?
Yes, MDF works well for painted shelves and supports. It costs $30 to $40 per 4×8 sheet and paints very well. Just be sure to sand edges smooth before finishing.
How do I make my closet organizer more stable?
Secure all cabinets to wall studs using 2½ inch cabinet screws rather than relying on drywall anchors. Use shims to level units and check for plumb during installation. Reinforce joints with wood glue and pocket hole screws for added durability.
Key Takeaways for Building Your Custom Closet Organizer
Building a custom closet organizer costs roughly $560 to $850 in materials, saving you over 50% compared to professional installation. Focus on accurate planning and measurements before purchasing any materials, as this prevents costly mistakes during construction. Use pocket hole joinery for strong invisible joints and secure all wall-mounted sections directly into wall studs for stability. Include custom features like toe kick shoe storage and drawer dividers to maximize functionality for your specific needs. Paint or finish all panels before assembly to ensure complete coverage and a professional appearance.


