

Installing a pull-out shelf transforms hard-to-reach base cabinets into accessible storage that eliminates the need to kneel and dig through clutter. Whether you store pots, pantry items, or cleaning supplies, a properly installed pull-out shelf brings everything within arm’s reach. This guide walks you through measuring, modifying, building, and mounting your pull-out shelf with professional techniques that ensure smooth operation and lasting durability.
Assess Cabinet Structure Before Installation
Before grabbing any tools, evaluate your base cabinet to ensure it can accommodate a pull-out shelf. This initial assessment prevents wasted time and materials on incompatible cabinets.
Measure Cabinet Dimensions
Standard base cabinets measure 24 inches deep and 33 inches high, but your specific unit may vary. Record the interior width from left to right, the depth from front to back, and the height between fixed shelves or mounting rails. Verify the space allows full extension of 22-inch drawer slides without hitting plumbing, walls, or flooring.
Check for Common Obstructions
Inspect the cabinet interior for potential blockers including sink plumbing, electrical outlets, wall studs, and door hinge clearance. Plumbing that runs through the cabinet may prevent full slide extension, requiring shorter slides or repositioned storage zones. Mark any obstructions clearly before proceeding.
Remove Doors and Shelves
Remove cabinet doors using a screwdriver or drill. Take out any fixed internal shelves, especially narrow half-shelves that limit usable depth. Clear all contents from the cabinet to create a clean, open workspace for installation.
Modify Cabinet Frame for Wider Access
Some cabinets require structural changes to fit wider or deeper pull-out units. Making these modifications correctly ensures your shelf functions properly without compromising cabinet integrity.
Remove Face-Frame Sections
To create wider access zones, mark vertical face-frame stiles on both sides of the cabinet opening. Use a Japanese handsaw or fine-tooth jigsaw to cut them cleanly. Save the removed pieces, as you can reattach them to the back of cabinet doors later for flush closure.
Reinforce Frame Before Cutting
If your cabinet supports a heavy countertop like granite, reinforce the top rail before removing vertical supports. Cut an oak strip to fit behind the top rail, apply wood glue, slide it into position, then clamp and screw from inside to prevent sagging after structural changes.
Install Support Posts and Partitions
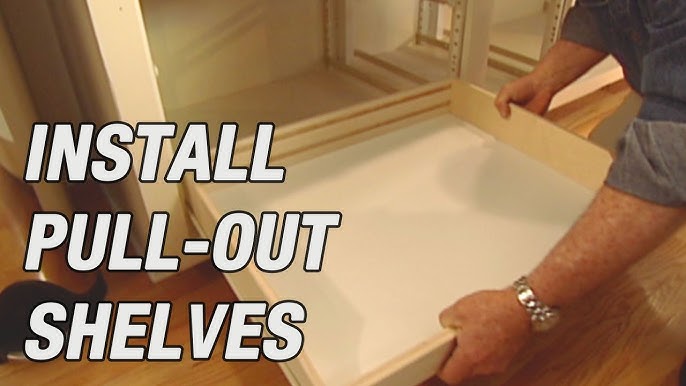
Support posts, also called pilasters, anchor the sliding mechanism and must be installed precisely for wobble-free operation.
Mount Front and Rear Support Posts
Attach the left front post to the cabinet’s left side. Where a wall is missing between two cabinets, install a partition and secure the left front post to it. Add a rear partition if there’s no back wall support. Snap drawer glides into slots on the rear post, then align and snap opposite ends into the front post. Screw rear supports in place for stability. Repeat the entire process on the right side of the cabinet.
Pro Tip: Systems like Quick Tray use modular pilasters with pre-cut glide slots, eliminating the need for tools during assembly.
Build the Pull-Out Shelf Frame
Custom shelves give you control over size, strength, and finish. Follow these measurement and construction guidelines for a professional result.
Select Appropriate Materials
Choose 1×3 or 1×4 pine for the frame due to its affordability and ease of cutting. Use ¾-inch birch plywood for the bottom panel because it offers strength, a smooth surface, and takes paint or stain well. Pre-fab kits include pre-cut parts, glides, and hardware for faster installation.
Measure and Cut for Perfect Fit
Use 22-inch full-extension drawer slides as your depth guide. Position a slide near the door hinge in its extended position to check clearance. Measure the gap between the cabinet side and the slide to determine cleat thickness. Rip two 2-inch-high cleats from plywood or 1×3s matching the slide length. Measure between the cleats, then subtract 1 inch for the two slide rails to determine your final shelf width.
Assemble the Frame
Cut two side pieces matching the bottom panel’s front-to-back length. Cut front and back pieces 1.5 inches longer than the bottom width to overlap the sides. Clamp side and back pieces to the plywood bottom with edges flush. Drill pilot holes every 8 to 10 inches using a countersink bit. Fasten with wood glue and 1⅝-inch drywall screws. Attach the front piece using the same method.
Mount Drawer Slides and Cleats
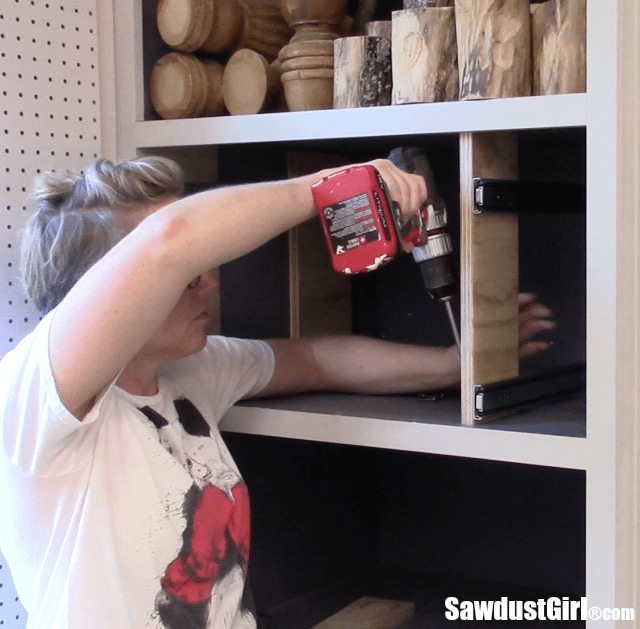
Proper slide alignment ensures smooth, wobble-free operation. Take time to get this step right.
Install Cleats and Slides
Remove the inner rail, which is the moving part, from each slide. Place two 1/8-inch shims on the cabinet floor. Position a cleat on the shims against the cabinet side. Screw the cleat into cabinet wall studs or solid framing. Set the slide on the shims against the cleat and attach using provided screws. Repeat on the opposite side. Use a level and centerline marks to ensure both slides are perfectly aligned.
Critical: Mark centerlines on both cabinet sides and use a center punch to align screw holes accurately.
Attach Slides to the Shelf
Now connect the shelf to the installed slide rails. Precise alignment at this stage prevents binding during use.
Align and Secure Rails
Take the removed inner rail and hold it against the shelf side. Align the rail front flush with the shelf edge. Leave a small gap between the rail and shelf bottom per manufacturer specifications. Screw the rail to the shelf using provided hardware. Repeat on the other side. Double-check that both rails are parallel and at the same height before tightening completely.
Insert and Test the Pull-Out Shelf
Final assembly requires careful engagement of the sliding mechanism.
Install the Shelf Unit
Remove shims from under cleats and slides. Clean the cabinet interior of dust and debris. Fully retract the inner rails to the closed position. Hold the shelf at the cabinet opening, aligned with installed slides. Engage the rails by aligning shelf-side glides with cabinet-side tracks. Push the shelf in firmly and evenly until fully seated. Test operation by pulling out fully to check extension and locking.
Fix Common Issues
If the shelf binds, check slide alignment and adjust cleat position. If the shelf won’t extend fully, verify no obstructions from pipes or walls. If door interference occurs, use thicker cleats to shift slides inward. For sagging, upgrade to thicker plywood or add a center support.
Finish the Shelf for Custom Builds
A protective finish improves appearance and longevity for custom-built shelves.
Sand and Apply Finish
Sand the entire shelf with 120-grit paper. Wipe with tack cloth to remove all dust. Work outdoors or in a well-ventilated area. Wear a dual-cartridge respirator and safety glasses. Apply a thin, even coat of spray lacquer to all surfaces. Wait 30 minutes, then lightly sand with 180-grit paper. Wipe clean and apply a second coat for durability.
Hide Screws with Wood Plugs
Concealed fasteners give your pull-out shelf a professional, clean appearance.
Use the Counterbore Method
Drill ¼-inch-deep counterbores with a ½-inch spade bit on the front and ends of the frame. Drill pilot holes through the counterbores. Glue and screw the front frame piece in place. Insert wood buttons matching your frame species into the counterbores. Use face-grain plugs rather than end-grain dowels for invisible repairs.
Pro Tip: Make custom plugs with a plug cutter bit from scrap wood for a perfect fit.
Reattach Cabinet Doors
Restore the original appearance while maintaining full pull-out functionality.
Reinstall and Test Doors
Reattach removed face-frame pieces to the back of cabinet doors to ensure flush closure. Use original hinges and screws to remount doors. Open and close the shelf 5 to 10 times, watching for scraping, misalignment, or incomplete retraction. Make micro-adjustments to cleats or glide positions as needed.
Use Tool-Free Adjustability with Kits
Many pre-fab systems offer easy height reconfiguration without tools.
Reposition Shelves Quickly
Unhook glides from support posts. Move to the desired height. Snap back into place. This adaptability lets you accommodate tall bottles, shallow trays, or changing storage needs without additional tools.
Maximize Storage Efficiency
Pull-out shelves transform deep cabinets into highly usable storage zones.
Ideal Storage Applications
Use pull-out shelves for pots and pans to eliminate digging behind baking sheets. Create an appliance garage for blenders, mixers, and toasters. Store pantry items where everything is visible at a glance. Organize cleaning supplies under the sink. When modifying narrow cabinets, shelf width can double from 12 to 24 inches.
Choose Between Custom Build and Kit
Select the approach that matches your time, skill level, and budget.
| Feature | Custom Build | Pre-Fab Kit |
|---|---|---|
| Cost | Lower materials only | Higher, saves labor |
| Time | 4 to 6 hours | 1 to 2 hours |
| Tools | Saw, drill, sander, clamps | Screwdriver, drill, tape measure |
| Adjustability | Fixed after build | Tool-free height change |
| Best For | Unique sizes, custom finish | Speed, consistency, retrofits |
Maintain Smooth Operation Long-Term
Regular care ensures your pull-out shelf functions well for decades.
Care and Inspection Routine
Wipe the shelf with a damp cloth and avoid standing water. Check screw tightness on glides and cleats every 6 months. Lubricate slides annually with silicone-based spray, never oil-based products which attract dust. Ball-bearing slides are rated for 50,000 or more cycles, typically lasting decades with proper care.
Final Installation Checklist
Verify every step is complete before finishing your project.
Ensure cabinet doors and shelves are removed. Check and clear all obstructions. Reinforce the frame if cutting supports. Mount cleats with shims and verify level. Align and secure slides. Assemble the shelf frame square and strong. Attach glides to the shelf flush with the front. Insert the shelf and engage glides. Test full extension with no binding. Conceal screws if custom building. Reattach doors to close flush. Test final operation multiple times.
Frequently Asked Questions About Installing Pull-Out Shelves
How long does it take to install a pull-out shelf?
A custom build typically takes 4 to 6 hours per shelf, while pre-fab kits install in 1 to 2 hours. Factor in additional time for finishing if building custom.
Can I install a pull-out shelf in any cabinet?
Most base cabinets work, but cabinets with plumbing obstructions or non-standard dimensions may require modifications or shorter slides. Always measure first.
Do I need special tools for pull-out shelf installation?
Custom builds require a saw, drill, sander, and clamps. Pre-fab kits need only a screwdriver, drill, and tape measure. Both require basic woodworking skills.
How much weight can a pull-out shelf hold?
Pull-out shelves with 22-inch full-extension ball-bearing slides typically support 75 to 100 pounds when properly installed. Check manufacturer specifications for exact ratings.
Can I convert a cabinet with existing shelves to a pull-out system?
Yes, remove fixed internal shelves first. The pull-out mechanism replaces traditional shelf supports. Ensure adequate depth for slide extension.
Key Takeaways for Installing Your Pull-Out Shelf
A properly installed pull-out shelf transforms frustrating deep cabinets into accessible storage that eliminates kneeling and blind searching. Focus on precise measurement and slide alignment during installation, as these two factors determine smooth operation more than any other. Choose custom builds for unique sizes or specific finishes, and opt for pre-fab kits when speed and adjustability are priorities. With proper installation and annual maintenance, your pull-out shelf will provide decades of reliable service. Start by assessing your cabinet dimensions today, then proceed with confidence through each installation phase.


