

Tangled ribbons. Frayed edges. Lost spools. If your crafting space is overrun by ribbon chaos, you’re not alone. Learning how to make a ribbon organizer transforms clutter into clarity fast. With simple materials and smart designs, you can create a custom storage system that saves time, protects your supplies, and makes every project easier.
This guide reveals six proven DIY methods, from wall-mounted curtain rods to no-tools cardstock wraps. Each method uses affordable, accessible materials and delivers real results. Whether you’re a scrapbooker, gift wrapper, or classroom teacher, there’s a perfect organizer here for your needs.
Install Wall-Mounted Curtain Rods for Maximum Capacity
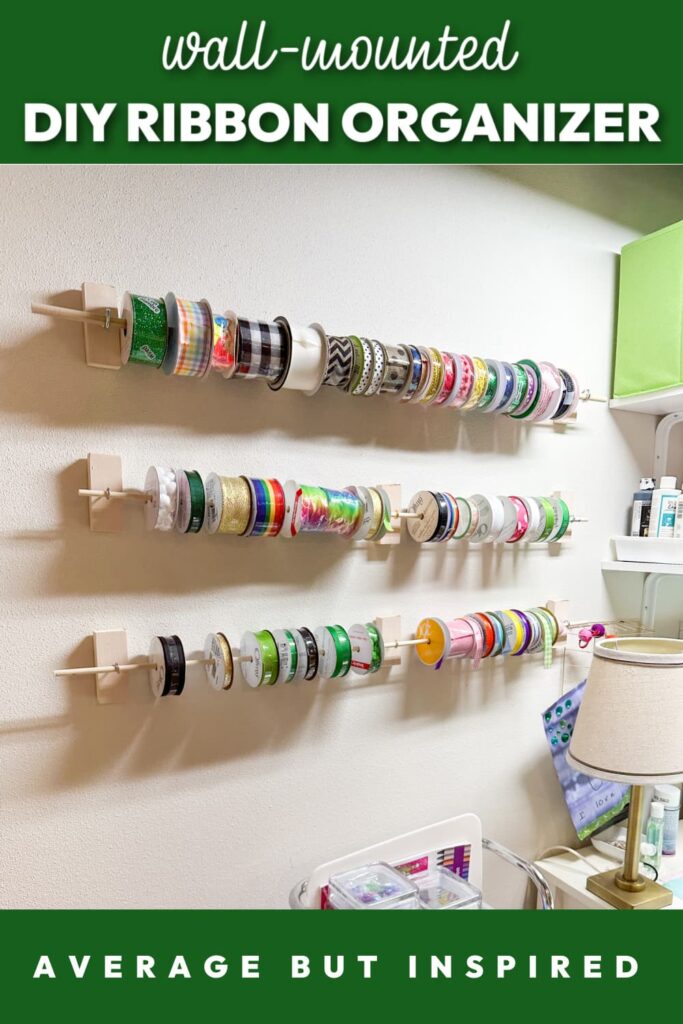
Create industrial-style ribbon storage that turns blank walls into high-capacity craft hubs. This method holds up to 43 spools per 28-inch rod, depending on size.
Tools You Need for Installation
You will need an adjustable curtain rod between 20 and 28 inches, a stud finder, a level, a pencil, and a screwdriver or drill. These basic tools make the installation straightforward and ensure stability.
Step-by-Step Curtain Rod Setup
- Locate wall studs using a stud finder or knock test.
- Mark screw hole positions with a pencil.
- Insert the first screw partially, place the bracket, then use a level to align the second hole.
- Pre-drill holes to prevent drywall cracks.
- Secure both screws tightly, ensuring at least one anchor sits in a stud for heavy loads.
Manage Spooled and Loose Ribbons
For spooled ribbons, prevent unrolling by inserting angled sewing pins through the flange. For loose ribbons, wrap them around 5 × 2.5-inch craft foam rectangles, secure with masking tape, then pin to the wall.
Build a Portable Dowel Tote Organizer
Take your ribbons anywhere with a sturdy, travel-ready container system. This method works perfectly for craft fairs, classes, or shared workspaces.
Choose the Right Container
Select a plastic food storage bin or craft box between 12 and 18 inches long with a tight-fitting lid. The lid protects ribbons during transport and keeps everything in place during moves.
Drill Dowel Holes and Assemble
Use 5/16-inch wooden dowels and a matching drill bit. Mark hole positions 2.5 inches from each short end and 2.5 to 3 inches down. Space holes at least 5 inches apart. Test with actual spools before drilling. Cut dowels to container width plus 2 inches for 1-inch overhang per side.
Cap ends with ¾-inch screw-hole plugs glued halfway on with hot glue, or use Tinker Toys for decorative flair. Slide one end of the dowel through the container, thread spools on, then complete the pass-through.
Wrap Ribbons with No-Tools Cardstock Labels
Organize instantly with no tools, no mess, and minimal cost. This method works great for kids, classrooms, or temporary projects.
Cut Custom Cardstock Wraps
Use standard 8.5 × 11-inch cardstock. Cut strips based on ribbon type. For standard ribbons, cut ½ inch by 5½ inches. For wide ribbons between 1.5 and 2 inches, cut ½ inch by 8½ inches. For thread spools, cut ½ inch by 2¼ inches.
Assemble Wraps in Six Steps
- Wrap around the spool using a spoon bowl as a former.
- Trim excess, leaving a 1-inch tail.
- Mark hole location while still wrapped.
- Punch a hole wider than ribbon width for easy threading.
- Apply glue inside one end and outside the other, then press together.
- Thread the ribbon tail under the label and up through the hole to keep it taut and visible.
This takes under 5 minutes per spool and keeps labels facing out for quick identification.
Design a Decorative Framed Wall Organizer
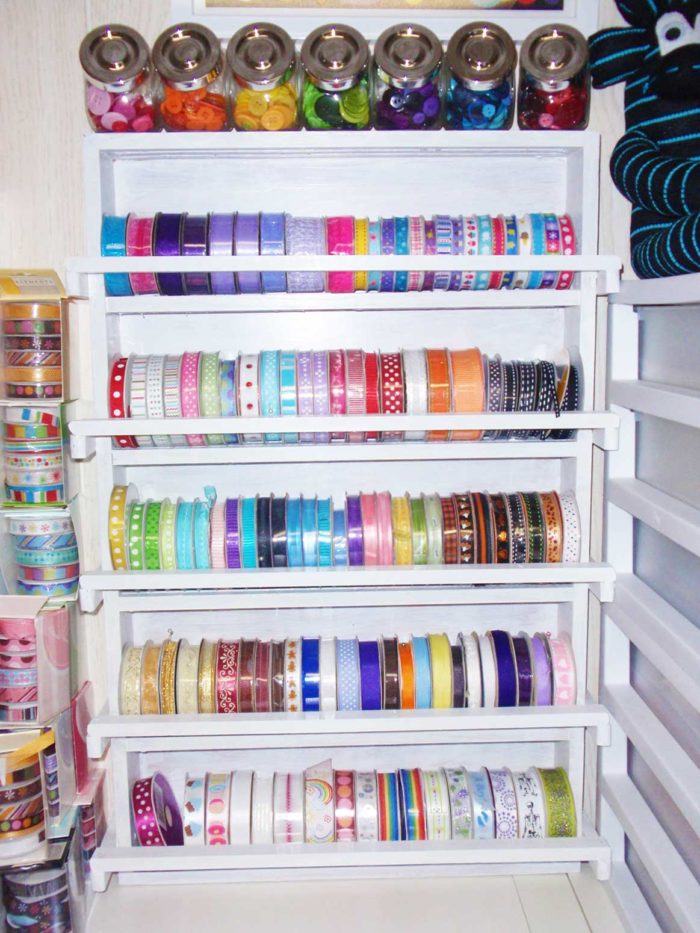
Turn an old picture frame into stylish, wall-ready ribbon display that doubles as functional art.
Repurpose Any Frame
Use an 11 × 14-inch or larger frame. Remove glass, backing, and mat. Paint it white or spray with copper, gold, or silver to match your decor.
Install Cup Hooks and Dowel Rods
Screw cup hooks into inner left and right sides, aligning horizontally and spacing vertically for full spool access. Use wood or aluminum rods between 1/8 and 1/4 inch in diameter. Cut rods 1 inch longer than inner frame width.
Slide rods into cup hooks. Add wooden balls as end caps, gluing one side permanently with E6000 or wood glue and leaving the other side removable for loading.
Mount and Use Your Frame Organizer
Hang on wall using two nails or screws, or use L-hook pegs on pegboard. Slide spools on and prevent unwinding with washi tape or clear tape on loose ends.
Create a Shoebox Ribbon Dispenser
Turn trash into treasure with a desktop ribbon dispenser that works like a tape dispenser.
Use a Recycled Shoebox
Grab any small shoebox, preferably a child’s size. No cost, no waste. This acts like a tape dispenser where you pull ribbon as you go.
Insert a Skewer Spindle and Cut Exit Slit
Poke a wooden skewer, chopstick, or drumstick through the short ends, centered and level. On the long side near one end, cut a small horizontal slit big enough to feed ribbon smoothly but small enough to prevent retraction.
Feed the loose end through. Cap the exposed skewer tip with a plastic wrap cap hot-glued on for safety. Mark color or type on the front. Use multiple boxes for different categories like satin, wired, sheer, or seasonal.
Build a Modular Stir-Stick Holder
Scale your storage with a dollar-store upgrade that lets you expand as your collection grows.
Gather Supplies and Assemble L-Frames
Buy four large wooden stir sticks per section, 2 × 12-inch dowels, tumbling blocks from Dollar Tree, wood glue, and a hot glue gun. Apply wood glue in dabs along one stir stick, add hot glue spots between for strength, then press the second stick perpendicularly to form an L shape. Repeat for two L-frames per section.
Install Tumbling Blocks and Expand
Place tumbling blocks inside the L-corner and glue to both sides. Insert dowel to test fit, then add 2 to 4 blocks per section for multiple levels. Use a large spool to measure spacing and mark where the next section begins. Repeat to build up to four sections or more.
Stabilize the Base
Cut wooden side panels from Dollar Tree sheets or laminated stir sticks. Glue to back and bottom to prevent tipping and increase durability. Sand and stain for a custom, high-end look.
Compare All Six Methods at a Glance
| Feature | Curtain Rod | Dowel Tote | Cardstock Wrap | Frame Mount | Shoebox Dispenser | Stir-Stick Holder |
|---|---|---|---|---|---|---|
| Max Capacity | 43 per rod | Box-limited | 1 per spool | 2-6 per dowel | 1-3 per box | Scalable |
| Portability | Low | High | Medium | Medium | High | Medium |
| Tools Needed | Drill, level | Drill, saw | None | Saw, screwdriver | Knife | Saw, clamps |
| Cost | Under $2 | $5-$15 | Under $1 | $0-$10 | $0-$5 | $5-$10 |
| Durability | High | High | Low-Medium | Medium-High | Medium | High |
| Best For | Large collections | Travelers | Kids, teachers | Decor | Desktop | Expandable |
Maintain and Upgrade Your Organizer
Care Tips for Long Life
Dust rods and containers monthly. Check tape and pins every few weeks. Rotate ribbons seasonally to prevent creasing. Avoid sunlight to prevent fading. Keep dry to prevent mold.
Customize for Smarter Use
Label by color, width, or type. Group by project or season. Use washi tape for removable labels. Add LED strip lights behind wall units. Paint dowels or plugs to match your decor.
Pick the Right Method for Your Needs
Match the organizer to your specific situation. For a large collection with permanent space, choose the curtain rod system. For frequent travel or classes, use the dowel tote in a plastic bin. For a small stash with zero budget, try cardstock wraps or a shoebox. For visible, stylish display, go with the framed wall organizer. For a growing collection, build the modular stir-stick holder. For kids or classroom use, choose cardstock or shoebox methods.
Frequently Asked Questions About Making a Ribbon Organizer
What is the easiest way to organize ribbons without tools?
The cardstock wrap method requires no tools at all. You only need scissors, glue, a hole punch, and standard cardstock. Each wrap takes under 5 minutes to make and keeps ribbons visible and tangle-free.
How many ribbons can a curtain rod hold?
A single 28-inch curtain rod can hold up to 43 ribbon spools, depending on spool width. Standard 1-inch-wide spools require approximately 1.5 inches each, yielding about 18 to 19 spools per rod.
Which ribbon organizer is best for travel?
The dowel tote organizer in a plastic container is best for travel. The lid protects ribbons during transport, and the sturdy construction keeps spools secure during moves.
Can I use替代 materials for dowels?
Yes, alternatives include knitting needles, metal rods, wooden skewers, chopsticks, and drumsticks. Metal rods prevent sagging and work well for long-term use.
How do I prevent ribbon from unrolling in storage?
Secure loose ends with tape or sewing pins through the spool flange. For cardstock wraps, thread the tail up through the hole to keep it taut. Use washi tape for removable, residue-free securing.
Key Takeaways for Making Your Own Ribbon Organizer
Building a ribbon organizer doesn’t require expensive equipment or advanced skills. The six methods covered here range from free and tool-free to more involved builds, so you can choose what fits your space, budget, and collection size. Start with one method that matches your current needs, then expand or combine approaches as your collection grows. A good organizer saves time, protects your supplies, and makes crafting more enjoyable. Pick one method today and transform your ribbon chaos into creative clarity.


