
Nothing beats the look and strength of handmade wooden shelf brackets. Whether you’re installing floating shelves in your living room or building a workshop rack, crafting your own brackets gives you full control over design, durability, and cost. Made from pine, oak, or even scrap wood, DIY wooden shelf brackets can support 25 to over 50 pounds each when built and mounted correctly.
This guide walks you through choosing the right wood, cutting precise shapes, reinforcing joints for maximum strength, finishing for style, and securing brackets to the wall. You’ll learn how to build three proven types: solid corbels, triangular braces, and L-shaped supports using common tools like a jigsaw, drill, and pocket hole jig.
Choose the Right Wood for Your Brackets
The wood you choose impacts both strength and appearance. For most DIYers, ¾” to 1½” thick pine is ideal because it’s affordable, easy to cut, and widely available as 1x4s or 2x8s. Rip 1×4 boards to 1½” width for clean, consistent stock.
For heavy-duty or visible shelves, upgrade to hardwoods like oak, maple, or walnut. These resist warping and support greater loads, especially in solid corbel designs. If you’re on a budget, reclaimed or scrap wood works well. Floor offcuts, furniture parts, or construction remnants from pine, spruce, or fir can be planed and repurposed. Just avoid boards with large knots, cracks, or twists since defects weaken structural integrity.
Use ¾” plywood, especially Baltic birch, for reinforcement in hybrid brackets. This adds shear resistance without excess weight. Use 5 mm or thicker plywood for gussets in L-brackets, and avoid particleboard or MDF since they swell and fail under stress.
Gather Essential Tools for the Job
You don’t need a full shop to make strong brackets. Start with these essentials:
• A miter saw or circular saw for straight cuts, and a jigsaw with a scroll blade for curves
• A drill or drill press for pilot holes, countersinks, and pocket holes
• A Kreg Pocket Hole Jig to reinforce joints in triangular brackets
• Clamps to hold pieces square during glue-up
• An 80 to 220 grit sander to smooth edges and surfaces
• A level or laser level critical for alignment during installation
Helpful add-ons include a Forstner bit for drilling flat-bottomed holes for inset mounting, an awl to mark precise drill points, a brad nailer for securing joints invisibly, a stop block for repeatable cuts, and contour sanding grips to reach tight curves on corbels.
Build Solid Corbel Brackets
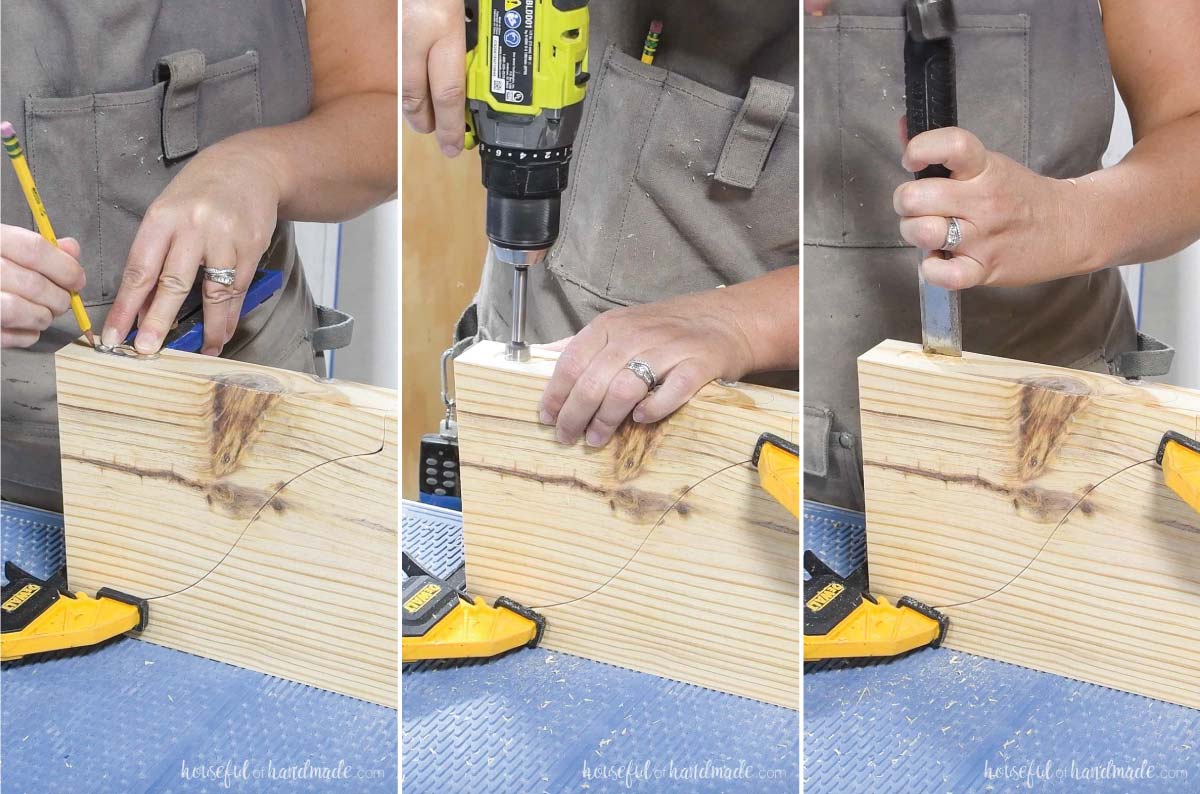
Solid corbels are carved from a single block, offering unmatched strength and visual impact. Cut a 10″ length from a 2×8 board, which gives you 1½” thick × 7¼” wide stock. Sand all surfaces smooth.
Draw a symmetrical shape like arched, tapered, or scroll-cut on the board. Trace a mirror image for matching pairs. Cut along the line with a jigsaw and detail blade, keeping the blade centered for clean symmetry. Sand all edges thoroughly, using a contour sander or file for tight radii.
Make brackets hang cleanly with hidden hangers. Metal keyhole hangers screw into the back with 1″ wood screws. Routed keyhole slots use a keyhole router bit for a recessed groove. Inset mounting pockets use a Forstner bit to drill flat-bottomed holes where screws pass through into wall studs.
Sand progressively from 80 to 120 to 220 grit. Wipe clean with a tack cloth. Apply your chosen finish: layered stain like Minweather Oak under Early American for aged depth, gray latex for industrial style, watered-down white paint for farmhouse charm, or 2 to 3 layers of polyurethane or tung oil for protection.
Assemble Triangular Bracket Supports
Triangular brackets are the strongest DIY design because they resist twist and sag. Use 1×3 pine for all parts. Cut the vertical leg to 7″, the horizontal leg to 6¼”, and the diagonal brace to 9″ with 45° bevels on both ends. Cut with a miter saw for precision and label each piece to avoid confusion.
On the 6¼” horizontal piece, drill two pocket holes using a Kreg Jig. These join it to the vertical leg. Apply wood glue to the end grain, clamp at 90°, and drive pocket screws. Check with a square since any misalignment weakens the joint.
Apply glue to both beveled ends of the diagonal brace. Position it to complete the triangle, forming a rigid frame. Clamp tightly using corner clamps or a speed square and let the glue cure fully, usually 24 hours, before handling.
Sand edges smooth, pre-drill wall-mounting holes, and apply your chosen finish.
Create L-Shaped Brackets with Plywood Gussets

L-brackets are the fastest to build. Cut two 7.87″ pieces from 2×3 CLS timber for the vertical and horizontal legs. Cut a right-triangle-shaped gusset from 5 mm or thicker plywood to reinforce the inside corner.
Mark pilot hole locations and use an awl to dent the wood to prevent drill bit skidding. On a drill press, drill clearance holes through one leg and use a depth stop to countersink screw heads.
Apply generous wood glue to the joint. Clamp at 90°, then drive screws. Attach the plywood gusset with glue and screws for added rigidity.
Trim excess glue with a chisel. Sand all surfaces from 80 to 220 grit. Paint or stain, with gray being popular for modern and workshop shelves. Seal with polyurethane in high-moisture areas like kitchens or bathrooms.
Maximize Bracket Strength and Load Capacity
Choose the right design for the load. L-shaped brackets support 25 to 30 pounds per bracket when stud-mounted. Triangular brackets hold 50+ pounds due to bracing. Solid corbels work best for deep shelves, with strength scaling with depth. Avoid drywall anchors for heavy loads and mount into wall studs whenever possible.
Space brackets correctly to prevent sag. Place them every 16 to 24″ for 1″ thick shelves and no more than 3 feet apart for long spans. Use at least three brackets for shelves over 8 feet. Closer spacing prevents sag, especially with pine or narrow boards.
Use the Right Fasteners for Secure Mounting
Screws and nails hold brackets securely when chosen correctly. Funnel-head (bugle-head) screws pull brackets flush even with slight misalignment but require counterboring. Standard wood screws at 2″ length work well for stud mounting. Brad nails at 18-gauge and 2″ long are ideal for assembling brackets and attaching shelves invisibly.
Always pre-drill pilot holes to prevent splitting, especially near edges. When studs aren’t available, use toggle bolts, snap toggles, or heavy-duty plastic anchors rated for at least 50 pounds. These are acceptable only for light decorative shelves.
Strengthen joints with PVA wood glue. It bonds stronger than wood over time and eliminates creaking. Apply generously, clamp, and wipe excess with a damp cloth before it dries.
Apply a Durable Finish to Your Brackets
Sand for a smooth base. Start with 80-grit to remove tool marks, progress to 120, then finish with 220. Sand with the grain and wipe dust with a tack cloth since regular rags leave lint.
Choose the right finish for your style. Stain enhances grain and layered tones add depth. Whitewash lets wood texture show through, ideal for coastal or rustic decor. Paint hides imperfections and latex offers durability. Clear sealant like polyurethane, tung oil, or wax provides natural looks.
Apply 2 to 3 coats of sealant for high-traffic areas. Let each coat dry fully and lightly sand between layers.
Install Brackets Like a Pro
Find and mark studs using a stud finder or knock test. Mark centers with a “+” symbol. For heavy shelves, every bracket must hit a stud.
Level and transfer holes accurately. Hold the bracket at the desired height and use a laser level for perfect alignment across multiple brackets. Apply painter’s tape to the back of the bracket, mark hole locations, then poke through with an awl to transfer points to the wall.
Drill pilot holes slightly smaller than your screws into studs. For drywall-only mounting, install anchors first. Drive 2″ wood screws with an impact driver and do not overtighten since this strips the hole. Mount brackets higher than the shelf thickness to allow the board to sit flush.
Place the shelf board on the brackets and secure from above with brad nails or counterbored screws. For floating shelves, use cleats or hidden screws from below.
Frequently Asked Questions About Making Wood Shelf Brackets
What type of wood is best for shelf brackets?
Pine is the most common choice because it’s affordable, easy to work with, and widely available. For heavy-duty or visible installations, hardwoods like oak, maple, or walnut offer superior durability and a premium appearance.
How much weight can wooden shelf brackets support?
L-shaped brackets support 25 to 30 pounds per bracket when mounted into studs. Triangular brackets hold 50+ pounds due to their reinforced design. Solid corbels support heavy loads proportional to their depth and thickness.
Do I need special tools to make wooden brackets?
No. Basic tools like a saw, drill, jigsaw, and clamps handle most builds. A Kreg Pocket Hole Jig strengthens triangular brackets, and a laser level ensures accurate installation.
How much do DIY wooden brackets cost to make?
Each bracket costs approximately $2 to $5 when made in batches. This saves 80 to 90% compared to store-bought metal brackets that cost $10 to $20 each.
Can I use scrap wood for shelf brackets?
Yes, reclaimed or scrap wood from pine, spruce, or fir works well. Avoid boards with large knots, cracks, or twists since these defects compromise structural integrity.
Key Takeaways for Building Your Own Wood Shelf Brackets
Wooden shelf brackets combine strength, beauty, and economy. Whether you build solid corbels, triangular braces, or simple L-shapes, the result is a custom, durable support system that outperforms metal and enhances your space. Choose the right wood for your load requirements, reinforce joints with pocket holes and wood glue, and always mount into wall studs for maximum holding power.
With the right tools, wood, and technique, you can make professional-quality brackets in under an hour while saving money and adding character to every shelf you hang. Start with a simple L-bracket design if you’re new to woodworking, then progress to triangular or corbel styles as you gain confidence.