

A loose or rusted towel rack isn’t just an eyesore—it’s a safety hazard waiting to happen. Whether your current rack wobbles under a wet towel, was ripped from the wall during a grab for balance, or simply clashes with your bathroom’s new look, replacing it is a quick, affordable upgrade. The good news? You don’t need to be a plumber or contractor to do it right. With a few basic tools and the right technique, you can install a secure, level towel rack in under an hour.
This guide walks you through every step, from removing stubborn old hardware to choosing the right anchors and mounting a new bar that lasts for years. We’ll cover all common towel rack types, including set-screw bars, fixed-end models, and clip-on systems. You’ll learn how to avoid common mistakes like using weak plastic anchors, how to reuse existing holes when possible, and smart fixes like foam shims for wobbly bars.
Remove the Old Towel Rack

Before grabbing tools, determine how your current towel rack is attached. This prevents unnecessary wall damage and guides your replacement strategy.
Identify the Mounting Type First
Look closely at the ends of the bar to identify the mounting system. If there’s a small screw underneath the holder, it’s a set-screw model—loosen it and slide the bar out horizontally. If the bar has ceramic or decorative ends that fit into wall brackets but don’t move, it’s likely a fixed-end system that may require cutting the bar to remove. If the entire rack lifts straight up off two wall-mounted posts, it’s a clip-on (lift-off) system that allows for damage-free removal.
Remove Set-Screw Towel Bars
Start by loosening the set screw under each mounting bracket using an Allen wrench or screwdriver. Once loose, slide the bar out horizontally. Then remove the screws securing the brackets to the wall. If screws are stuck, apply a drop of penetrating oil and wait 5 minutes before trying again. Use a flathead screwdriver to gently pry off any decorative caps hiding screw heads. After removal, inspect the wall holes—crumbling drywall means the original anchors failed, a sign you’ll need stronger hardware for the new installation.
Cut Out Fixed-End Bars When Needed
If the towel bar won’t slide out, it likely has fixed ceramic end caps. In this case, cut the bar in the middle using a hacksaw. Wrap the cut area with masking tape first to reduce metal shavings. Once split, pull both halves free from the wall brackets. The brackets usually stay in place. This method avoids damaging tiles or walls and allows reuse of the existing mounts with a new, adjustable bar.
Detach Clip-On Systems Safely
For lift-off racks, try lifting the entire bar straight up—many models are designed to unhook from wall prongs. If it’s stuck, wiggle gently while pulling upward. Do not twist or force it sideways. Once removed, the mounting plate stays on the wall. Check the condition of the screws and anchors. If the rack was yanked down, replace weak spiral anchors with heavy-duty toggle bolts before reattaching.
Choose the Right Replacement Bar
Measure the diameter of the old bar or existing brackets before purchasing a replacement. Common sizes are ⅝” or ¾”. Standard lengths are 18″, 24″, 30″, or 36″. For most bathrooms, a 24″ bar fits between sinks and toilets without crowding.
Match Diameter and Length Correctly
Buy a new bar that matches the diameter of your old bar or existing brackets. If replacing only the bar and not the brackets, measure the inside distance between fixed wall brackets and cut your new bar slightly shorter—about 1/8″ less—to allow room for spring-loaded end caps to compress. This ensures a snug fit without forcing the bar into place.
Pick a Durable Finish and Style
Chrome is classic and affordable, but brushed nickel, matte black, or oil-rubbed bronze offer modern flair and better resistance to water spots. Avoid thin, hollow bars—they bend under heavy towels. Opt for solid or thick-walled steel. If you’re renting, choose a rental-friendly style like a clip-on bar that installs without permanent changes. For high-traffic homes, go for a stud-mounted or reinforced design to handle daily use.
Install Brackets With Strong Anchors
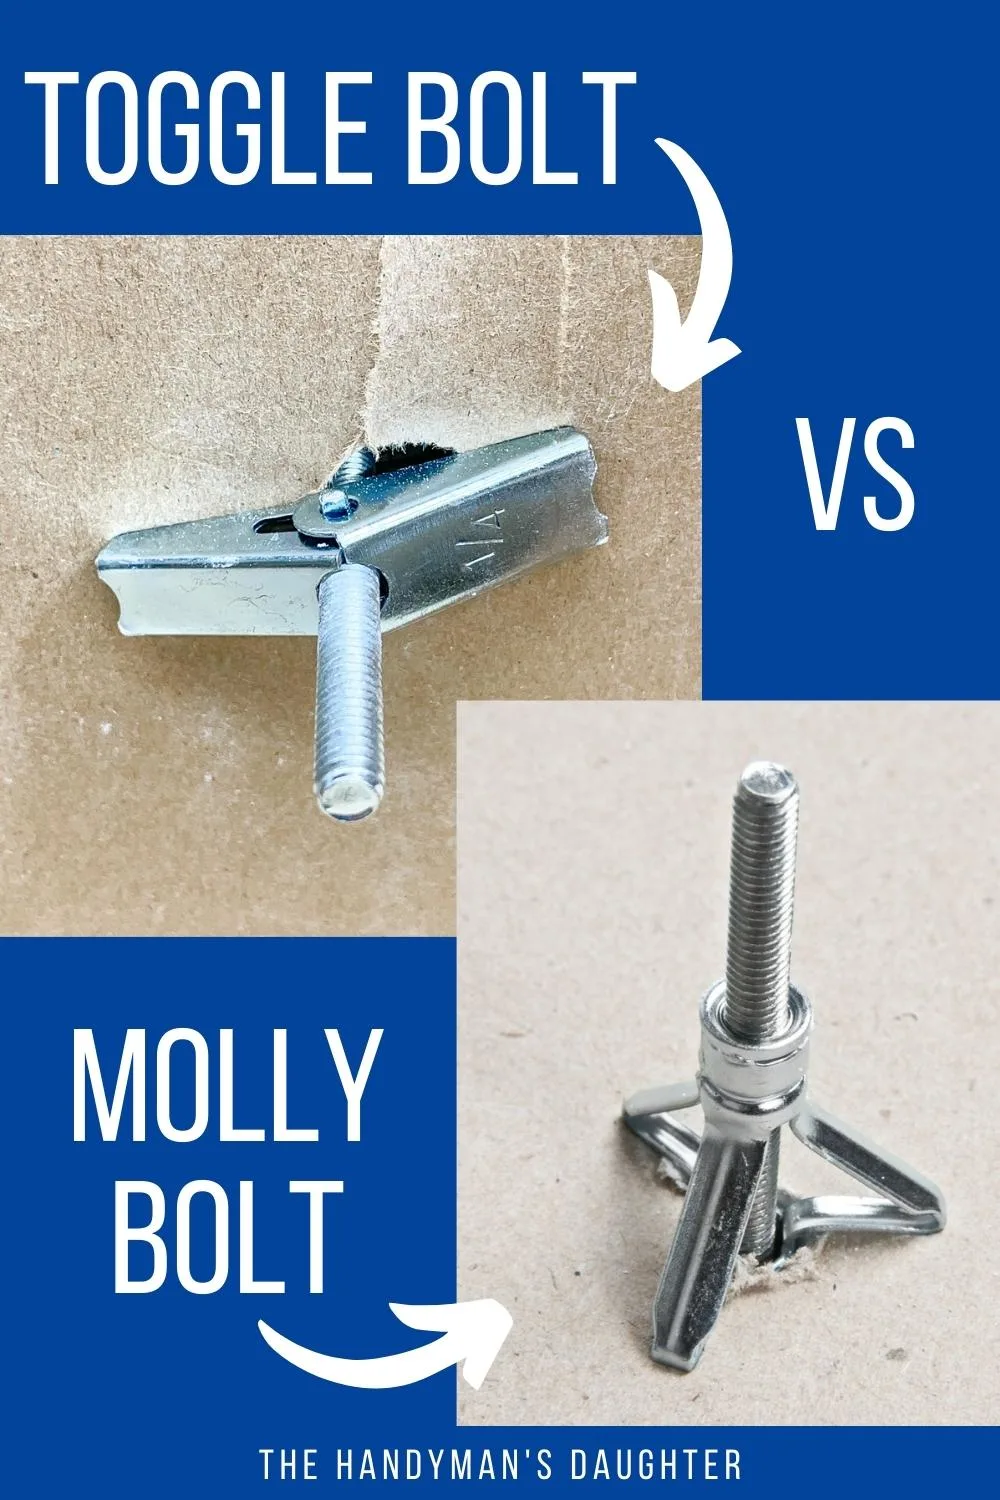
The anchoring system you choose determines how well your towel rack holds up over time. Wet towels can weigh 5 to 10 pounds each, so your rack needs to support at least 30 to 50 pounds total.
Avoid Weak Plastic Anchors
Never reuse old plastic expansion anchors—they’re rated for only about 10 pounds and often pull out over time. Instead, use self-tapping screw anchors rated for 50 lb in drywall. These cut threads into the wall as you drive them in, creating a much stronger hold. For maximum strength, especially in high-use bathrooms, use toggle bolts or molly bolts that expand behind the drywall.
Mount Into Studs When Possible
Use a stud finder to locate wall studs behind the drywall. If the towel rack position aligns with two studs (usually 16″ apart), drill pilot holes and secure the brackets with 2.5″ to 3″ screws directly into the wood. This creates the most durable installation—no anchors needed. If only one bracket hits a stud, mount that side into the stud and use a heavy-duty anchor on the other. Always check with a level before tightening screws fully.
Use Plywood Backing for Permanent Strength
In weak drywall areas or rental units prone to misuse, install a ¾” plywood backing board across two studs behind the wall surface. Cut a 5″ x 3′ strip, attach it with drywall screws, then mount the towel rack to the wood. This creates a rock-solid base that won’t loosen, even if someone grabs the rack for balance. It’s a smart upgrade during bathroom renovations or when replacing a rack that failed previously.
Mount the New Towel Bar
With secure brackets in place, you’re ready to attach the towel bar. The method depends on your specific mounting system.
Slide and Secure Set-Screw Bars
Place the new bar into the brackets, ensuring the top edge fits into the notched interior. The bar should sit snugly, with no side-to-side movement. Then, tighten the set screw located underneath each holder using an Allen wrench. Make sure the screw presses firmly against the bar but doesn’t gouge it. Over-tightening can strip the screw or damage the finish. Once secured, test the bar by pulling down gently—it should not rotate or shift.
Cut and Fit Bars for Fixed Brackets
If reusing old fixed-end brackets, attach spring-loaded end caps to both ends of a new metal bar. Slide one end into a wall bracket, then push the bar across until the opposite end reaches the second bracket. Mark the bar where it meets the inside edge of the second bracket—cut it slightly shorter (about 1/16″) to allow the spring cap to compress and lock in place. Use a hacksaw to cut the bar cleanly. Deburr the edges with sandpaper. Insert both ends and confirm the bar stays put under pressure.
Reattach Clip-On Racks Easily
For lift-off systems, align the loops on the bottom of the towel bar with the upward-facing prongs on the wall mounting plate. Lower the bar straight down until it seats fully. You should feel it click or lock into place. Test by pulling down lightly. If it feels loose, check that the prongs are not bent and that the wall plate is tightly secured. This system allows quick removal for cleaning or moving out—ideal for renters.
Fix Common Problems Fast
Even with proper installation, issues can arise. Here’s how to address the most common problems quickly.
Stop a Wobbly Towel Bar
If your new bar jiggles in the brackets, the fit may be too loose—especially with worn or oversized mounts. Fix it with sticky-backed craft foam. Cut four small squares (about ⅝”) and press them into the bracket interior, two on each side, without peeling the backing first. Test the fit. If the bar stays tight, stick the foam permanently. The shims are invisible from the front and prevent movement without replacing the entire unit.
Align Brackets Perfectly
Even slight misalignment causes bars to bind or not seat properly. When marking bracket positions, use a laser level or bubble level to draw a horizontal line at your target height (standard is 48″ to 52″ from the floor). Mark the center point first, then measure equal distances left and right for each bracket. Use brackets with oval mounting holes—they allow minor left-right adjustments after drilling. Hold the bracket in place, insert screws loosely, adjust with the level, then tighten fully.
Repair Damaged Wall Holes
If old anchors pulled out and left large holes, don’t patch with spackle alone. For a strong hold, insert a toggle bolt—it expands behind the drywall and supports over 100 pounds. Or, for multiple nearby holes, install a backing board (as described earlier). If the damage is minor, use a self-tapping anchor that cuts fresh threads in the drywall. Always ensure the anchor sits flush with the wall surface so the bracket mounts flat.
Upgrade for Long-Term Durability
A well-installed towel rack should last 10 or more years without loosening. These upgrades ensure your investment pays off long-term.
Use Heavy-Duty Anchors for Wet Towels
Wet towels are heavier than you think—up to 8 pounds each. A rack holding two or three needs to support 30 to 50 pounds. That’s why toggle bolts are the best choice for drywall installations where studs aren’t aligned. They outperform plastic and self-tapping anchors in long-term load tests. Install by drilling a slightly larger hole, inserting the bolt, and tightening until the wings open behind the wall. These are ideal for high-traffic bathrooms or homes with kids.
Prevent Future Pullouts
The most common cause of failure is someone using the towel rack for balance. To prevent this, mount the rack into wall studs or use a plywood backing board. If that’s not possible, choose a low-profile, flush-mounted bracket that’s harder to grab. Educate household members not to lean on it. For rentals, consider installing a temporary grab bar nearby to redirect support use away from the towel rack.
Maintain Your Towel Rack
Clean the bar and brackets monthly with a soft cloth and mild soap to prevent soap scum and moisture buildup. Check the set screws every 6 to 12 months and tighten if needed. In high-humidity bathrooms, wipe down the bar after use to reduce corrosion, especially on chrome finishes. Replace spring-loaded end caps if they lose tension. A well-maintained rack can last a decade or more without loosening.
Key Takeaways for Replacing Your Towel Rack
Replacing a towel rack is a simple DIY task that boosts both function and style in your bathroom. By choosing the right hardware, using strong anchors like toggle bolts or self-tapping screws instead of weak plastic anchors, and installing with precision, you ensure a secure, level mount that handles heavy towels and daily use. Always measure twice—matching diameter, length, and bracket type—before cutting or purchasing replacement parts. For fixed-end systems, cutting a new bar to size with spring-loaded end caps is a practical workaround. Whether you’re fixing damage, upgrading aesthetics, or preparing a rental unit, this guide gives you the proven steps to get it right—every time.
Frequently Asked Questions About Replacing a Towel Rack
How do I know what type of towel rack I have?
Look at how the bar attaches to the wall brackets. Set-screw bars have a small screw underneath the holder that secures the bar. Fixed-end bars have decorative ceramic or metal ends that don’t move. Clip-on bars lift straight up off wall prongs. Each type requires a different removal and installation method.
Can I reuse the existing holes when installing a new towel rack?
You can reuse existing holes if they’re in good condition and the anchors are secure. However, if the drywall is crumbling or the holes are enlarged, replace weak anchors with stronger options like self-tapping anchors or toggle bolts. This prevents the new rack from loosening over time.
What anchors should I use for a towel rack in drywall?
Avoid plastic expansion anchors—they only hold about 10 pounds. Use self-tapping screw anchors rated for 50 pounds or higher. For maximum strength, especially in high-traffic bathrooms, use toggle bolts that expand behind the drywall and can support over 100 pounds.
How do I fix a wobbly towel bar that jiggles in its brackets?
Use sticky-backed craft foam shims. Cut small squares (about ⅝”) and place them inside the bracket interior, two on each side. Test the fit before peeling the backing. The foam fills the gap between the bar and bracket, preventing movement without being visible from the front.
What height should a towel rack be installed at?
The standard height for towel racks is 48 to 52 inches from the floor. This places the bar at a comfortable reach height for most adults. Use a level to ensure both brackets are at the exact same height for a straight, professional appearance.


