

Transporting a canoe on your vehicle’s roof should never be a guessing game. Whether you’re heading to a remote lake for a weekend paddle or storing your gear after a successful trip, knowing how to secure a canoe to a roof rack safely and efficiently is essential for every paddler. A poorly secured canoe can shift, detach, or cause serious damage at worst, ruining your trip and endangering lives on the road. The good news is that with the right equipment, proper technique, and a few minutes of careful setup, you can achieve a bombproof rig that handles highway speeds, wind gusts, and bumpy backroads with complete confidence.
This comprehensive guide walks you through every step of the process, from choosing the right roof rack system and padding to performing final safety checks. You’ll learn exactly how to tie down your canoe properly while avoiding the most common mistakes that lead to loosening straps, hull damage, or dangerous accidents on the road.
Choose the Right Roof Rack System for Canoe Transport
Use Crossbars for Maximum Security
The foundation of any safe canoe transport system begins with a roof rack equipped with crossbars. These horizontal bars span the width of your vehicle and provide secure anchor points for all tie-downs. Factory-installed roof rails or quality aftermarket systems from trusted brands like Thule or Yakima work exceptionally well, provided they are properly mounted and rated for your load capacity.
Avoid relying solely on roof rails without crossbars, as they simply do not offer enough support or clearance for effective tie-downs. Your crossbars must be long enough to extend beyond the canoe’s beam so that straps can wrap cleanly underneath without pinching or damaging the hull.
Select Compatible Crossbar Types
Three main crossbar designs are commonly used for canoe transport:
• Square bars (Thule-style) offer durability and wide compatibility with most strap systems
• Round bars (Yakima-style) provide a smooth surface and work well with cradles or foam pads
• Aero bars are streamlined and quieter at speed but may require specialized attachments
Pro Tip: Aero bars reduce wind noise significantly but may require adapter kits for certain strap systems, so always check compatibility before purchasing.
Protect the Canoe Hull with Proper Padding
Place Foam Pads Under Gunwales
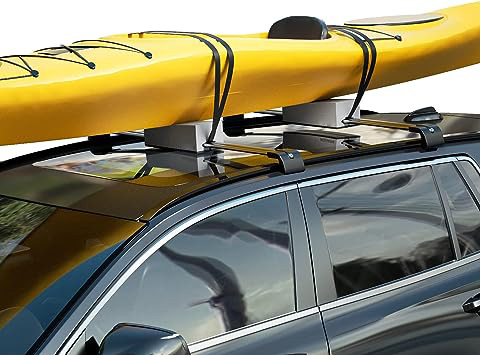
Never allow your canoe to rest directly on bare crossbars. Use closed-cell foam pads or manufacturer-supplied cradles positioned between the gunwales (upper edges) and the crossbars. This essential padding prevents scratches, distributes pressure evenly across the hull, and reduces damaging vibration during transit.
Towels or fabric can work in an emergency pinch, but they compress easily and tend to slip during travel. Do not rely on them for regular or long-distance trips.
Critical Warning: Never support the canoe on its hull bottom or on unsupported gunwales. This positioning risks permanent deformation, especially with plastic or rotomolded polyethylene canoes.
Position Pads at Reinforced Hull Points
Align your padding under the yoke (central thwart) or near the front and rear thwarts, where the hull structure is strongest and most reinforced. Avoid placing weight on weak or unsupported sections of the hull.
For canoes without a yoke, locate the natural balance point, which is typically near the midpoint of the hull, and center one crossbar there for optimal support.
Load the Canoe Safely onto Your Roof
Use Two-Person Lift for Better Control
The safest method for loading a canoe involves two people working together. One person stands at the bow (front) while the other positions at the stern (rear). Together, they lift the canoe overhead while keeping it perfectly level, then gently lower it onto the roof rack in the correct position.
This coordinated approach prevents tipping, reduces strain on your back, and ensures the canoe stays aligned throughout the loading process.
Visual Cue: Keep your shoulders aligned and communicate clearly throughout the lift using simple commands like “up,” “stop,” and “easy.”
Solo Loading Technique When Help Is Not Available
If you must load alone, start by positioning yourself at the rear of the vehicle. Slide the stern of the canoe up the back of your car until it clears the roofline. Then walk forward carefully, using controlled leverage to roll the canoe onto the roof. Slide it into position and center it before securing.
Expert Note: Consider installing roof-mounted loading ramps or assist arms if you frequently load solo. These devices can cut your effort in half and make the process much safer.
Position the Canoe Correctly for Transport
Transport Upside Down, Bow Forward
Always carry your canoe upside down (hull facing upward) unless it features delicate wood trim or interior components that require protection. This orientation offers several important benefits including reduced wind resistance, protection for seats and thwarts, and no water pooling in the cockpit.
Orient the bow forward to minimize aerodynamic drag and improve stability at highway speeds.
Exception: Some composite or wood-canvas canoes should be transported right-side up to protect fragile exteriors. Always check your manufacturer’s guidelines if you are unsure.
Center the Canoe on the Roof Rack
Proper balance is critical for safe transport. Center the canoe so the yoke sits between the two crossbars. If your canoe has no yoke, place the midpoint of the hull directly over the center of your roof.
Misalignment causes annoying vibration, excessive wind noise, and uneven strap tension that can work loose over time.
Check Your Alignment: Step behind the vehicle and look up. The canoe should appear perfectly straight and parallel to the ground with no visible tilt.
Avoid allowing the bow to extend past the front grille of your vehicle. Rear overhang is generally permitted up to 4 feet (1.2 meters) in most areas, but front overhang restrictions are typically much stricter.
Secure with Cam Straps Instead of Ratchet Straps
Why Cam-Buckle Straps Are the Best Choice
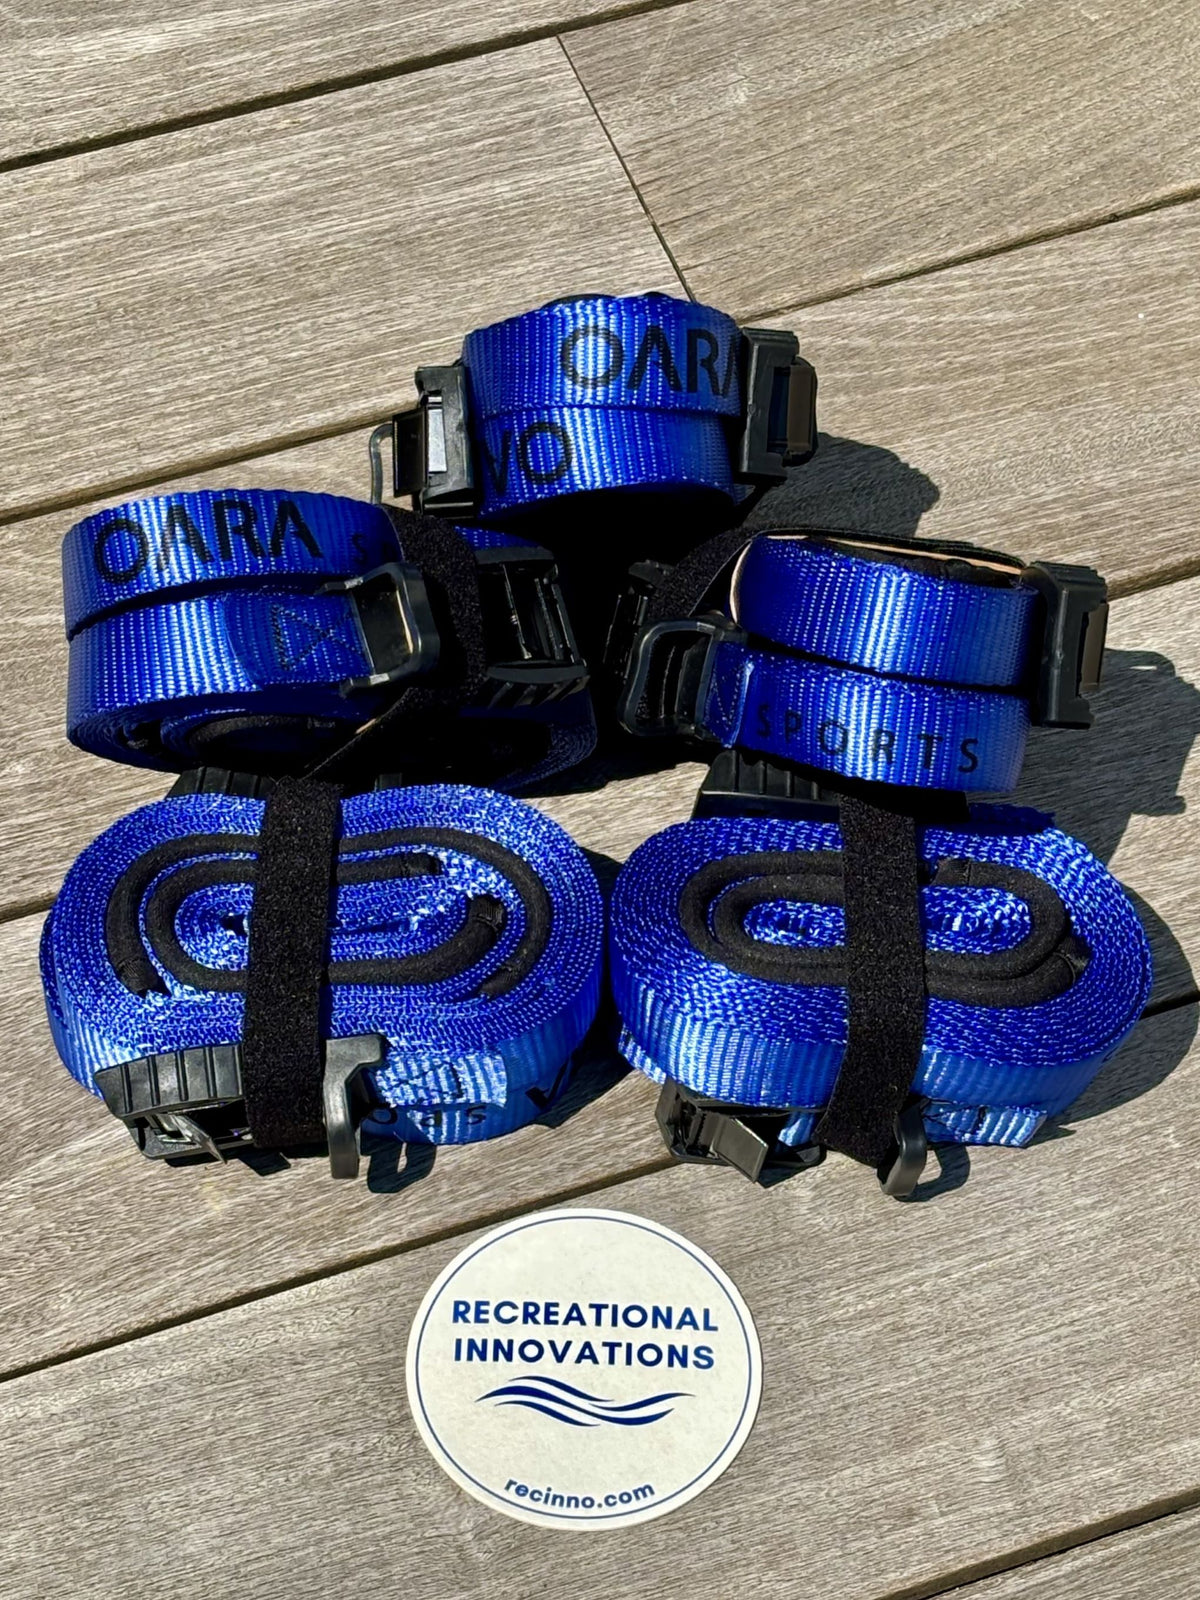
Use 1-inch-wide, 12 to 15-foot polyester cam straps for securing your canoe. These straps are safer and easier to use than ratchet straps. Quality brands like NRS offer UV-resistant webbing with rubber-coated buckles that protect your vehicle’s paint finish.
Ratchet straps generate excessive force and can easily crack gel coat, dent hulls, or deform polyethylene. Industry experts consistently advise against using them for canoe transport.
Fact: Cam straps allow you to visually control tension. You can see exactly when they are snug without risk of over-tightening and damaging your hull.
Apply the Horseshoe Wrap Method
Also called the wrap-under technique, this method ensures full strap contact and maximum hold. Start by tossing the buckle end of the strap over the crossbar from outside the vehicle. Run the strap under the bar, then up over the canoe. Feed the webbing through the cam buckle, press the lever, pull out slack, and lock it in place.
Slide the buckle up toward the gunwale before final tightening to prevent it from snagging on the crossbar during transit. Tighten firmly using body weight if needed, then repeat the process on the opposite side using a second cam strap.
Avoid This Mistake: Never cross straps over the top of the canoe. This limits your ability to adjust each strap independently and significantly reduces effectiveness.
Maintain Vertical Strap Paths
Your straps should run straight down (“happy”) from the widest part of the hull directly to the crossbar. An “A-frame” angle where straps angle inward allows unwanted side-to-side movement and increases stress on the hull.
Consequence: Angled straps drastically reduce lateral stability and can lead to dangerous shifting during highway driving.
Add Bow and Stern Safety Lines for Critical Security
Why Secondary Tethers Are Absolutely Essential
Even with tight cam straps properly in place, bow and stern lines are absolutely mandatory. These secondary tethers prevent forward and backward movement caused by sudden braking, acceleration, wind gusts, or the wake from passing large trucks.
Without bow and stern lines, only one strap resists forward motion during braking, creating a dangerous single point of failure.
Legal Requirement: Many states and provinces require bow and stern lines by law, especially when carrying a rear overhang.
Use Static Rope, Never Stretchy Cord
Choose ¼-inch (6 mm) static nylon or polyester rope for your bow and stern lines. Static rope does not stretch, providing reliable and consistent tension throughout your journey. Never use dynamic ropes like climbing gear, which stretch under load and compromise security.
Cut two lengths of rope at 10 to 15 feet each, one for the bow and one for the stern.
Anchor Lines to Safe Vehicle Points
Avoid Windshield Wipers and Use Proper Anchors
Never tie bow or stern lines to windshield wipers. These components are not load-bearing and can snap off unexpectedly, causing serious damage to your hood and windshield.
Instead, use proper anchor points such as:
• Factory tie-down loops found under bumpers (always inspect for rust or looseness first)
• Aftermarket hood or trunk loops like Quickie Hood Loop, which feature plastic toggles that fit securely under hood or trunk lids
• DIY fender-bolt anchors using webbing attached to inner skirt bolts. These are hidden, scratchproof, and remarkably strong
User Feedback: DIY anchors cost under $5 and are rated as “indestructible” by experienced paddlers who use them regularly.
Tie the Bow Line Properly
Attach with a Girth Hitch or Bowline
Secure the midpoint of your rope around the bow carry handle using a girth hitch (cow hitch). Form a loop around the handle, pass both ends through the loop, and pull tight to secure.
If your canoe has no carry handle, tie a bowline or double figure-eight knot to create a fixed loop instead.
Use a Trucker’s Hitch for Proper Tension
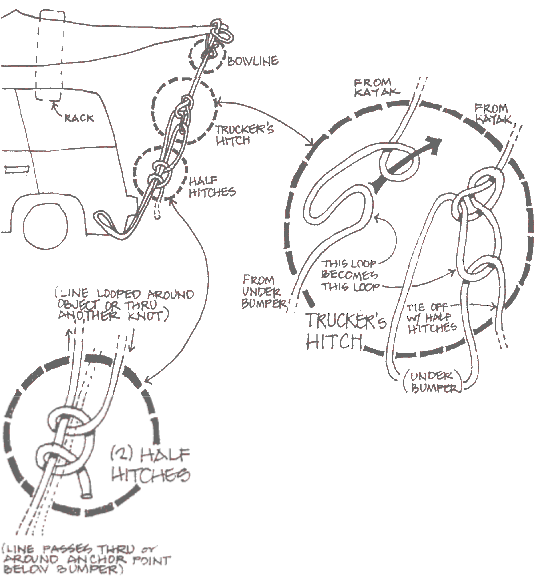
Apply a double trucker’s hitch on the vehicle end to gain mechanical advantage when tightening. Create a loop in the rope, pass the working end through your anchor point and back through the loop, then pull to tighten. Lock everything in place with two half hitches.
Key Tip: Apply only moderate tension to bow lines. Carry handles are not load-rated and can break under excessive force.
Prevent Dangerous Side-to-Side Swing
Use two separate ropes (one per side) instead of running a single line across the bow. If using a deck grab handle, tie knots on both sides of the handle to prevent the rope from sliding and creating lateral swing.
Critical Insight: A swinging bow can loosen your main straps and destabilize your entire load, creating a serious safety hazard.
Secure the Stern Line Using the Same Method
Follow identical steps for securing the stern line. Use the stern carry handle with a girth hitch or bowline, anchor to your rear bumper or trunk loop, apply tension with a trucker’s hitch, and finish with half hitches.
Ensure the line is taut but not over-tightened, applying just enough pressure to eliminate all slack.
Perform Final Safety Checks Before Departure
Conduct the Shake Test
After securing all straps and lines, perform a thorough shake test. Grab the canoe firmly at both the bow and stern, then try moving it side-to-side, front-to-back, and up-and-down.
The canoe should not shift at all. Some vehicle rocking is normal, but the canoe itself must remain locked securely in place.
Complete Your Visual Inspection Checklist
Before driving, confirm that your setup meets all these requirements:
• Canoe is centered and perfectly straight
• Padding is flat and not compressed
• Straps are untwisted and snug with no kinks
• Buckles are locked and webbing shows no fraying
• Bow and stern lines are taut with properly tied knots
• No loose ends flapping in the wind
Warning: Flapping webbing or rope can unravel knots over time or damage your vehicle’s finish during transit.
Recheck After Your First 15 Minutes of Driving
Stop and Inspect Early
After driving the first 10 to 15 minutes, pull over and recheck all your connections. Vibration and wind often loosen components during initial travel, especially with nylon webbing that can slip when wet.
Pay particular attention to cam straps, all knots on bow and stern lines, and the position of your padding.
User Experience: With practice, experienced paddlers reduce their total setup time from over 15 minutes to under 5 minutes while maintaining perfect safety.
Follow Legal Transport Rules and Regulations
Observe Overhang Limits
Most jurisdictions permit up to 4 feet (1.2 meters) of rear overhang but restrict front overhang more strictly. Never allow the bow to extend past your front bumper or grille.
Check local laws before traveling, as some states enforce stricter overhang regulations.
Add Visibility for Overhanging Loads
If your stern extends more than 4 feet, you must attach a red flag (minimum 3×3 feet) to the end of the canoe. Use a painter’s line to hold it in place securely. If traveling at night or in low visibility conditions, add reflectors or lights as required by local regulations.
Safety First: A visible canoe prevents accidents and keeps you compliant with the law.
Maintain Your Gear for Long-Term Reliability
Inspect Straps and Ropes Before Every Trip
Before each use, carefully check all your equipment for:
• Fraying or UV damage on webbing
• Cracked or worn cam buckles
• Stretched or worn rope sections
Replace any damaged components immediately rather than risking failure on the road.
Lifespan Note: High-quality cam straps like NRS products often come with lifetime warranties. Nylon ropes should be replaced every 2 to 3 years with regular use.
Store Equipment Properly
Coil your straps and ropes neatly after each trip. Keep them out of direct sunlight to prevent UV degradation that weakens materials over time.
Handle Special Situations Safely
Transporting Multiple Canoes
When carrying multiple canoes, use extended crossbars that stay within legal width limits. Stack canoes alternately, some upside down and some right-side up, to create a stable configuration.
Secure each layer with independent tie-downs and ensure weight is balanced symmetrically across your roof.
Real-World Example: Paddlers have successfully transported five canoes on a VW Jetta using wooden DIY extensions and rope systems, driving safely at speeds over 60 mph.
Important Caution: Multi-canoe loads demand perfect balance and complete redundancy in tie-downs. Never skimp on straps or safety lines when carrying extra canoes.
Never Skip the Safety Steps
Understand the Real Consequences of Poor Securing
An improperly secured canoe can detach at highway speed, causing serious injury or death to other drivers, passengers, and yourself. Even if the canoe stays attached, shifting during transit leads to hull scratches, vehicle paint damage, and poor fuel economy due to increased aerodynamic drag.
Final Warning: Treat every canoe transport as a safety-critical task. Your responsibility begins the moment the canoe hits your roof and ends only when it is safely unloaded.
Key Takeaways for Securing Your Canoe to a Roof Rack
Mastering how to secure a canoe to a roof rack is about more than convenience. It is fundamentally about safety, responsibility, and peace of mind for every journey. The essential elements include using proper roof rack crossbars, positioning the canoe upside down and centered, applying cam straps with the horseshoe wrap technique, and always adding bow and stern safety lines with static rope.
With the right gear, proper technique, and attention to every detail, you will protect your investment, your vehicle, and everyone sharing the road with you. Practice this process until it becomes second nature, inspect every connection before each trip, and make every journey a safe one.
Frequently Asked Questions About Securing Canoe to Roof Rack
What is the best way to secure a canoe to a roof rack?
The best method involves using two 12 to 15-foot cam-buckle straps applied in a horseshoe wrap pattern, combined with separate bow and stern lines using static rope. This system provides redundant security and prevents both lateral shifting and forward/backward movement.
Can I use ratchet straps to secure my canoe?
You should avoid ratchet straps for canoe transport. They generate too much force and can easily crack gel coat, dent hulls, or deform polyethylene. Cam-buckle straps provide sufficient tension without the risk of over-tightening.
Do I need bow and stern lines if I already have straps?
Yes, bow and stern lines are absolutely required even with properly tightened straps. They serve as a critical backup system that prevents forward and backward movement during braking, acceleration, or strong wind gusts. Many jurisdictions legally require them.
How far can a canoe overhang on my vehicle?
Most areas permit up to 4 feet (1.2 meters) of rear overhang. Front overhang is typically restricted to the bumper or grille area. Always check local regulations before traveling.
How often should I check my canoe tie-downs while driving?
Check your tie-downs after the first 10 to 15 minutes of driving, then periodically during long trips. Vibration and wind can loosen straps, especially with nylon webbing that may slip when wet.
What anchor points can I use for bow and stern lines?
Use factory tie-down loops under bumpers, aftermarket hood or trunk loops, or DIY fender-bolt anchors. Never attach lines to windshield wipers, as they are not load-bearing and can fail catastrophically.


